
In this post, I am going to talk about Apache Cassandra, its purpose, usage, configuration, and setting up a cluster and in the end, how can you access it in your Python applications. At the end of the post, you should have an idea of it and could start playing it for your next project.
What is Apache Cassandra?
According to Wikipedia:
Apache Cassandra is a free and open-source, distributed, wide column store, NoSQL database management system designed to handle large amounts of data across many commodity servers, providing high availability with no single point of failure. Cassandra offers robust support for clusters spanning multiple datacenters,[1] with asynchronous masterless replication allowing low latency operations for all clients.
Cassandra developed by two Facebook engineers to deal with search mechanism of Inbox. Later Facebook released it as an opensource project on Google code and after a while, it was handed over to Apache foundation. Cassandra is being used by many big names like Netflix, Apple, Weather channel, eBay and many more. It’s decentralized nature( a Masterless system), fault tolerance, scalability, and durability makes it superior to its competitors. Let’s discuss a bit of its architecture, if you want, you may skip to the installation and setup part. I’d suggest you skim thru the architecture section as it will give you an idea about why you would want to use it.
Cassandra Architecture
Cassandra Architecture consists of the following components:
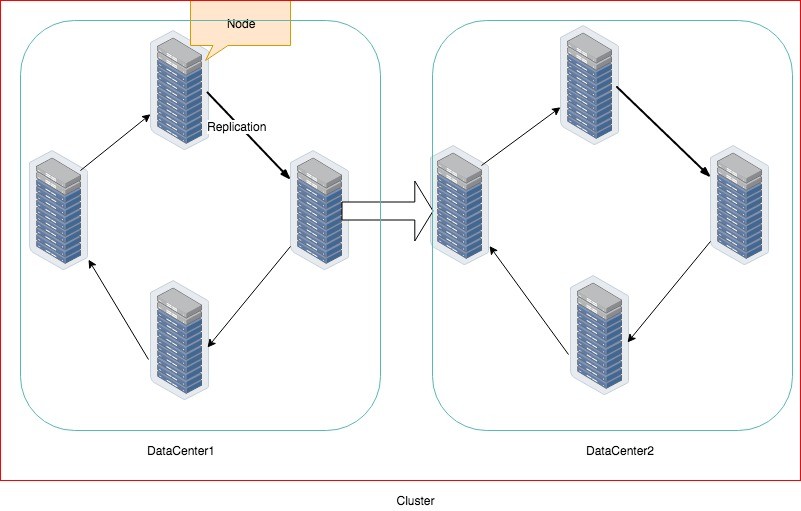
Node
It is the basic component of the data, a machine where the data is stored
Datacenter
A collection of related nodes. It can be a physical datacenter or virtual
Cluster
A cluster contains one or more datacenters, it could span across locations.
Commit Log
Every write operation is first stored in the commit log. It is used for crash recovery.
Mem-Table
After data is written to the commit log it then is stored in Mem-Table(Memory Table) which remains there till it reaches to the threshold.
SSTable
Sorted-String Table or SSTable is a disk file which stores data from MemTable once it reaches to the threshold. SSTables are stored on disk sequentially and maintained for each database table.
Write Operations
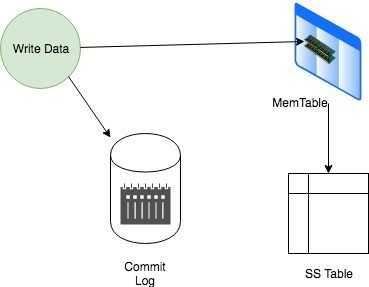
- As soon as the write request is received, it is first dumped into commit log to make sure that data is saved.
- Data is also written in MemTable, an in-memory system that holds the data till it’s get fulled.
- Once MemTable reaches its threshold, its data is then flushed to SS Table.
The node that accepts the write requests called coordinator for that particular operation. It acts as a proxy between the client that sent the request and other nodes. The coordinator then determines which node should be sent this data in a ring based on the cluster configuration.
Consistency level determines how many nodes will respond back with the success acknowledgment.
Read Operations
There are three types of read requests that a coordinator can send to a replica:
- Direct Request:- The coordinator node sends the read request to one of the replicas. After that send a digest request to the other replicas to make sure whether the returned data is an updated data.
- Digest Request: The coordinator contacts the replicas specified by the consistency level. The contacted nodes respond with a digest request of the required data. The rows from each replica are compared in memory for consistency. If they are not consistent, the replica having the most recent data (timestamp) is used by the coordinator to forward the result back to the client.
- Read Repair Request: In case of data is not consistent across the node, a background read repair request is initiated that makes sure that the most recent data is available across the nodes.
Data Replication Strategies
Data replication is a must feature to make sure that no data is lost due to hardware or network failure. A replication strategy determines which nodes to place replicas on. Cassandra provides two different replication strategies.
Simple Strategy
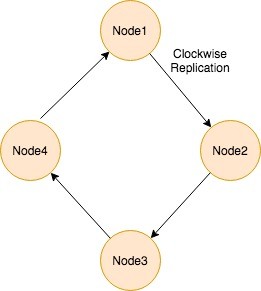
SimpleStrategy is used when you have only one data center. It places the first replica on the node selected by the partitioner. A partitioner determines how data is distributed across the nodes in the cluster (including replicas). After that, remaining replicas are placed in a clockwise direction in the Node ring.
Network Topology Strategy

It is used when you have deployments across multiple data centers. This strategy places replicas in the same datacenter by traversing the ring clockwise until reaching the first node in another rack. This is due to the reason that sometimes failure or problem can occur in the rack. Then replicas on other nodes can provide data. This strategy is highly recommended for scalability purpose and future expansion.
Okay, enough theory is discussed, let’s do something practical.
Installation and Setup
You can download the package from Official website and run in single mode for the development purpose but it will not help you to know the true strength of Cassandra as it’d be behaving like any other database. Therefore, I am going with the docker version of it where I will set up a cluster of two nodes.
Note: Before you even start, make sure you set up the Docker Memory to at least 4GB otherwise the container can exit with the error code 137. It took me an hour to figure it out as this error due to low memory resources.
Create a folder on your machine, like I created as /Development/PetProjects/CassandraTut/data. Inside that folder, I created two sub-folders for storing data of both nodes. Once done, it will look like below:
➜  data tree -a
.
├── node1
└── node2

2 directories, 1 file
Stay in the same folder and run the command docker pull cassandra to download the official image. If you are new to docker then you should check my posts in the Docker Series. Once downloaded, docker images the command will show it on your terminal. Make sure that docker is installed and running. Also, you have to give writing permissions to the folder where the data will be stored by Cassandra.

We will set up two nodes: Node1 as the main node and the Node2 as a seed node. Seeds are used during startup to discover the cluster. Let’s run the first node.
docker run --name cas1 -p 9042:9042 -v /Development/PetProjects/CassandraTut/data/node1:/var/lib/cassandra/data -e CASSANDRA_CLUSTER_NAME=MyCluster -e CASSANDRA_ENDPOINT_SNITCH=GossipingPropertyFileSnitch -e CASSANDRA_DC=datacenter1 -d cassandra
Many environment variables were self-explanatory, I will discuss CASSANDRA_ENDPOINT_SNITCH
Snitches determine how Cassandra distribute replicas. This snitch is recommended for production. GossipingPropertyFileSnitch automatically updates all nodes using gossip protocol when adding new nodes and is recommended for production. Run the following command to learn about the status of the node.
➜  data docker exec -it cas1  nodetool status
Datacenter: datacenter1
=======================
Status=Up/Down
|/ State=Normal/Leaving/Joining/Moving
--  Address     Load       Tokens       Owns (effective)  Host ID                               Rack
UN  172.17.0.2  103.67 KiB  256          100.0%            bcb57440-7303-4849-9afc-af0237587870  rack1
UN tells the status that it is Up and Normal. When other nodes join, you may see the status UJ which means Up and Joining. I am using -d switch of docker run to run it in the background. Also, notice the content of the node1 folder. It creates the default system databases, something akin to MySQL.
➜  node1 ls
system             system_auth        system_distributed system_schema      system_traces
➜  node1
Now let’s run the 2nd node:
docker run --name cas2 -v /Development/PetProjects/CassandraTut/data/node2:/var/lib/cassandra/data -e CASSANDRA_SEEDS="$(docker inspect --format='{{ .NetworkSettings.IPAddress }}' cas1)" -e CASSANDRA_CLUSTER_NAME=MyCluster -e CASSANDRA_ENDPOINT_SNITCH=GossipingPropertyFileSnitch -e CASSANDRA_DC=datacenter1 -d cassandra:latest
After setting the relevant container name and data center, you will also set CASSANDRA_SEEDS here to the IP address of the node cas1 which can fetch by using the docker inspect command. After a while when you run the nodetool status command in cas1 you should see something like below:

As you can see, our second node is joining the cluster and we learned it from the status UJ.
If you look go the mounted volume, node2 folder you will see the system folders there as well.
Running commands from the terminal is irritating therefore I created a docker-compose.yaml file to run the cluster without any hassle
https://gist.github.com/kadnan/2a815fe2d13504e40c9fe0bd16abfd83
In order to make sure that cas1 is up and running, I am making cas2 dependant of cas1 and also put a sleep of 60 seconds.
I was getting RPC error INFO [main] 2019-05-14 01:51:07,336 CassandraDaemon.java:556 - Not starting RPC server as requested. Use JMX (StorageService->startRPCServer()) or nodetool (enablethrift) to start it so I am calling CASSANDRA_START_RPC environment parameter too and set it to True.
Let’s run the docker-compose up -d to run in detached mode.
As you can see that the first node is not up, the second node initiation process has not started either.

After a while, both nodes are up with their unique IPs.

All Cassandra config files reside in /etc/cassandra/ folder inside containers.
Let’s run the CQL shell.
➜  CassandraTut docker exec -it cas2  cqlsh
Connected to MyCluster at 127.0.0.1:9042.
[cqlsh 5.0.1 | Cassandra 3.11.4 | CQL spec 3.4.4 | Native protocol v4]
Use HELP for help.
cqlsh>
it is similar to MySQL shell. CQL, Cassandra Query Language is similar to SQL in syntax but its usage is not as similar to RDBMS systems. We will look further on it soon. Hang on!
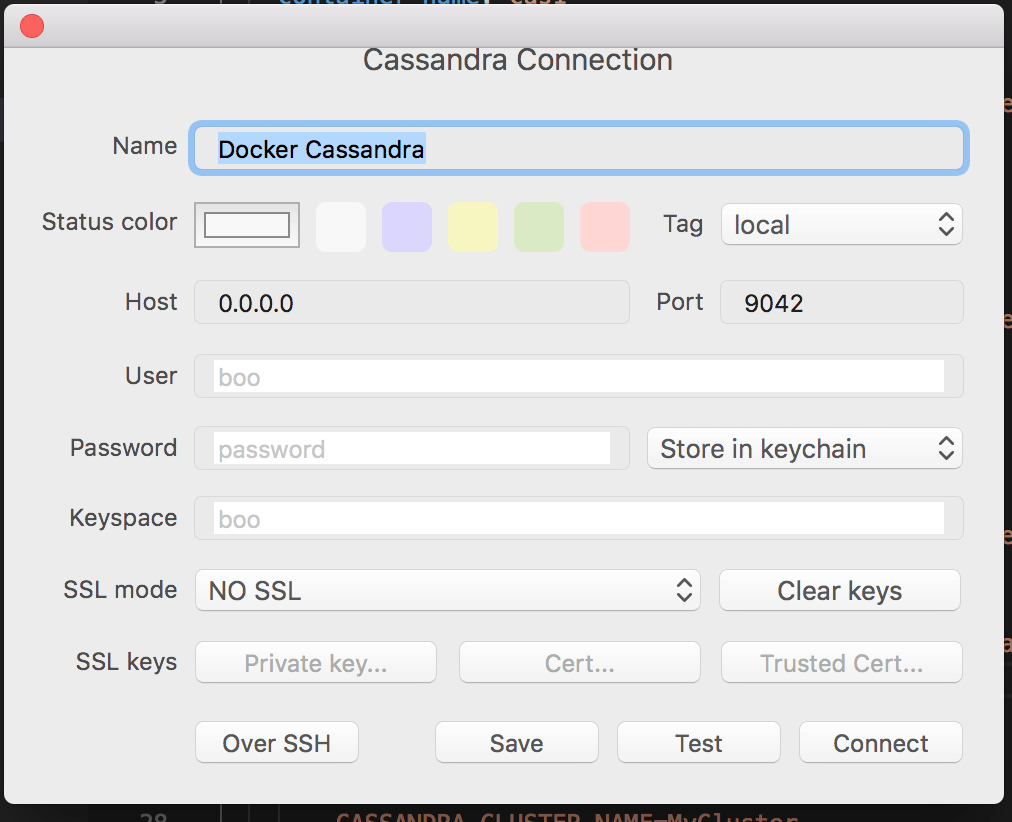
If you notice I had exposed the default Cassandra port that is 9042 in both docker run and docker compose command. Using terminal like is not fascinating, how about using a GUI client? I am using TablePlus, a SQL/NoSQL client.
Once connected, you will see default system databases.

Let’s create a test KEYSPACE, the Cassandra version of Database, and a Table on node cas1. Do not worry, I will discuss it in details later. Right now the purpose is to tell you how data is replicated.
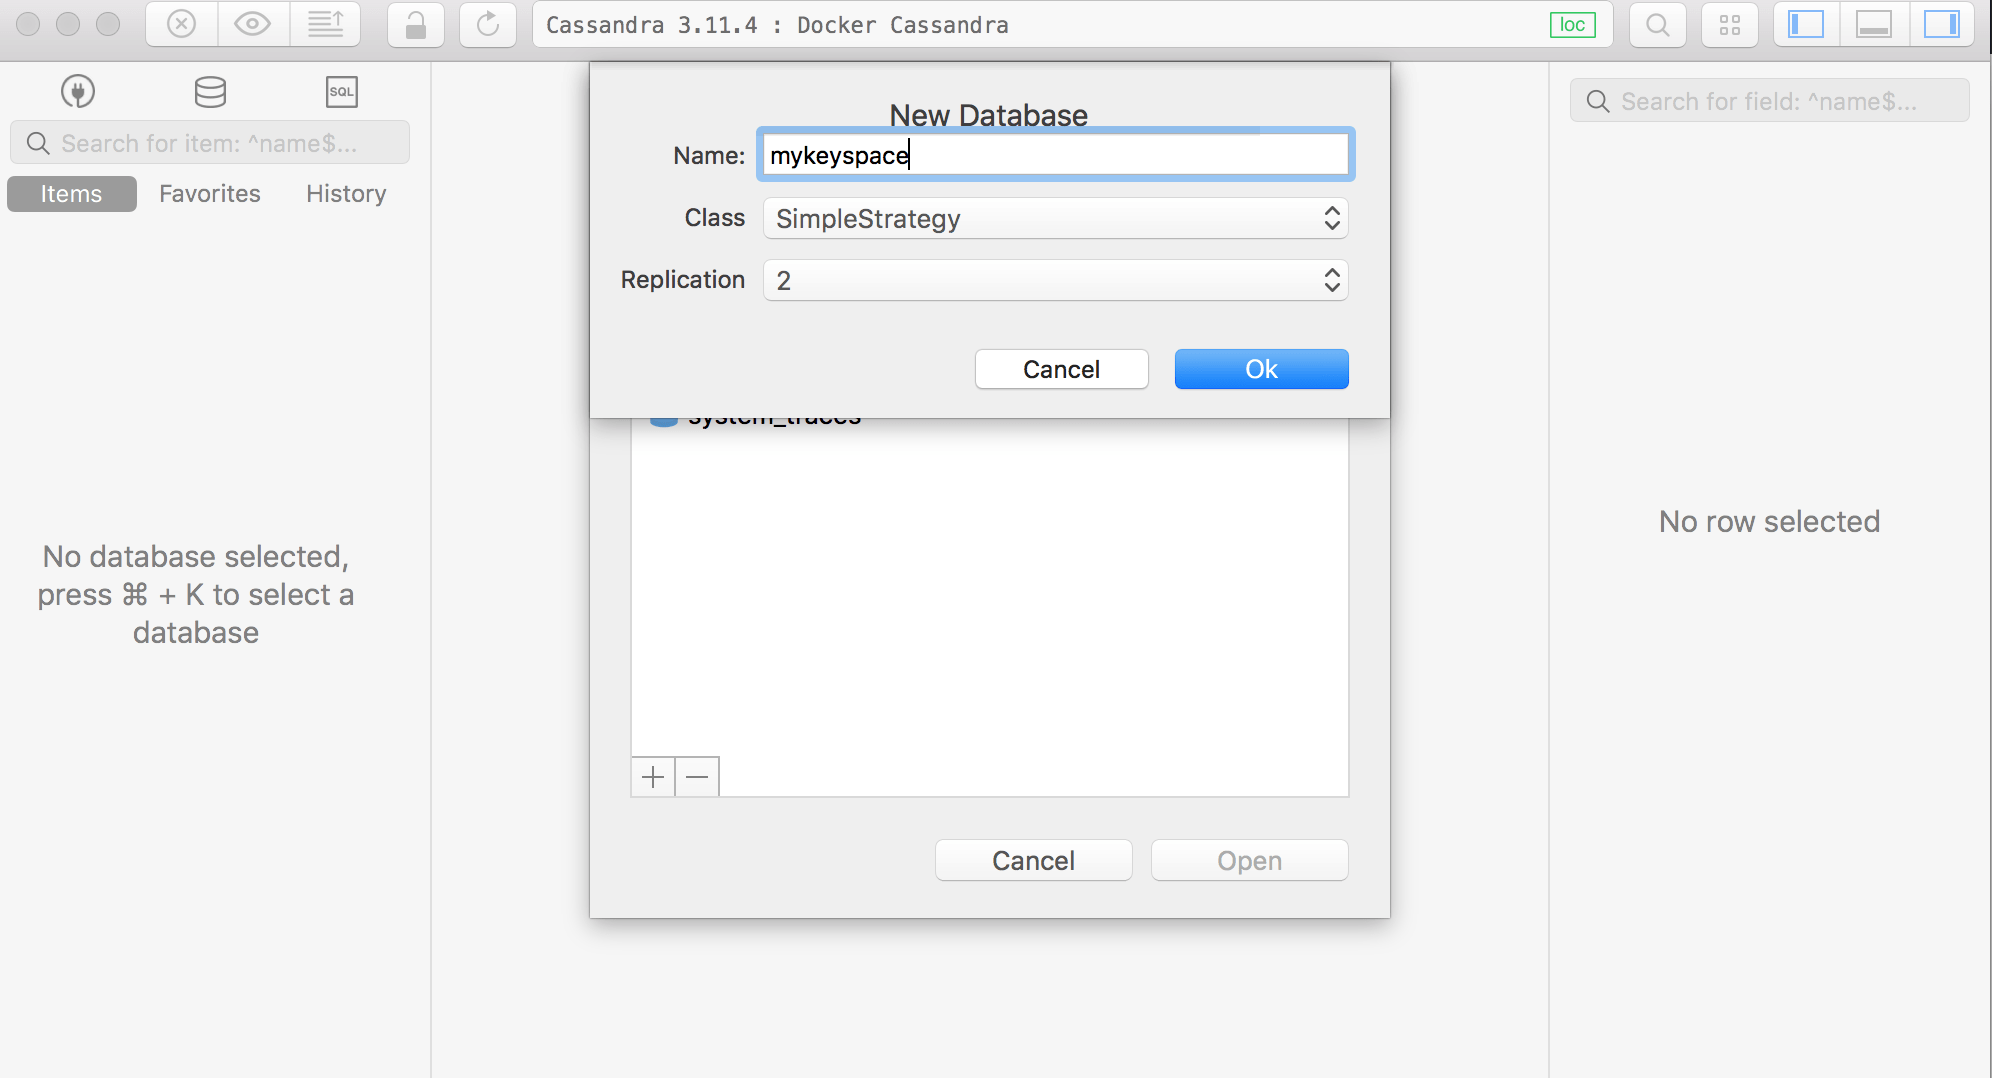
Setting Replication factor to 2, which means there will be 2 copies of data, one on each node.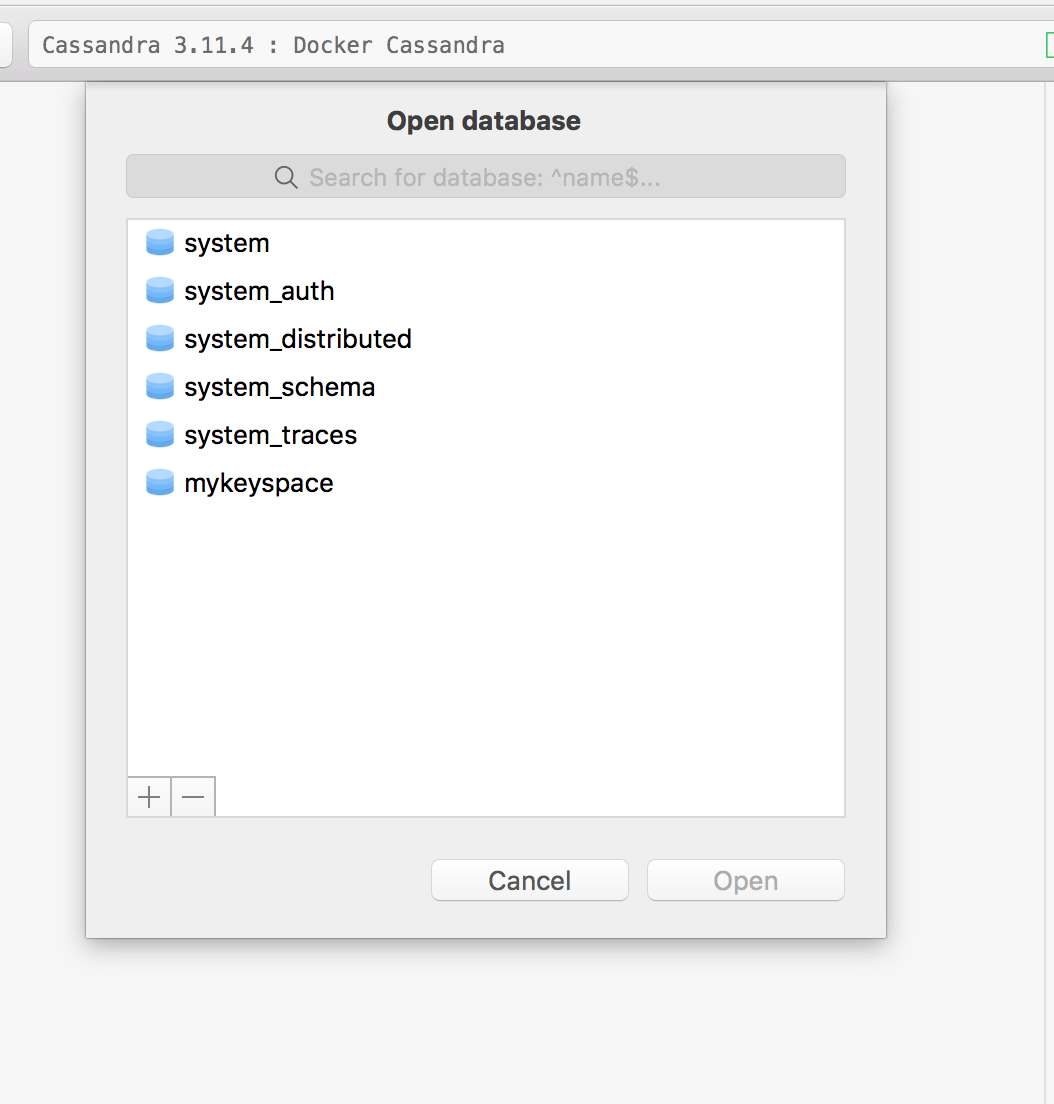
Let’s connect to the second node.

Notice the port 9043. The 9042 was already assigned to cas1.
Lo and Behold! MyKeySpace exists here as well, it was well replicated from Cas1 to Cas2
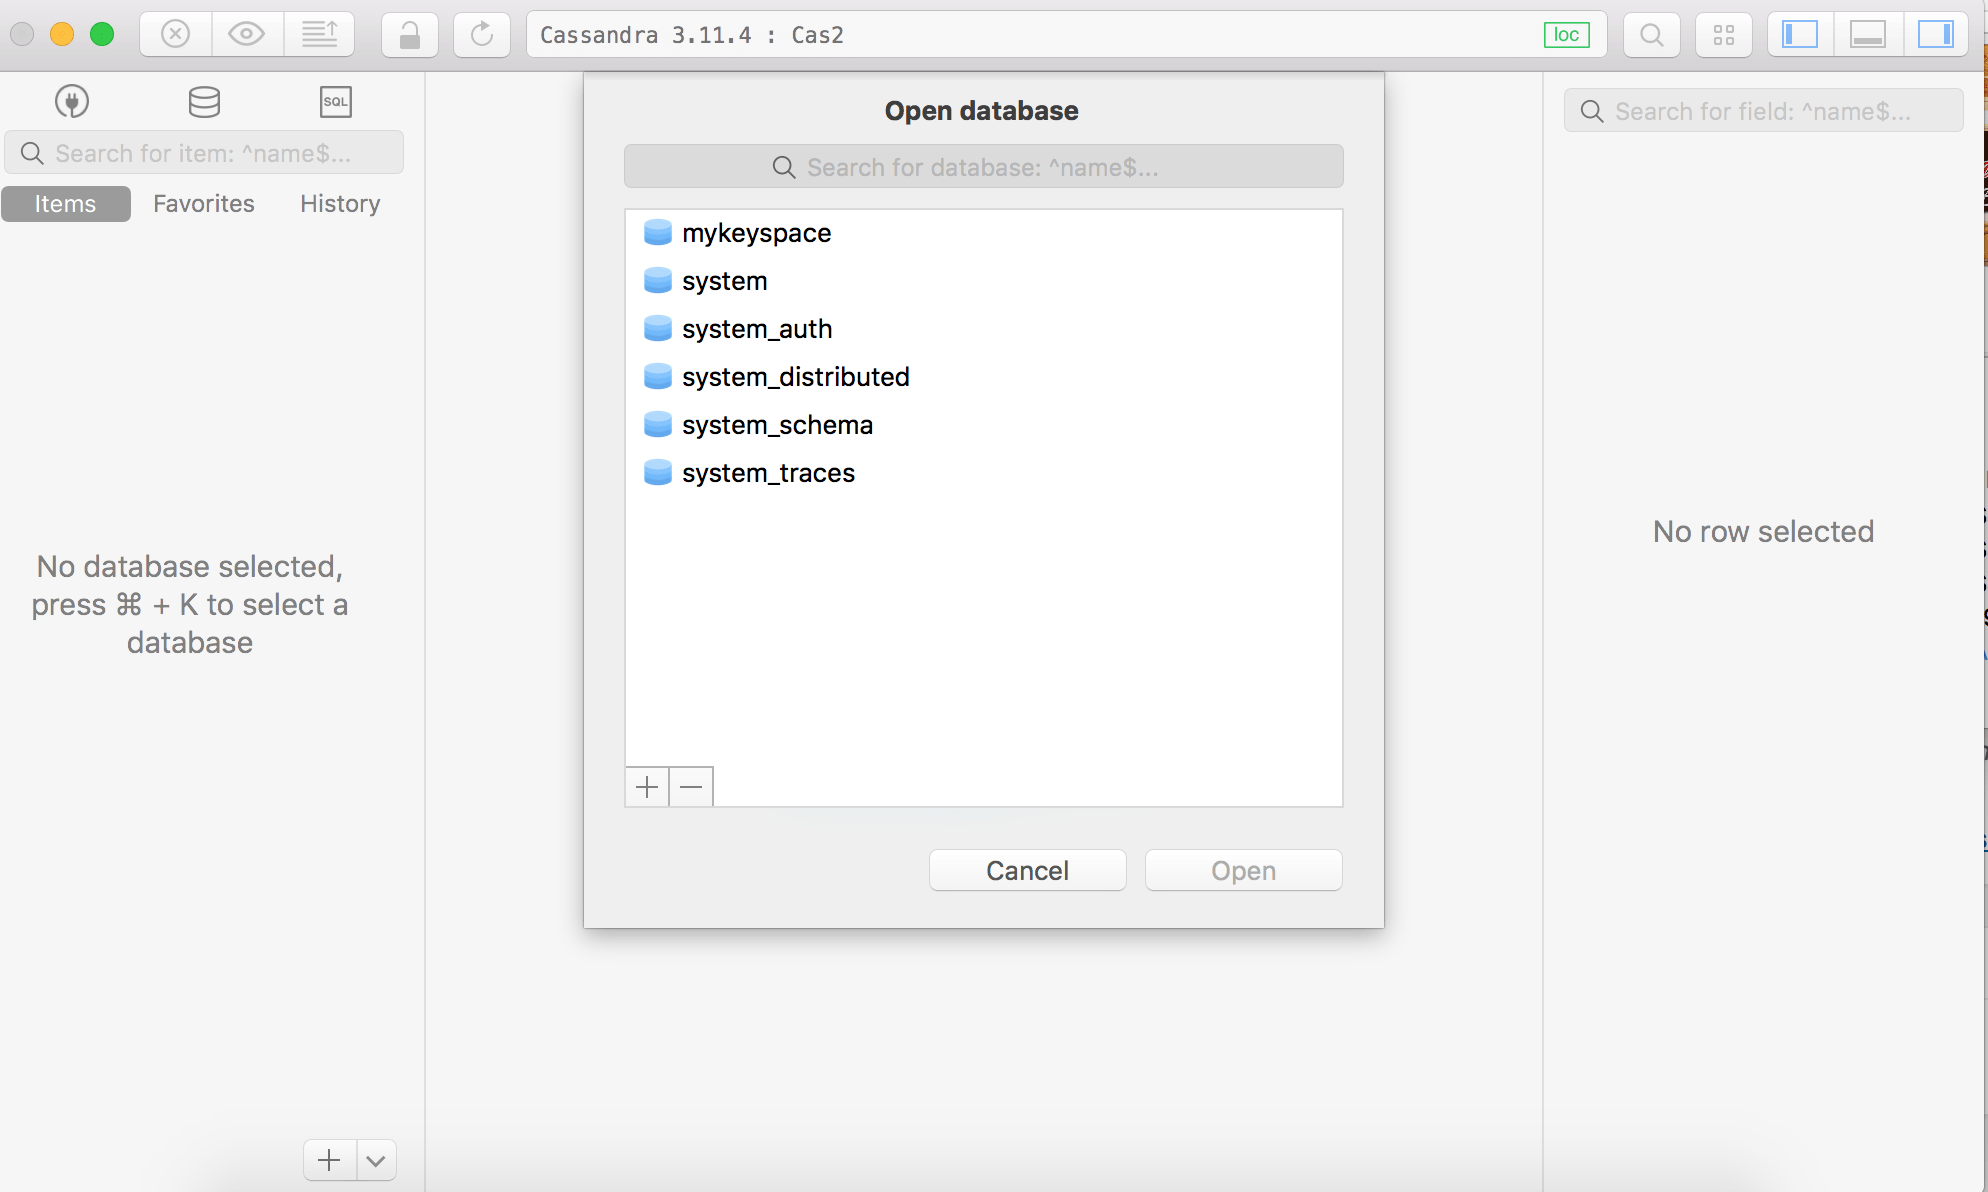
Either you make changes on Cas1 or Cas2, it will eventually be propagated. This is not similar to a typical Master/Slave concept, it is rather called Masterless as the entire system is decentralized and P2P connection is established in the ring(Does it reminds you Blockchain?)
Next up is Data Modeling concepts and creating entities in CQL.
Cassandra Data Modeling and CQL
Cassandra is a beast and it is not possible to cover every aspect of data modeling here. Therefore I will be covering the basics to give you a little bit idea that how is it different than a typical relational database system. Despite CQL looks very much similar to SQL or MySQL based SQL, it is not SQL at all. Prepare yourself to be ready to unlearn RDBMS things.
Terminologies
Below is a little comparison between Cassandra and RDBMS world.
Keyspace:- It is the container collection of column families. You can think of it as a Database in the RDBMS world.
Column Family:- A column family is a container for an ordered collection of rows. Each row, in turn, is an ordered collection of columns. Think of it as a Table in the RDBMS world.
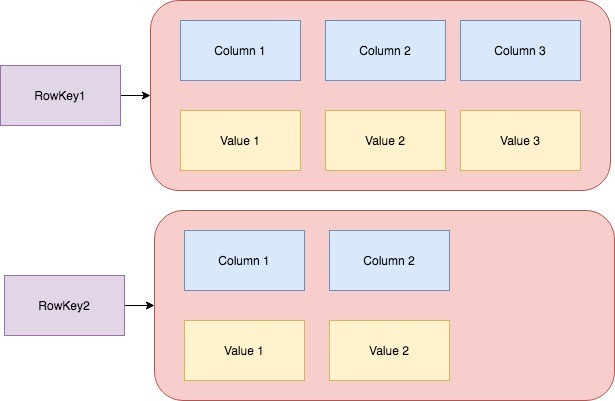
Row:- A row is the collection of columns ordered columns.
Column:- A column is the collection of key/value pairs.
RowKey:- A primary key is called a row key.
Compound Primary Key:- A primary key consist of multiple columns. One part of that key then called Partition Key and rest a Cluster Key.
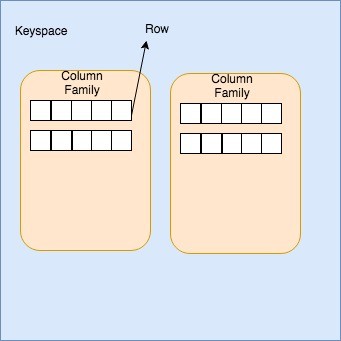
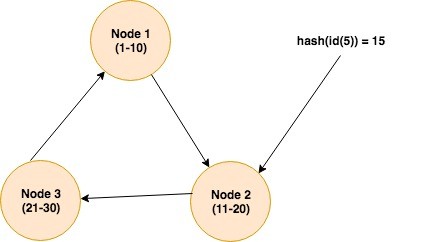
Partition Key:- Data in Cassandra is spread across the nodes. The purpose of the partition key is to identify the node that has stored that particular row which is being asked for. A function, called partition, is used to compute the hash value of the partition key at the time of row is being written. For instance, node 1 has key values range from 1-10, node 2 contains 11-20 and node 3 consists of range 21-30. When a SELECT command with WHERE clause is executed, the hash value of partition key is used to find the required node, once the node is found, it then fetches the data and returns to the client. For instance, the query is SELECT * FROM users where id = 5, and suppose the hash value of partition key(which is 5 in this case) is 15, it’d be the node 2 which will have that row available. Below is the pictorial representation of it.
Let’s come up with an example. You are working on a system that keeps information about the site users and their cities. We will create a Keyspace, called, CityInfo. You may use CQLSH or TablePlus GUI, up to you.
create keyspace CityInfo with replication = {'class' : 'SimpleStrategy', 'replication_factor':2}
Since I have 2 nodes so I set the replication_factor to 2.
Designing Models
In RDBMS we have a facility like JOINs and writing is not cheap hence we avoid duplicates by using foreign keys in relevant tables. This is not the case in Cassandra. Cassandra is a distributed system, writing is cheap hence you are most welcome to de-normalize data where needed. This helps to retrieve data which you usually fetch via JOINs. On the other hand, data reads could be expensive because data is spanned across nodes and retrieve via partition keys. While designing models you should have the following goals in mind:
- Evenly spread of data in a cluster:- The primary key is the partition key if it is consist of a single column and a partition key and cluster key in case of a composite primary key. To spread data evenly you must select a column for PK which has uniqueness thus could be spread across nodes. Things like ID, Username, and email have uniqueness and will fully utilize the cluster of nodes. But if you use keys like first/last name, gender, etc then there will be very fewer choices of partition keys and despite having 100s of nodes only a few will always be used thus making a partition fat and less performant.
- Minimize the number of Reads:- As I mentioned, reads are expensive. If you model in a way that a single query is fetching from multiple partitions it will make the system slow.
Therefore, unlike RDBMS where you design schema first and get the liberty of creating queries based on your requirements, this is not the case for Cassandra. You must know the queries in advance which are required in the system and then design model accordingly.
Example Use case
We have a system where users of different cities visit a website. The management has asked to come up with the following information:
- List of all users
- List of all cities.
- List of users by cities
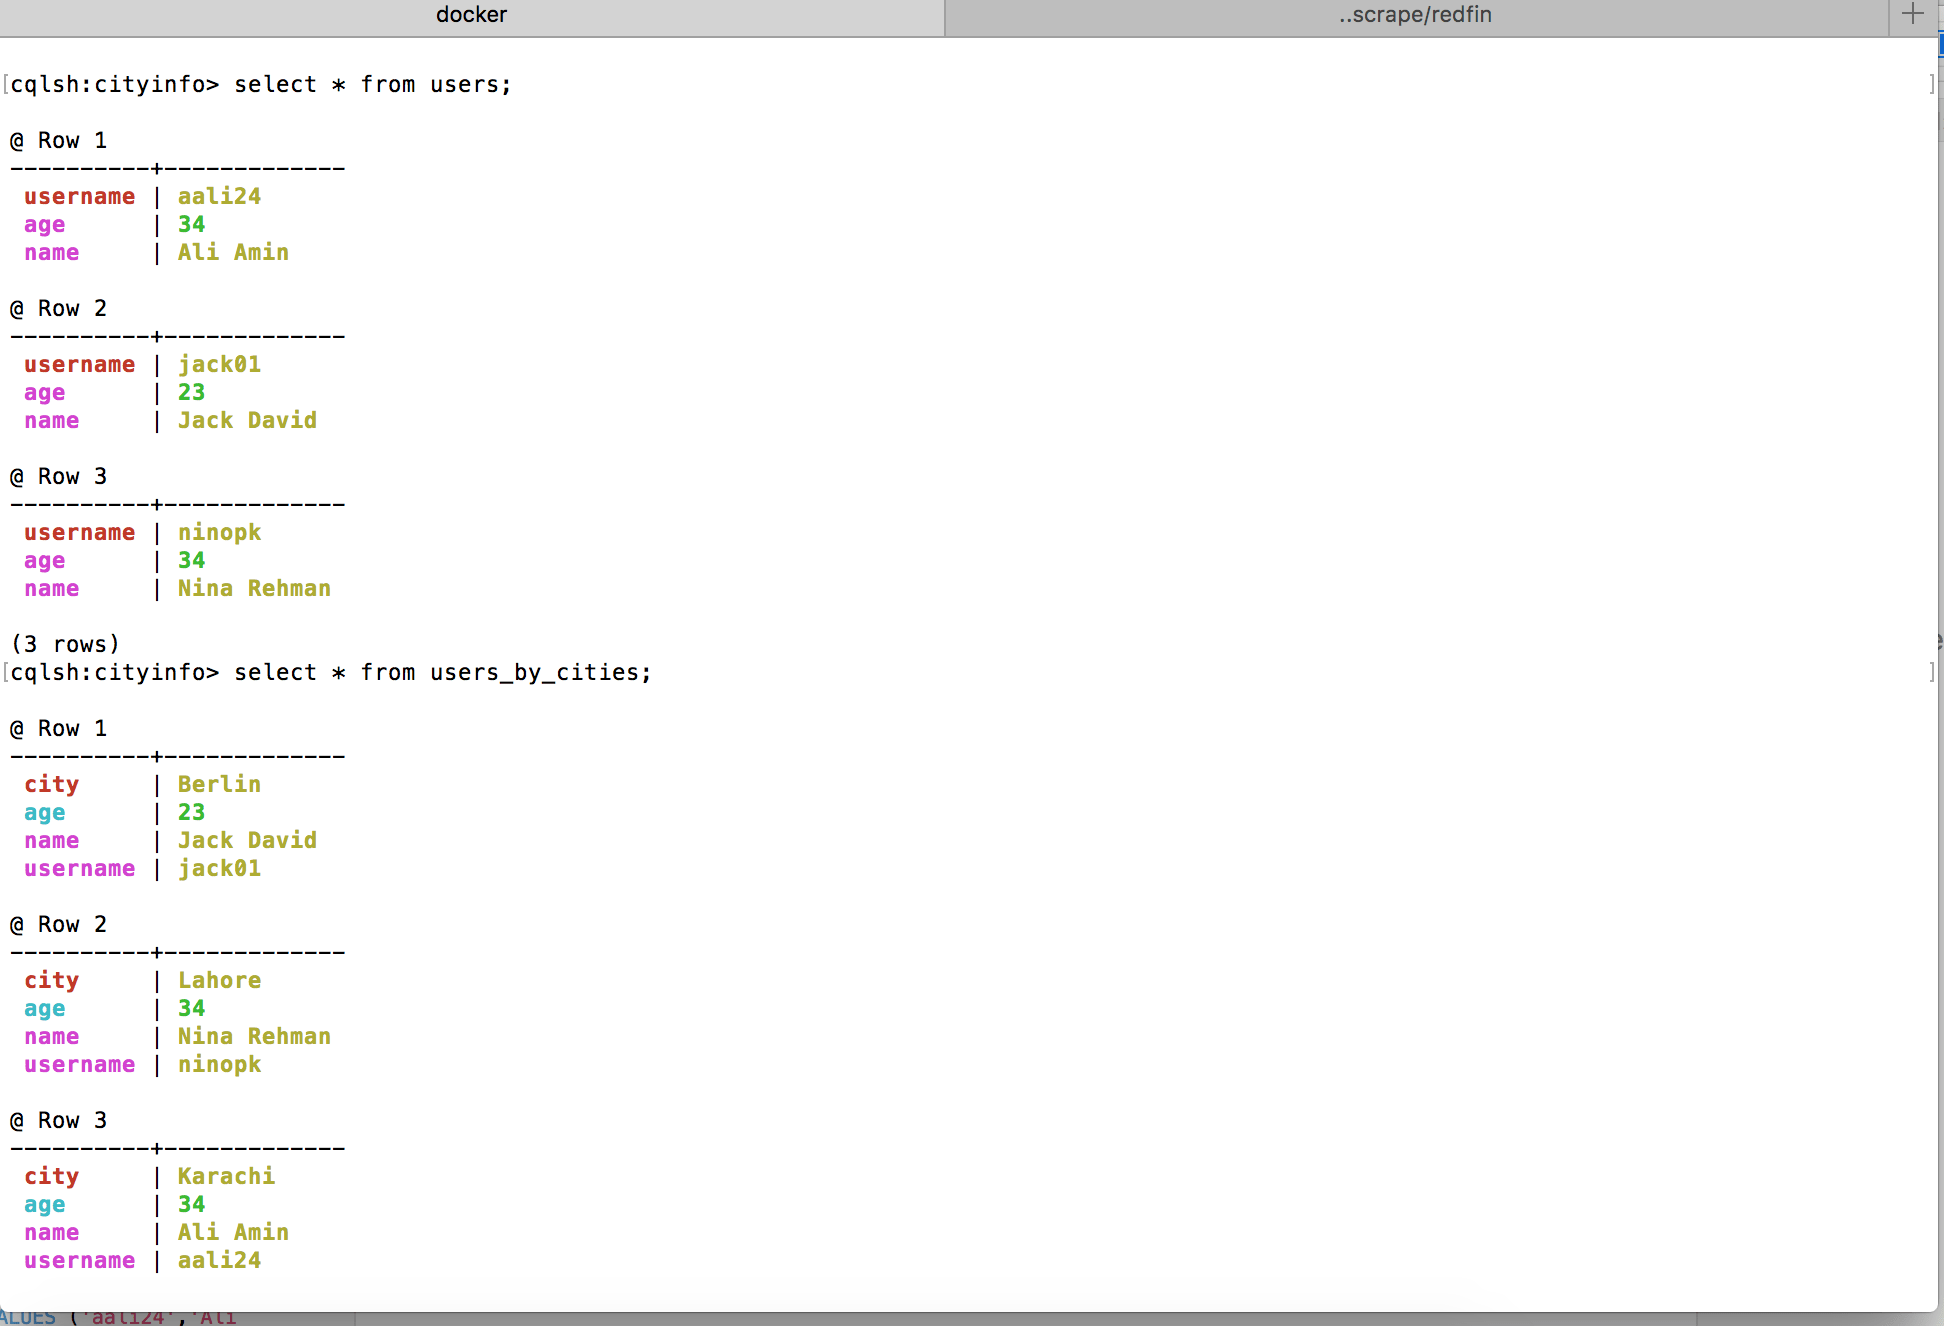
Let’s create the cities table first.
CREATE TABLE cities (
	id int,
	name text,
	country text,
	PRIMARY KEY(id)
);
then users
CREATE TABLE users (
	username text,
	name text,
	age int,
	PRIMARY KEY(username)
);
Inserting a few cities.
INSERT INTO cities(id,name,country) VALUES (1,'Karachi','Pakistan');
INSERT INTO cities(id,name,country) VALUES (2,'Lahore','Pakistan');
INSERT INTO cities(id,name,country) VALUES (3,'Dubai','UAE');
INSERT INTO cities(id,name,country) VALUES (4,'Berlin','Germany');
And inserting a few users
INSERT INTO users(username,name,age) VALUES ('aali24','Ali Amin',34);
INSERT INTO users(username,name,age) VALUES ('jack01','Jack David',23);
INSERT INTO users(username,name,age) VALUES ('ninopk','Nina Rehman',34);
These insertions fulfill our first two requirements but what about the 3rd one? In RDBMS world we would have used city_id as an FK in users table and a JOIN would easily return the data but this is Cassandra, we can’t do this, what is left for us create another table that would satisfy our needs.
CREATE TABLE users_by_cities (
	username text,
	name text,
	city text,
	age int,
	PRIMARY KEY(city,age)
);
This primary key has two components: First becomes partition key and the second becomes cluster key. It will look up w.r.t city and all the records are clustered/grouped by age.
Insert a few records now:
INSERT INTO users_by_cities(username,name,city,age) VALUES ('aali24','Ali Amin','Karachi',34);
INSERT INTO users_by_cities(username,name,city, age) VALUES ('jack01','Jack David','Berlin',23);
INSERT INTO users_by_cities(username,name,city, age) VALUES ('ninopk','Nina Rehman','Lahore',34);
Normally these insertions in two tables will be done in a go from an “Add User” interface, from CQL side you can do something like this to add a user’s information.
BEGIN BATCH
INSERT into users(username,name,age) VALUES('raziz12','Rashid Aziz',34);
INSERT INTO users_by_cities(username,name,city, age) VALUES ('raziz12','Rashid Aziz','Karachi',30);
APPLY BATCH;
Before I move further, I would like to remind you about the hashed token I discussed earlier. First, run the EXPAND ON command on CQL shell. Once you do that you see the results like below:
Looks good, No? OK, now we are going to see the token value of our primary key. It returns the below result:
cqlsh:cityinfo> select token(username) from users;

@ Row 1
------------------------+----------------------
 system.token(username) | -7905752472182359000

@ Row 2
------------------------+----------------------
 system.token(username) | 2621513098312339776

@ Row 3
------------------------+----------------------
 system.token(username) | 6013687671608201304
Make sense, tokens are unique because the usernames are unique. These tokens will spread across nodes. When the user runs the command SELECT * FROM users where username = 'raziz12', it will pick the node based on this token value. I already showed this in pictorial form a few lines above.
The query below shows the token values from users_by_cities table.
cqlsh:cityinfo> select token(username),username,city from users_by_cities;

@ Row 1
------------------------+----------------------
 system.token(username) | 2621513098312339776
 username               | jack01
 city                   | Berlin

@ Row 2
------------------------+----------------------
 system.token(username) | 6013687671608201304
 username               | ninopk
 city                   | Lahore

@ Row 3
------------------------+----------------------
 system.token(username) | -882788003101376442
 username               | raziz12
 city                   | Karachi

@ Row 4
------------------------+----------------------
 system.token(username) | -7905752472182359000
 username               | aali24
 city                   | Karachi
Select * from users_by_cities where city = 'Karachi'; returns the following:
cqlsh:cityinfo> select * from users_by_cities where city = 'Karachi';

@ Row 1
----------+-------------
 city     | Karachi
 username | aali24
 name     | Ali Amin

@ Row 2
----------+-------------
 city     | Karachi
 username | raziz12
 name     | Rashid Aziz
The model also serves the query select * from users_by_cities where city = 'Karachi' and age = 34
But what if you want to pick a record based on name the field?
SELECT * from users_by_cities where name = 'Ali Amin';
You’d get the following error.
Error from server: code=2200 [Invalid query] message="Cannot execute this query as it might involve data filtering and thus may have unpredictable performance. If you want to execute this query despite the performance unpredictability
It is because no partition key was mentioned, Cassandra is asking to hunt the required name in ALL nodes, yes ALL nodes and imagine if nodes are 10 or 100, it’d take time to return the data. Hence it is not suggested. If you want to find something w.r.t field, either create another table(highly recommended) or create a secondary index(not recommended)
The data is partitioned by city, on lookup, one node responds with the token of the city, once the node is discovered, it fetches all the record in that partition for the users belong to the city of Karachi. Something similar could be visualized about the clustering of data related to Karachi. The data is clustered against age column.
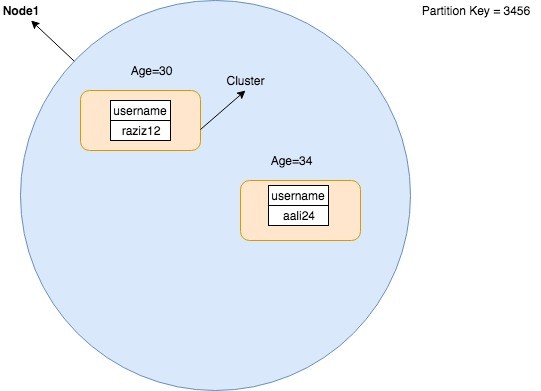
So for a partition holding records of all Karachiites, you will be seeing clusters of records w.r.t age.
Your head must be spinning and would be missing your beloved MySQL but I am telling you that this is something worth learning, I am learning too and I just scratched the surface of this beast.
You’d be wondering that title of the post mentions Python but so far no Python code written at all, I hear you. It was necessary to prepare a ground because you will just be executing queries in your Python app. The main work is somewhere else, right above.
OK before I move to development, I discussed that Cassandra initially wrote data in Commitlog.
The path of Cassandra CommitLog can be obtained from /etc/cassandra/cassandra.yaml which is /var/lib/cassandra/commitlog here it creates log file w.r.t timestamp. It is not as readable but when I searched a few inserted record then found a few traces. Check the screen below:
You can find traces of jack01, aali, and ninopk here. You also find text related to repairing mechanism.
SSTables are found in /var/lib/cassandra/data/<keyspacename> .In my case it is cityinfo
For every table/Column Family it generates manifest.json files, a few *.dband a few other types of file, below are the files of the table users_by_citiestable.
./users_by_cities-62cea5f0788e11e9b568e709cd27ef9f/snapshots/truncated-1558089482008-users_by_cities
./users_by_cities-62cea5f0788e11e9b568e709cd27ef9f/snapshots/truncated-1558089482008-users_by_cities/manifest.json
./users_by_cities-62cea5f0788e11e9b568e709cd27ef9f/snapshots/truncated-1558089482008-users_by_cities/md-1-big-CompressionInfo.db
./users_by_cities-62cea5f0788e11e9b568e709cd27ef9f/snapshots/truncated-1558089482008-users_by_cities/md-1-big-Data.db
./users_by_cities-62cea5f0788e11e9b568e709cd27ef9f/snapshots/truncated-1558089482008-users_by_cities/md-1-big-Digest.crc32
./users_by_cities-62cea5f0788e11e9b568e709cd27ef9f/snapshots/truncated-1558089482008-users_by_cities/md-1-big-Filter.db
./users_by_cities-62cea5f0788e11e9b568e709cd27ef9f/snapshots/truncated-1558089482008-users_by_cities/md-1-big-Index.db
./users_by_cities-62cea5f0788e11e9b568e709cd27ef9f/snapshots/truncated-1558089482008-users_by_cities/md-1-big-Statistics.db
./users_by_cities-62cea5f0788e11e9b568e709cd27ef9f/snapshots/truncated-1558089482008-users_by_cities/md-1-big-Summary.db
./users_by_cities-62cea5f0788e11e9b568e709cd27ef9f/snapshots/truncated-1558089482008-users_by_cities/md-1-big-TOC.txt
./users_by_cities-62cea5f0788e11e9b568e709cd27ef9f/snapshots/truncated-1558089482008-users_by_cities/schema.cql
You can learn more about it here.
Accessing Cassandra from Python
Alright, so, first of all, we’d need to install the driver. I am out the docker shell as I’d be accessing it from my host machine. Run the command pip install cassandra-driver
It takes a while during building the driver:
Requirement already satisfied: six>=1.9 in /anaconda3/anaconda/lib/python3.6/site-packages (from cassandra-driver) (1.11.0)
Building wheels for collected packages: cassandra-driver
  Building wheel for cassandra-driver (setup.py) ... done
  Stored in directory: /Users/AdnanAhmad/Library/Caches/pip/wheels/df/f4/40/941c98128d60f08d2f628b04a7a1b10006655aac3803e0e227
Successfully built cassandra-driver
Installing collected packages: cassandra-driver
Successfully installed cassandra-driver-3.17.1
Below is the code connecting to the Cassandra Cluster within Docker from the Python script running out of the Docker.
from cassandra.cluster import Cluster
if __name__ == "__main__":
    cluster = Cluster(['0.0.0.0'],port=9042)
    session = cluster.connect('cityinfo',wait_for_all_pools=True)
    session.execute('USE cityinfo')
    rows = session.execute('SELECT * FROM users')
    for row in rows:
        print(row.age,row.name,row.username)
The following output returned:
➜  CassandraTut python cassandra_connect.py
34 Ali Amin aali24
34 Rashid Aziz raziz12
23 Jack David jack01
34 Nina Rehman ninopk
➜  CassandraTut
You can learn more about it here
Conclusion
So in this post, you learned a bit about Cassandra and how to use CQL and connecting it in your Python scripts. Leave your comment below for comments, correction or feedback. As always, the code is on Github.
This post was originally published here.