Introduction
In this post, I am going to talk about Kubernetes, what is it all about, why to use it and how to use it. At the end of this post you should be able to understand the basic working of Kubernetes and be able to deploy your app in a Kubernetes cluster.
Prerequisite
It will be very difficult to understand Kubernetes if you have no idea of containerization tool like Docker. If you don’t know what Docker is and how to use it for making modular architecture than you should visit this two-part series. (Part 1, Part 2). Infact, I will recommend you to read both part as this post is sequel of Docker series and will be using same code and images in this tutorial.
Background
Docker is a great tool to divide your application into multiple components and run them as a single app. So far so good but suppose your application or a web application get quite famous and getting so many hits, how’d you cope up with it? You’d say, well, add more containers? good! that’s what will be done but how will you distribute the traffic, what will you do if one of the containers dies, how’d you manage it? Will you be up all the time to take care of it? What if you want to send version 2 of your famous app? You might say, well, I would bring my containers down and upload it quickly, or I would prepare a backup container and as soon as the new container goes up, I will quickly point out my app to that IP. All is possible but not feasible and doable. Especially if your app is very famous you would not want to deal with downtime of it. Kubernetes is the answer of all of it, and probably many other questions related to automated and scalable deployment.
What is Kubernetes?

From the official website:
Kubernetes (k8s) is an open-source system for automating deployment, scaling, and management of containerized applications.
It groups containers that make up an application into logical units for easy management and discovery.
You got some idea. K8s provide a way to group existing or new containers and make them run as a single logical entity thus make it easy to automate operations like deployment and scaling.
In other words, K8s provide a way to orchestrate your containers.
Kubernetes is used mostly in Microservices based applications.
What is container orchestration?
Container orchestration is about managing life cycles of containers. In modern application development, a single application is divided into multiple units that are usually installed in containers. Container orchestration helps to run these individual units as a single app. Orchestration helps in provisioning and deployment of containers, resource allocation, load balancing and many other things. Just to tell that Kubernetes is NOT the only way to orchestrate containers, Apache Mesos and Docker Swarms are alternate options available.
Kubernetes Architecture

Master Node
The master node consists of 3 components:
- API Server:- A REST API based server that allows the Administrator to perform several operations like Pods creation, deployment etc.
- Scheduler:- The purpose of the scheduler to take care nodes management. It is responsible where to divert the traffic to a worker node or how to use resources properly by making sure that required resources are available.
- Controller Manager:- It is responsible to manage different kinds of controllers offered by Kubernetes. Node Controller is responsible to notify when a node goes down. Replication Controller makes sure that the correct number of pods are available. Endpoints Controller populates the endpoint objects for Pods and Services. Service Account & Token Controllers are responsible for creating accounts and tokens for accessing different parts of the system
Worker Node
A worker node is a machine(VM/Physical) which runs applications by using Pods and is controlled by the master node. A worker node consists of the following components:
- Kubelet:- It is the lowest level component in Kubernetes which is responsible to figure out what to run on a single machine/node. It is kind of a supervisor of containers and makes sure that the required number of containers/pods are running at any given time.
- Pod:- A pod is a collection of containers that share the same resources. A pod encapsulates containers, network IP and storage resources. It is the single instance of an application which is deployed. Usually, a pod contains a single container but it is not restricted to it. For instance, a Database server pod contains a container for the Db itself and another container for storing logging data. It is not mandatory to use Docker containers, others like rkt is also used.
- Service:- Pods are born and died, you can’t trust them to be with you in rainy days. Therefore, there was a need for something that works as a proxy of underlying pods and provides you an interface for communication irrespective of which pod is alive and which pod is going to die. Services have the option to provide an external IP so that the outer world can communicate. For instance, you could have a web service to access the containerized Apache and show the page on your favorite browser. Labels are used to pick the required set of pods. For instance, pods labeled with app-frontend will be picked by a service which uses the app-frontend Label Selector.
OK, too much text, it’s time to take action and get our hands dirty.
Installation and Configuration
Kubernetes is provided by many Cloud Providers like Google Cloud Platform(GCP), Azure by Microsoft and EKS by Amazon. Thankfully, you don’t need to use any of these services when starting as Kubernetes provides Minikube, a single cluster based environment for local development and testing. You don’t have to worry about which cloud platform you will be using lately as all are using K8s anyway. Think of it running your PHP web app in XAMPP or MAMP and you just upload on a remote apache server without making any changes in your coding file. In order to run Minikube, you should have following tools installed on your machine:
- VirtualBox or VMWare. I am using Virtualbox so go for it. You can download it from here.
- kubectl: It is used to access the Kubernetes cluster. You can download it from here as per your OS requirements. Since I am on OSX so will go for the homebrew version.
brew install kubernetes-cli
If installed correctly then kubectl version should give you the following output:
➜  LearningK8s kubectl version
Client Version: version.Info{Major:"1", Minor:"13", GitVersion:"v1.13.1", GitCommit:"eec55b9ba98609a46fee712359c7b5b365bdd920", GitTreeState:"clean", BuildDate:"2019-01-01T08:17:16Z", GoVersion:"go1.11.4", Compiler:"gc", Platform:"darwin/amd64"}
Server Version: version.Info{Major:"", Minor:"", GitVersion:"v1.9.0", GitCommit:"925c127ec6b946659ad0fd596fa959be43f0cc05", GitTreeState:"clean", BuildDate:"2018-01-26T19:04:38Z", GoVersion:"go1.9.1", Compiler:"gc", Platform:"linux/amd64"}
Next, install Minikube. Though latest versions greater than 0.30 are now available but I will go with the version 0.25.0 as Minikube versions > 0.26 giving issues on start so better go with the one which is stable.
curl -Lo minikube https://storage.googleapis.com/minikube/releases/v0.25.0/minikube-linux-amd64 && chmod +x minikube && sudo mv minikube /usr/local/bin/
It will download the file via CURL, make it executable and then move to the folder which is in PATH. If installed well then you should see something like below:
➜  LearningK8s minikube version
minikube version: v0.25.0
You can also check the status by running minikube status
➜  LearningK8s minikube status
minikube: Running
cluster: Running
kubectl: Correctly Configured: pointing to minikube-vm at 192.168.99.100
Needless to say but all of the commands above should be run on the terminal/console.
Importing Local images into Kubernetes
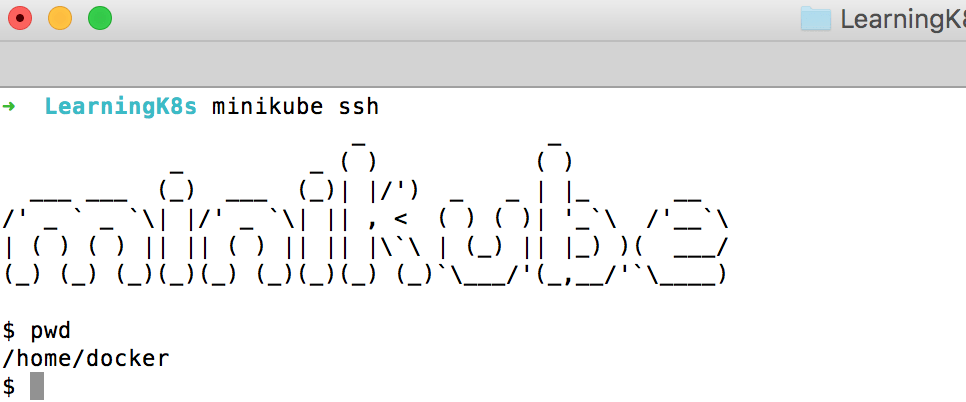
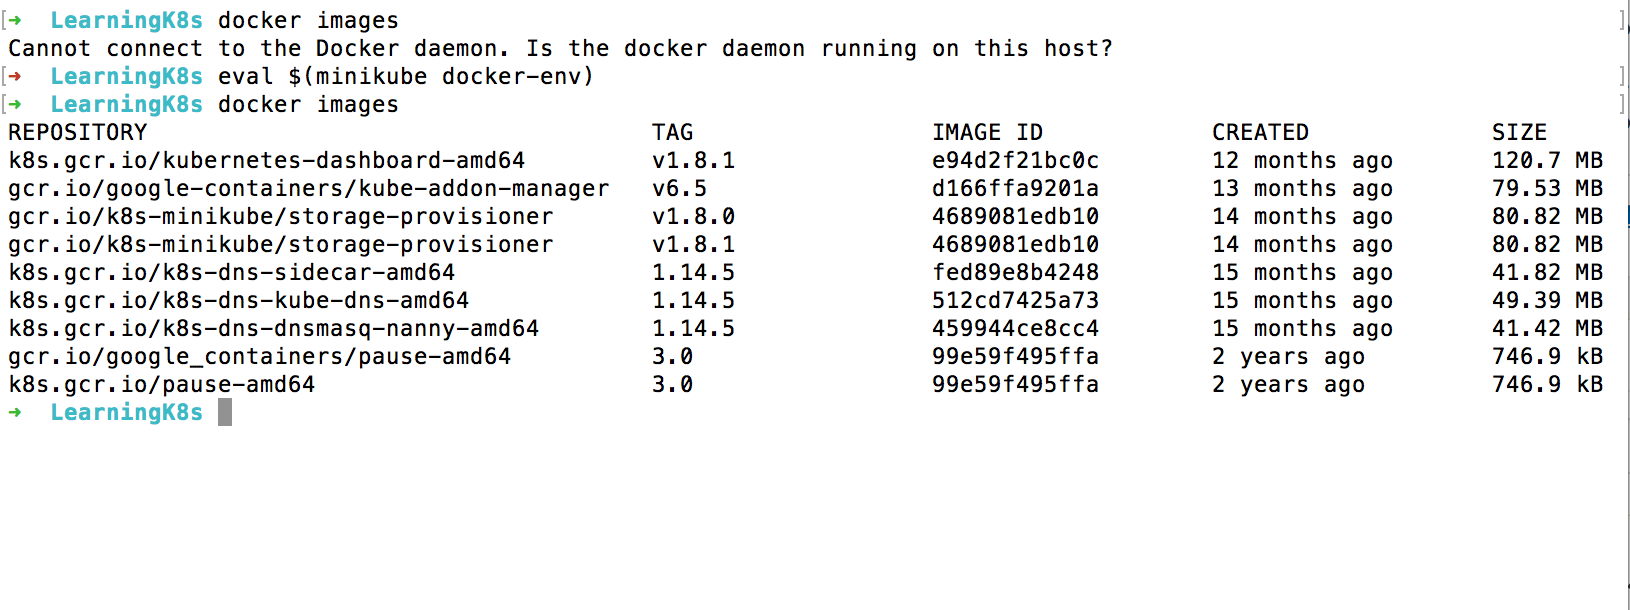
We already have prepared configuration files for our required PHP and MySQL Images in the posts related to docker. So I created a new folder and transferred the existing Dockerfile and docker-compose.yaml in it. The goal is to create images for K8s. How to make images INSIDE a Kubernetes cluster? Not a big deal. When you install minikube, you also get a pre-installed docker. You can test it by doing an SSH to minikube.
Good but how to prepare images locally and transfer to minikube’s docker. Luckily provide a way to do it.
eval $(minikube docker-env)
When you run the above command on your terminal it lets you interact with the docker system WITHIN the cluster:
You can undo or getting out of minikube docker by running the command:
eval $(minikube docker-env -u)
I already transferred the existing Dockerfile and docker-compose.yaml file in the folder, all I have to do is to runt he docker-compose up command. Before you ask, let me clarify that you don’t have to go for this route. All you need is to BUILD your images which can easily be done by running docker build command. Since I am lazy enough, I am using same compose file to create the required images.
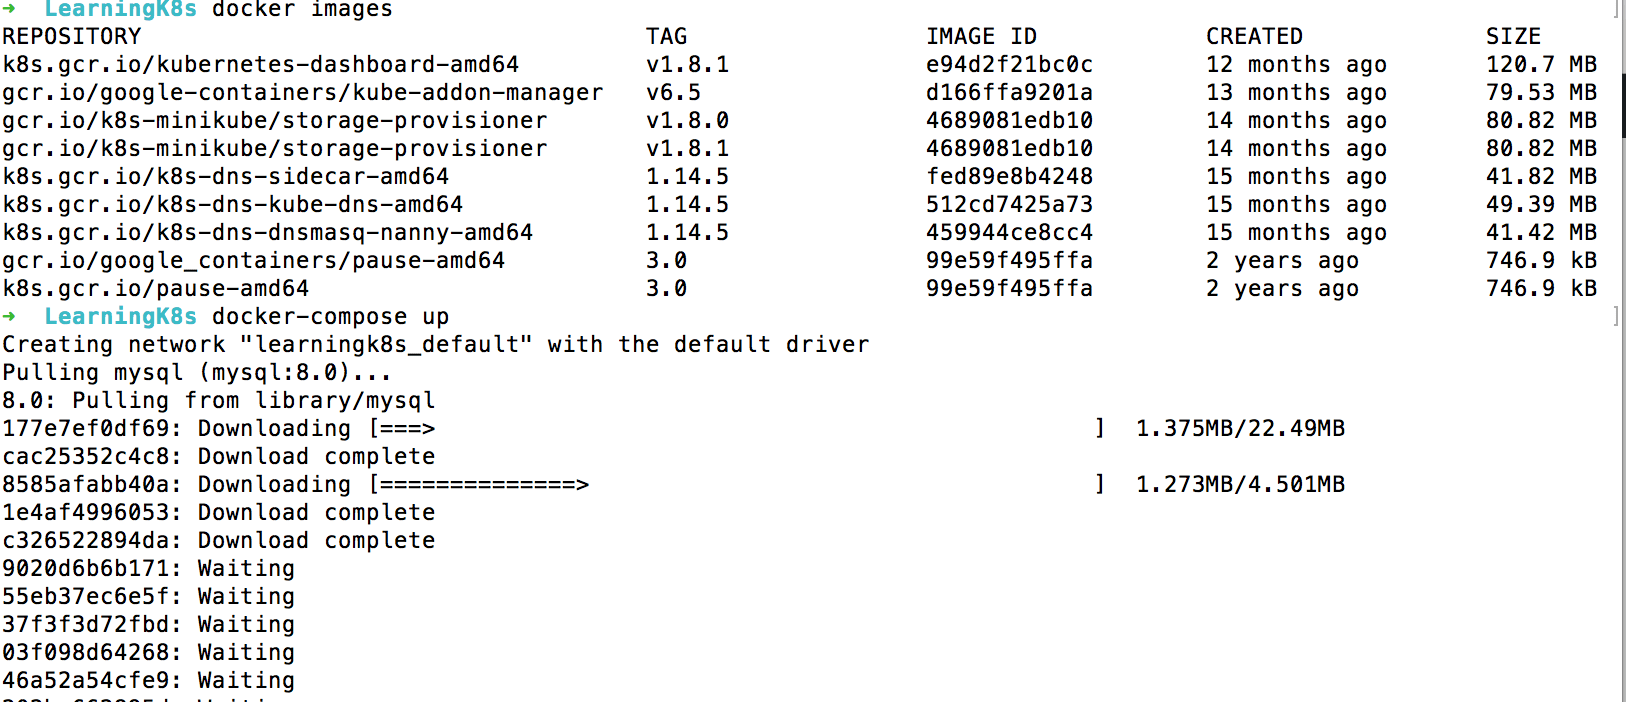
It will take a while to download. Once done you can see something similar:
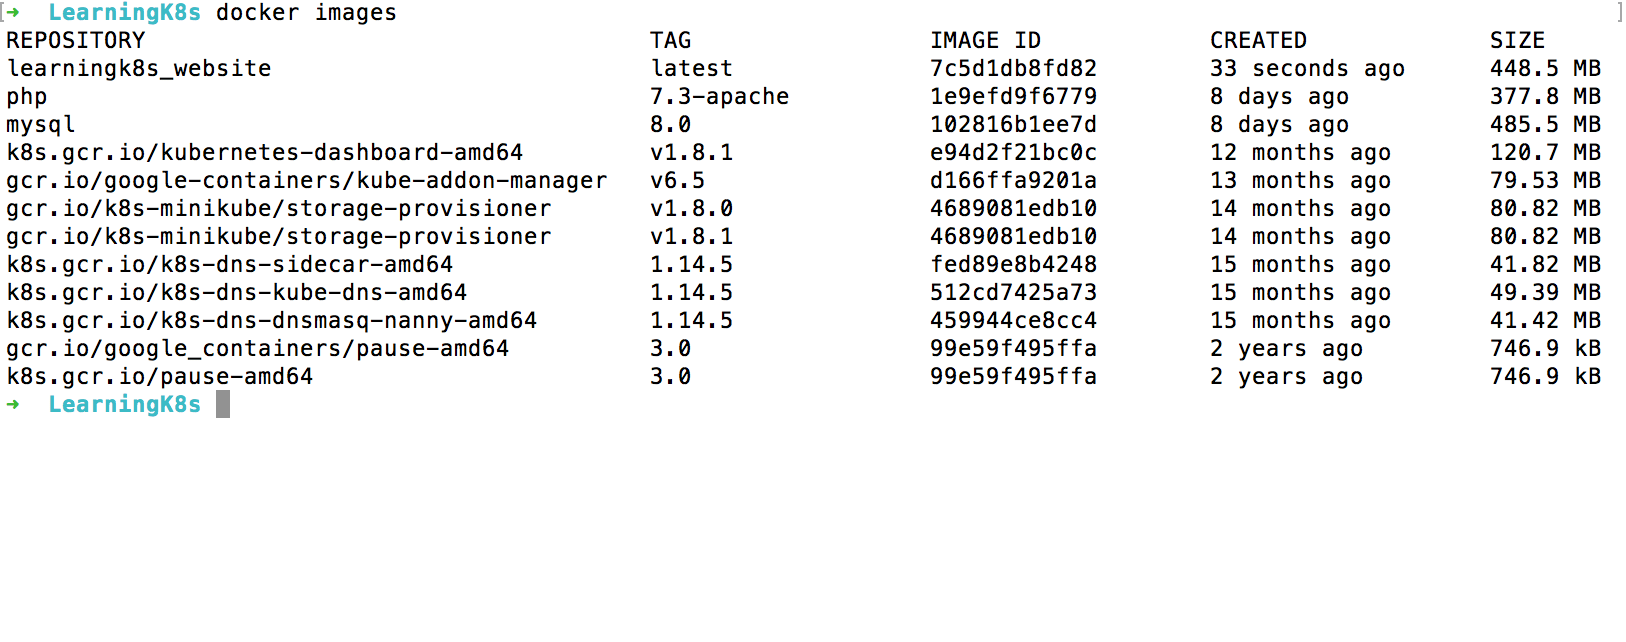
As you can see, the images, learningk8s_website, PHP and MySQL are now available.
Accessing Minikube
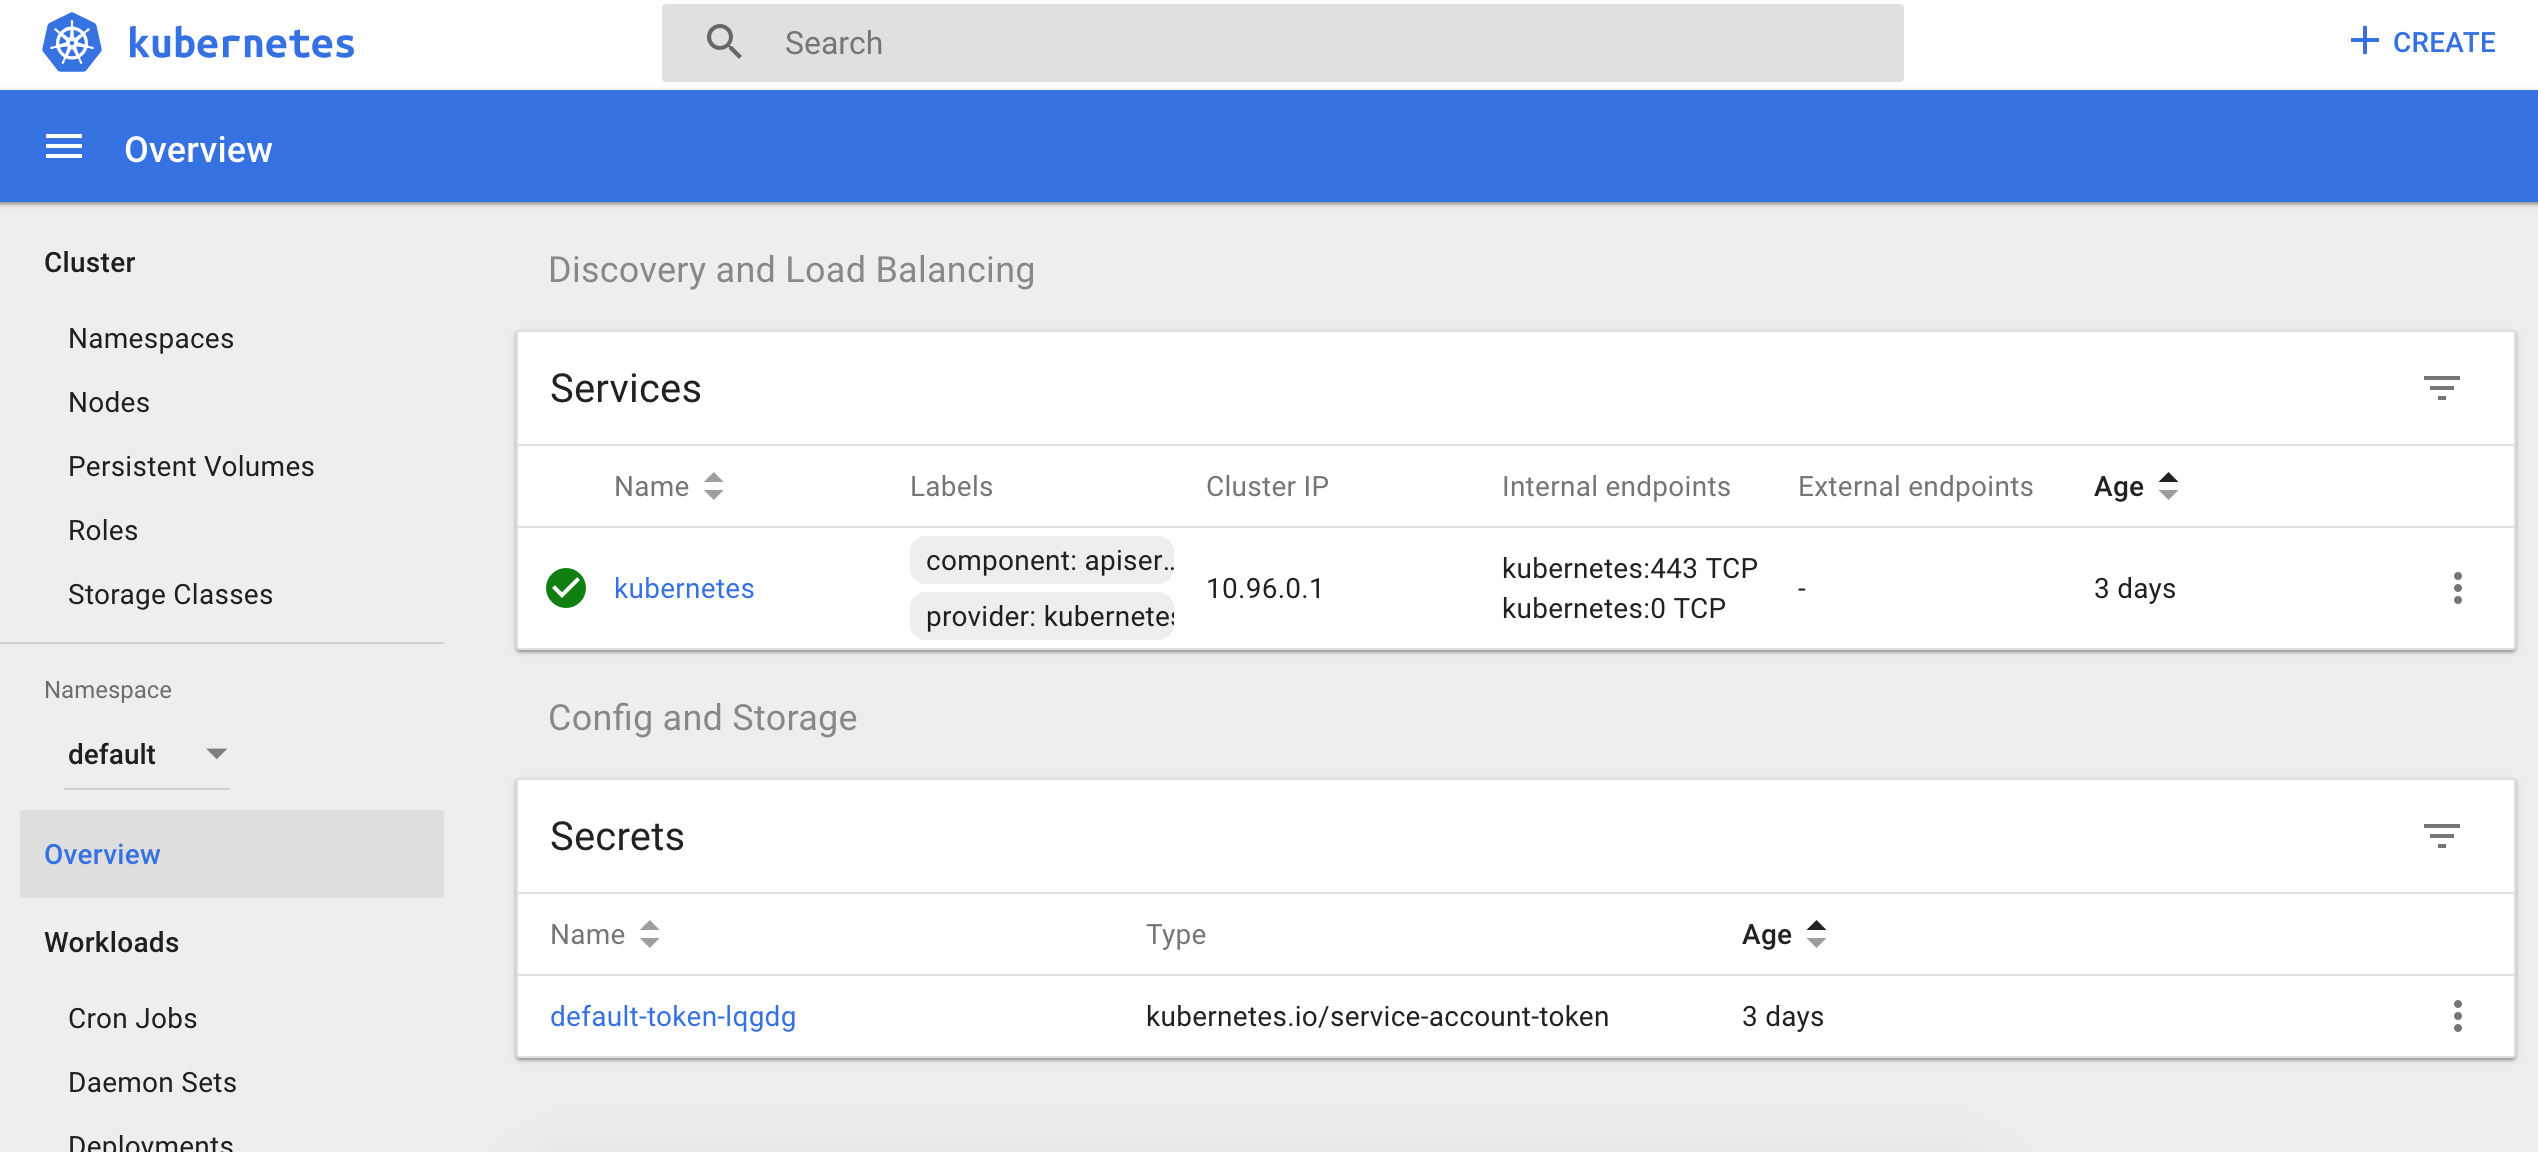
I will be using both CLI and GUI based tools to administer the cluster. For CLI you can just use kubectl and for GUI base you can launch the web interface by running the command minikube dashboard
The required Images are ready. It’s to create deployments so that your apps can run inside pods.
What is Deployment?
A deployment object keeps the info how pods will be created and how will they run and communicate with each other. A DeploymentController makes sure that the desired containers state is equal to the current running state. In short, it is all about how your apps will be deployed and run within containers who themselves are part of pods. We will create two deployments; one for the web server and other for MySQL DB. First we will create webserver.yaml file.
apiVersion: apps/v1
kind: Deployment
metadata:
  name: webserver
  labels:
    app: apache
spec:
  replicas: 3
  selector:
    matchLabels:
      app: apache
  template:
    metadata:
      labels:
        app: apache
    spec:
      containers:
      - name: php-apache
        image: learningk8s_website
        imagePullPolicy: Never
        ports:
        - containerPort: 80
Many things are similar to Docker related file. labels as I told earlier, is used to select relevant pods. Since pods are mortal and new could be created, labels are used to pick relevant pods. In our case it is app: apache. The selectors is then used to pick the pods to match labels. Learn more about them here.
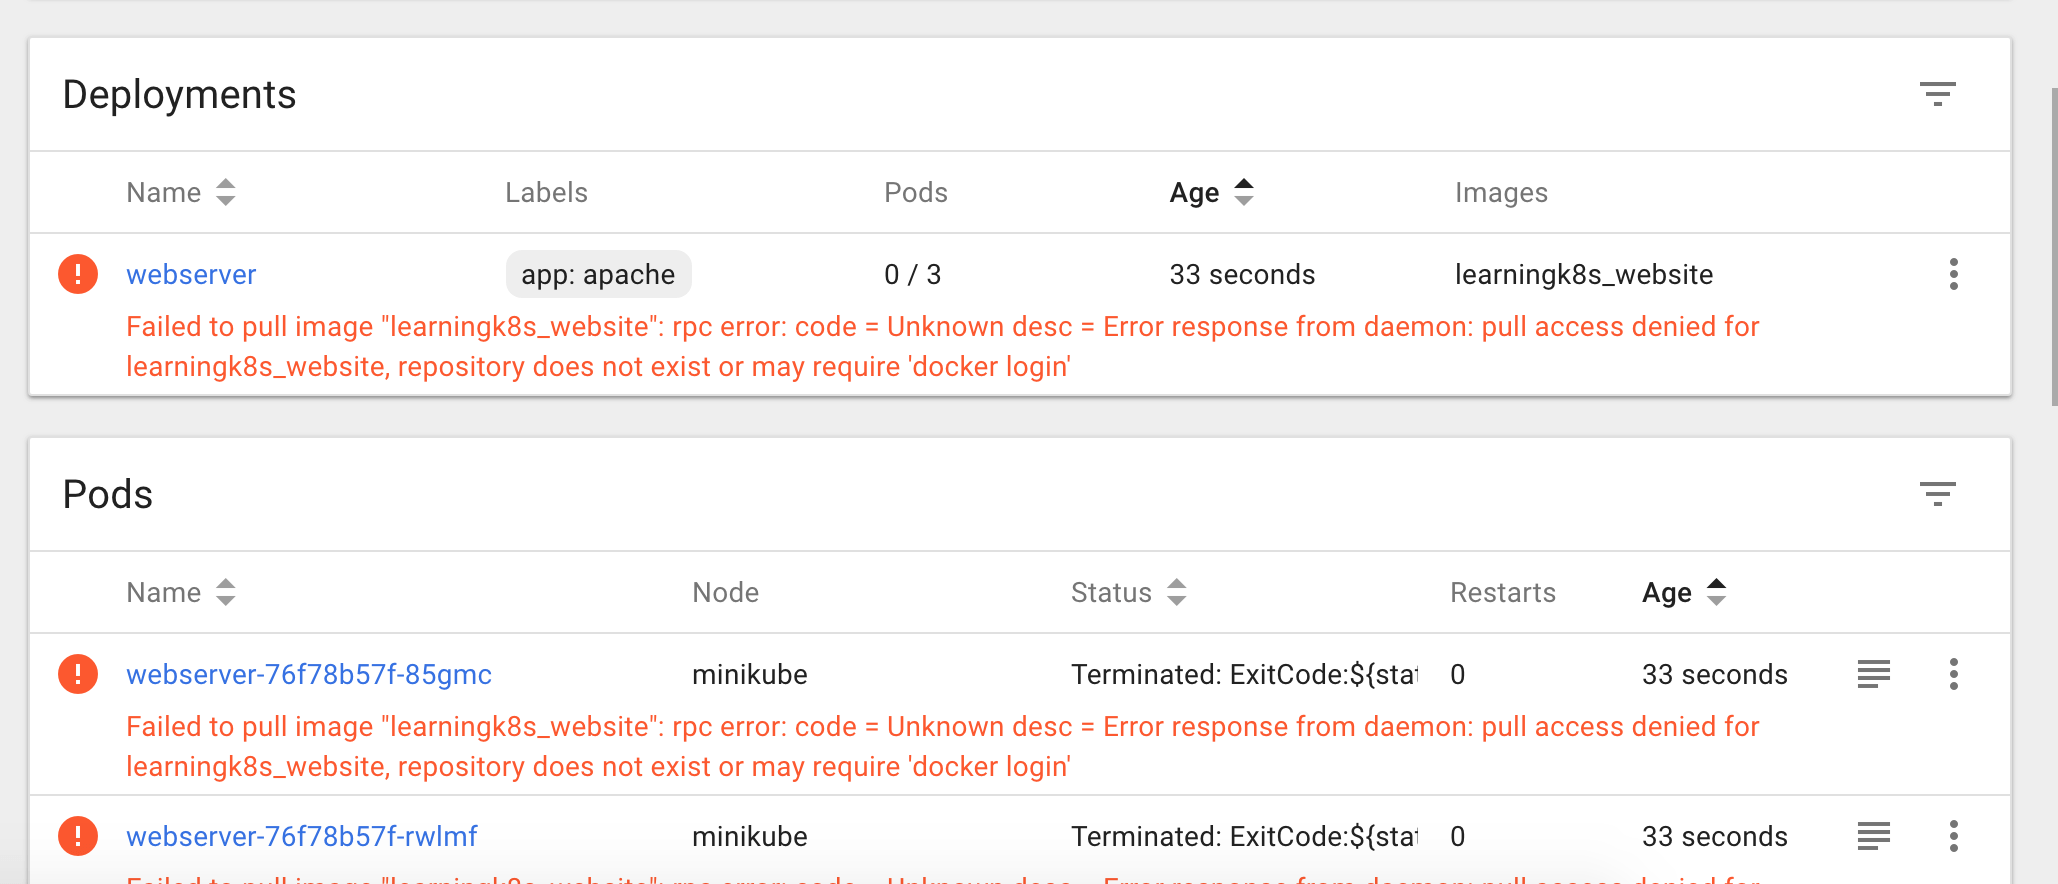
We then set replicas: 3. It means that a web server will have 3 instances. In the containers section I added imagePullPolicy to Never. The reason I had to do is that if you don’t do it, it tries to pull the image from main DockerHub website and if does not found, it gives error like below:
Since I already have prepared the image locally hence I am going to use it.
The deployment file is ready, I am going to run the following command to deploy it:
kubectl create -f webserver.yaml
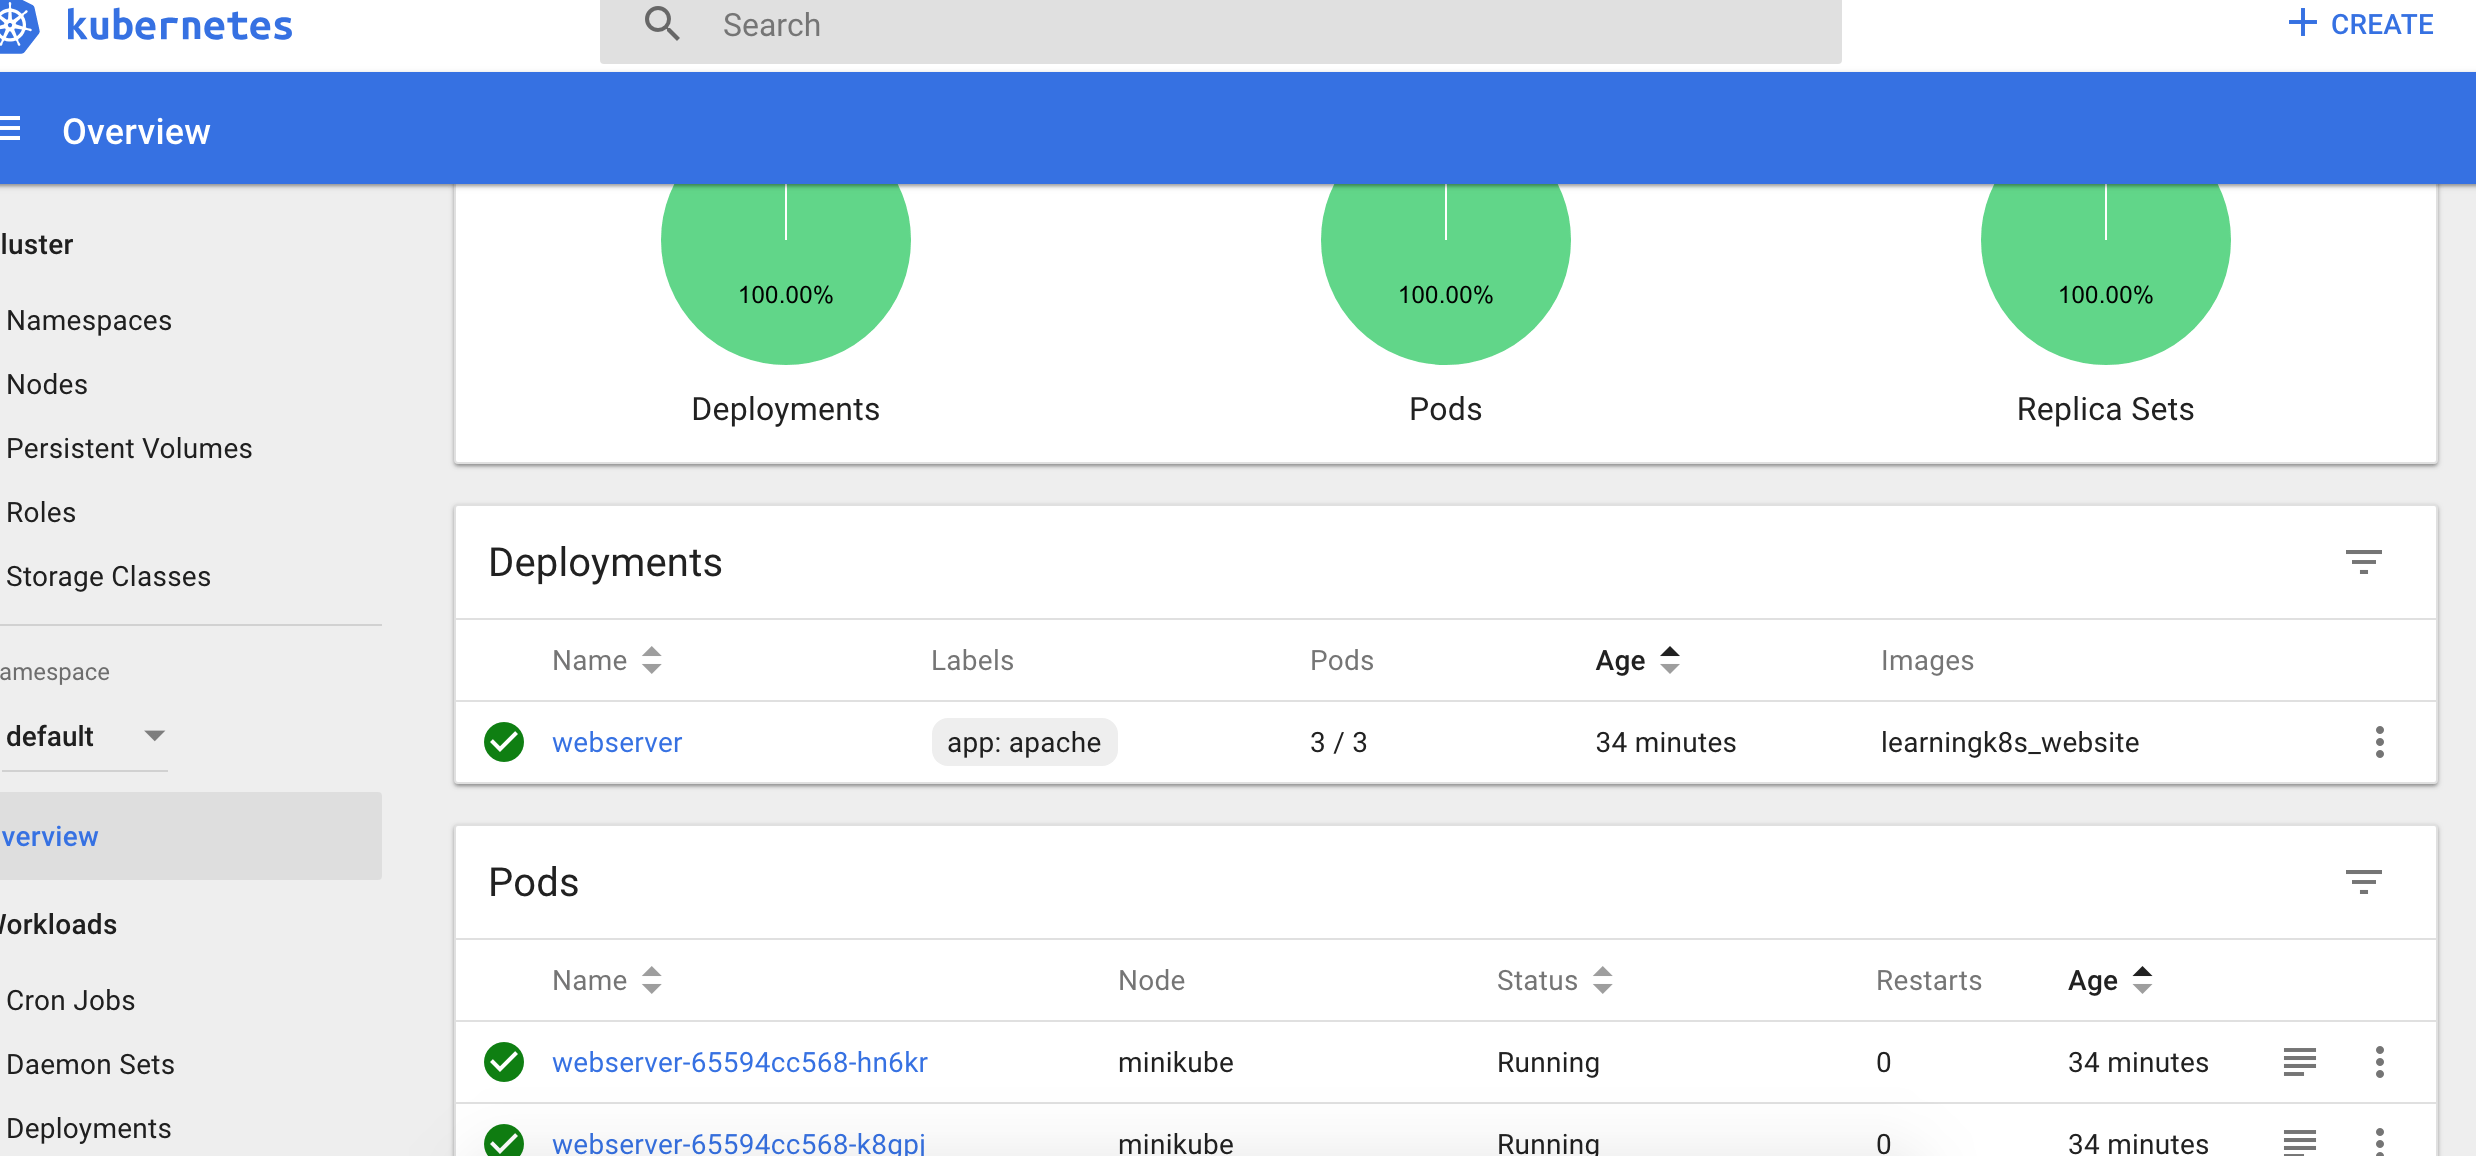
As you can see, 3 pods are now created for the deployment webserver.
You can also run kubectl get pods in the terminal to get the response:
➜  LearningK8s kubectl get pods
NAME                         READY   STATUS    RESTARTS   AGE
webserver-65594cc568-hn6kr   1/1     Running   0          43m
webserver-65594cc568-k8gpj   1/1     Running   0          43m
webserver-65594cc568-vvr4s   1/1     Running   0          43m
If you are on the dashboard, clicking on a single pod gives you more details:

kubectl describe pod webserver-65594cc568-hn6kr and it returns:

Alright, the pod is created but we can’t access it despite having its IP, the reason because the Pod IP is not public, more, the life of pod is uncertain so even if we know the IP it’s useless to use it in our app. So is there any solution? Yes, there it is and it’s called service.
Kubernetes Service
A service is responsible to make possible accessing multiple pods in a way that the end-user does not know which application instance is being used. When a user tries to access an app, for instance, a web server here, it actually makes a request to a service which itself then check where it should forward the request.
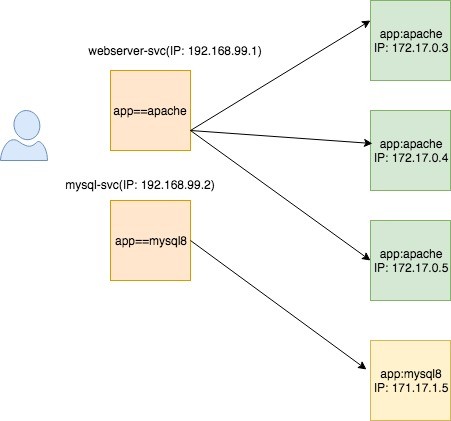
Makes sense, No? Now in order to access the webserver you will just access the IP and port as deifned in the service configuration file.
apiVersion: v1
kind: Service
metadata:
  name: web-service
  labels:
    run: web-service
spec:
  type: LoadBalancer
  ports:
  - port: 80
    protocol: TCP
  selector:
    app: apache
Here the type is selected to LoadBalancer because we want the service to decide the best pod to serve the request. By doing this you are automatically scaling your app from one server to the multiple web servers to deal with high traffic. How awesome is that! We will use the same kubectl create -f webserver-svc.yaml command. The create command knows which kind of obect to be created by reading kind attribute. You coud have a single file for both deployment and service seperated by --
Once the service is created, you can see it in the dashboard as well as via CLI. Running a will give you the following result:
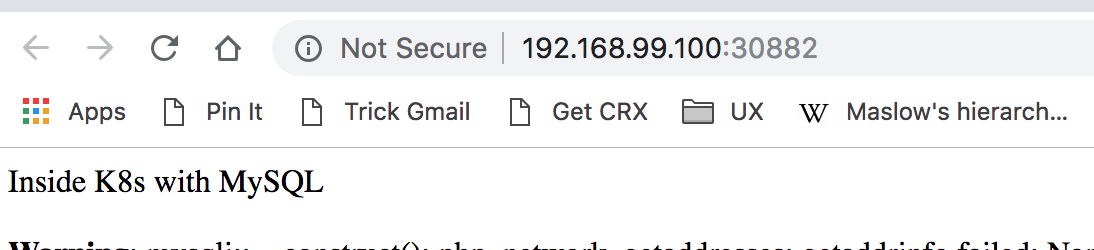
➜  LearningK8s kubectl get svc
NAME          TYPE           CLUSTER-IP       EXTERNAL-IP   PORT(S)        AGE
kubernetes    ClusterIP      10.96.0.1        <none>        443/TCP        3d9h
web-service   LoadBalancer   10.103.182.115   <pending>     80:30882/TCP   5m33s
Don’t worry about <pending> thing. It is because we are using Loadbalancer and since we are on minikube instead of some Cloud Provider, it will remain pending. In case if you run on Google Cloud or Azure you will get an IP for it.
Now, the service is ready, it’s time to check whether the webserver is running. There are two ways to run it. First, run minikube service list and it will return you the IP along with the port. The other way is minikube service web-service which again will open the same URL. If all goes well you should see this page:
Same method of creating deployment and service for MySQLDB but this time only a single instnace of MySQLDB will be used.
apiVersion: apps/v1 # for versions before 1.9.0 use apps/v1beta2
kind: Deployment
metadata:
  name: mysql
spec:
  selector:
    matchLabels:
      app: mysql8
  strategy:
    type: Recreate
  template:
    metadata:
      labels:
        app: mysql8
    spec:
      containers:
      - image: mysql:8.0
        name: mysql
        imagePullPolicy: Never
        env:
        - name: MYSQL_ROOT_PASSWORD
          value: .sweetpwd.
        - name: MYSQL_DATABASE
          value: my_db
        - name: MYSQL_USER
          value: db_user
        - name: MYSQL_PASSWORD
          value: .mypwd
        args: ["--default-authentication-plugin=mysql_native_password"]
        ports:
        - containerPort: 3306
          name: mysql8
Just like we did in docker, here we pass the mysql8 related arguments as args and environment variables also passed in. Now, let’s create the relevant service.
apiVersion: v1
kind: Service
metadata:
  name: mysql8-service
  labels:
    app: mysql8
spec:
  type: NodePort
  ports:
  - port: 3306
    protocol: TCP
  selector:
    app: mysql8
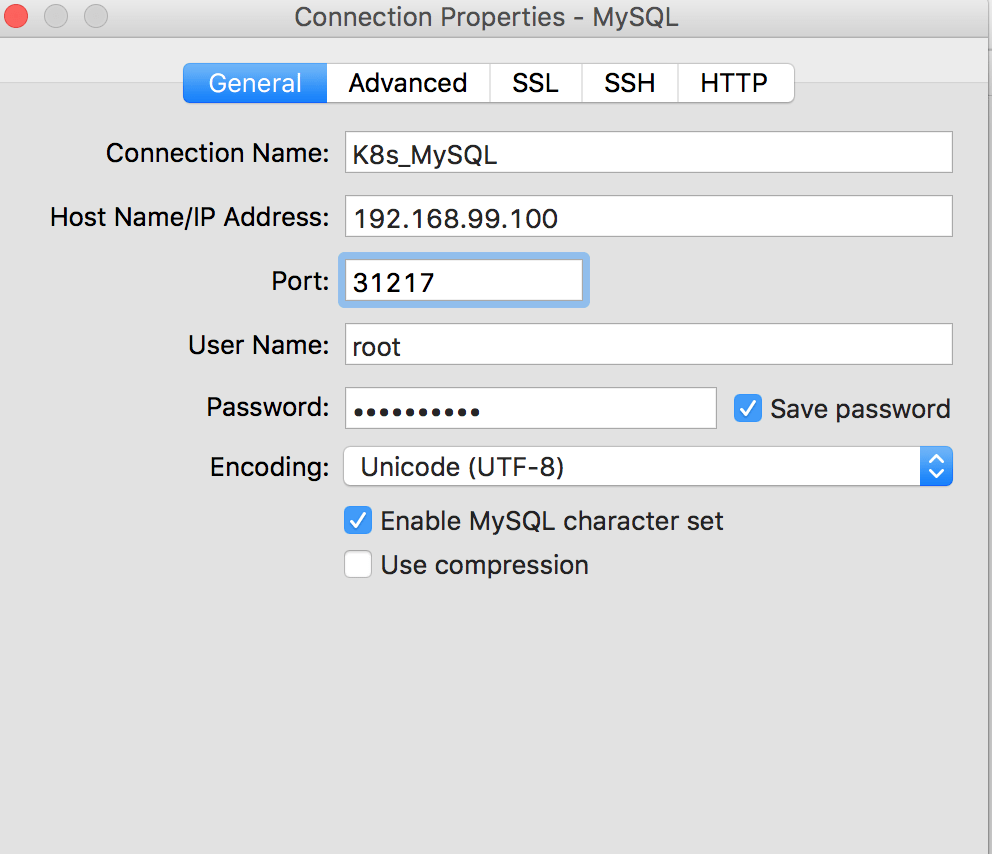
Here I set the the type to NodePort because I want to connect my favorite MySQL client with the DB inside the cluster. I can do it with LoadBalancer as well but since we are using a single DB server so NodePort is good enough to do our work.
Alright, the MySQL service is created by running kubectl create -f mysql-svc.yaml which we can witness on the dashboard.
➜  LearningK8s minikube service list
|-------------|----------------------|-----------------------------|
|  NAMESPACE  |         NAME         |             URL             |
|-------------|----------------------|-----------------------------|
| default     | kubernetes           | No node port                |
| default     | mysql8-service       | http://192.168.99.100:31217 |
| default     | web-service          | http://192.168.99.100:30882 |
| kube-system | kube-dns             | No node port                |
| kube-system | kubernetes-dashboard | http://192.168.99.100:30000 |
|-------------|----------------------|-----------------------------|
You can connect your local MySQL client.
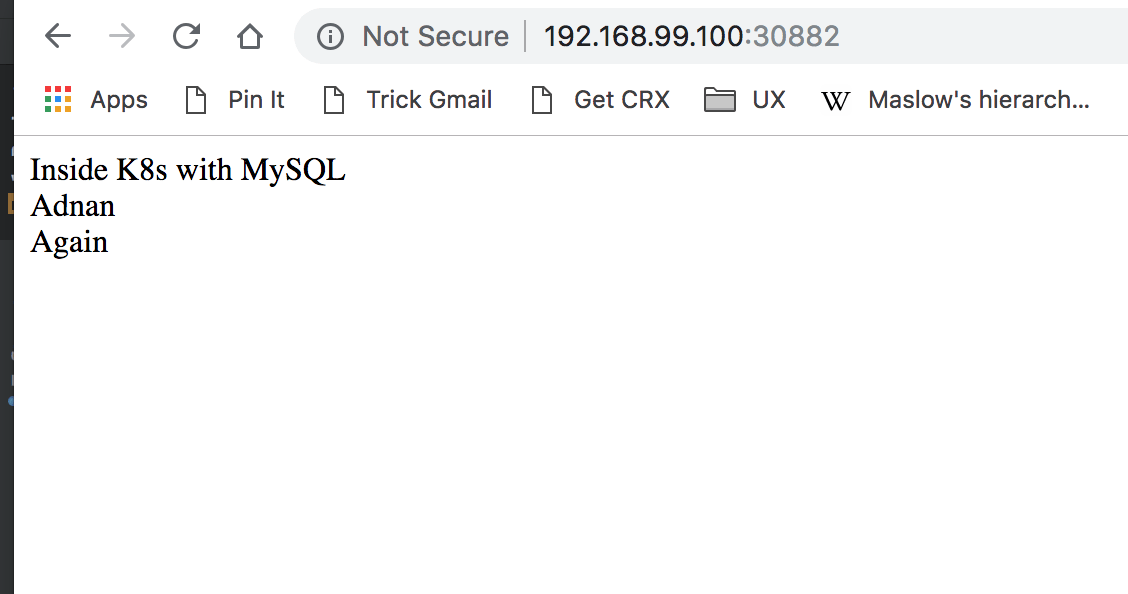
Now I make the required connection string changes in the code:
<?php
echo "Inside K8s with MySQL <br>";
$conn = new mysqli("mysql8-service", "root", ".sweetpwd.", "my_db");
// Check connection
if ($conn->connect_error) {
	die("Connection failed: " . $conn->connect_error);
}

$sql = "SELECT name FROM users";
$result = $conn->query($sql);

if ($result->num_rows > 0) {
	// output data of each row
	while($row = $result->fetch_assoc()) {
		echo $row['name']."<br>";
	}
} else {
	echo "0 results";
}
$conn->close();
Like Docker here I passed the service name instead of the actual IP because both IP/Port could change and service name here will resolve the actual address. If everything goes fine then this screen should made your day.
OK, you did almost your job, only two things left. Right now If you make changes in code, it will not reflect. Also, if you remove MySQL deployment or even restart minikube it will also erase the data. What is required is mounting volume.
So, for making changes in the code we have to first mount local folder in Minikube and then mount minikube folder to the cluster. For that, we have to stop minikube and start with the following parameters.
minikube start --mount-string /Development/PetProjects/LearningK8s/src:/data --mount
I passed the local path with --mount-string which is then mapped to /data inside minikube. In the end, I passed the --mount parameter.
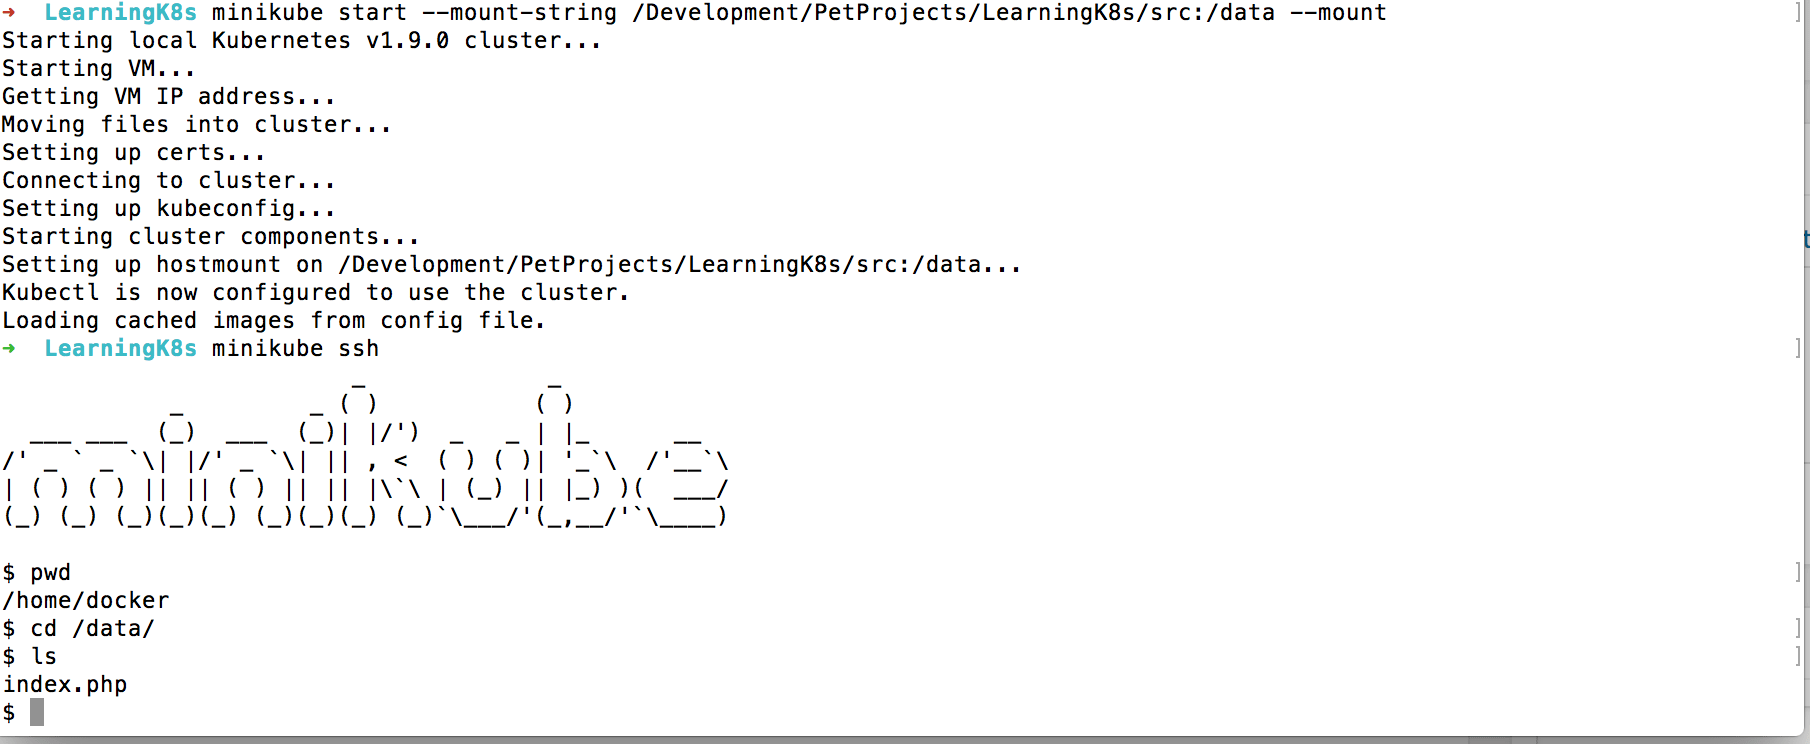
You can see that the index.php exists in data folder. This is 50% done, we still have to push things to the machines within containers. For that I will make changes in the Deployment so that the spec will now look like:
spec:
      containers:
      - name: php-apache
        image: learningk8s_website
        imagePullPolicy: Never
        ports:
        - containerPort: 80
        volumeMounts:
        - name: hostvol
          mountPath: /var/www/html/
      volumes:
        - name: hostvol
          hostPath:
            path: /data
I created a volume with name hostvol and then mount it to the DocumentRoot of Apache. I made changes and then ran the following command to update the existing deployment.
kubectl apply -f webserver.yaml
Now if you make changes in code it would reflect instantly as if you are working on local machine.
So far so good, now all is left to retain MySQL data. In order to do it, we need PersistentVolumeClaim
Persistent Volume Claim configuration allocates space so that future MySQL data can be stored independent of a pod’s life.
apiVersion: v1
kind: PersistentVolumeClaim
metadata:
  name: mysql-pv-claim
  labels:
    app: mysql8
spec:
  accessModes:
    - ReadWriteOnce
  resources:
    requests:
      storage: 5Gi #5 GB
Here ReadWriteOnce access mode is set which means that only a single node can mount it in RW mode. In a real scenario you might have to set ReadWriteMany. Create the claim by running kubectl create -f mysql-pv-claim.yaml and then update the MySQL deployment. Don’t forget to create the claim first otherwise you would have mounting issue.
spec:
      containers:
      - image: mysql:8.0
        name: mysql
        imagePullPolicy: Never
        env:
        - name: MYSQL_ROOT_PASSWORD
          value: .sweetpwd.
        - name: MYSQL_DATABASE
          value: my_db
        - name: MYSQL_USER
          value: db_user
        - name: MYSQL_PASSWORD
          value: .mypwd
        args: ["--default-authentication-plugin=mysql_native_password"]
        ports:
        - containerPort: 3306
          name: mysql8
        volumeMounts:
          - name: mysql-persistent-storage
            mountPath: /var/lib/mysql
      volumes:
      - name: mysql-persistent-storage
        persistentVolumeClaim:
          claimName: mysql-pv-claim
I set the persistentVolumeClaim to the one created by us and also mount to default path of mysql server. Update the MySQL file as did for the web server by running kubectl apply -f mysql.yaml
Go ahead and delete the MySQL related pod or even restart minikube, your data will remain intact.
If you are done with your work then run eval $(minikube docker-env -u) to detact the Docker inside K8s.
Conclusion
So in this post you learn how to install and configure Kubernetes locally and deploy your first web application. I have just touched the surface of the K8s, it is more than what is covered here. Especially the Rolling Update feature is amazing to deploy upgraded apps in a way it does not go down for a moment. I will see if I can cover in future posts. For now, that’s it with the DevOps series.
As always code is avaiable on Github.

