Introduction
Chatbots are essential tools because they make communication between people and technology much easier. These clever programs can answer questions, provide helpful information, and even assist with tasks. In various fields like real estate, chatbots play a crucial role by engaging with potential clients, enhancing user experience, and helping businesses capture valuable leads. They’re like smart assistants who work around the clock, making interactions smoother and more efficient for everyone involved.
Chatbots come in different levels of complexity, categorized as either stateless or stateful. Stateless chatbots treat each conversation as if it’s a new interaction with a user, while stateful chatbots can remember and consider past exchanges when generating responses.
Integrating a chatbot into a service or sales department is often a low or no-code endeavor. Numerous chatbot service providers offer tools that empower developers to create conversational user interfaces seamlessly integrated into third-party business applications.
In this post, I am going to develop a real estate chatbot that will display properties from the website and then capture all information about the potential lead. I am using the OnTheMarket website for the sake of the demo. I am using the VoiceFlow chatbot platform which is very yet very powerful. Unlike many others, VoiceFlow provides a trial account for 2 weeks, enough to test your idea. I will be using unofficial APIs of OnTheMarket in Python Flask. There will also be a web interface to display captured leads. If you are in a hurry and want to see how it works, watch the video below:
Introduction to VoiceFlow
VoiceFlow is a chatbot platform that facilitates you to create and deploy your chatbot whether they are AI-based or non-AI. It provides an easy-to-use designer to create the flow of your bot and a Javascript code snippet to deploy your bot on a website. The bot could be integrated with other platforms as well for instance WhatsApp, Instagram, etc with the help of 3rd party tools. It provides a 2-week trial which is enough to test things, plus they also offer a Sandbox mode. Visit their pricing page for further details.
Bot Development
OK! So we are going to make a chatbot for OnTheMarket(OTM), one of the famous property portals for the UK. The flow of the bot is simple; it will ask whether you want to buy a house or for rent, minimum/maximum prices, location, and the number of bedrooms, and return a list of properties within the chatbot. The user will select the properties he is interested in and then his contact details along with the preferences will be stored in the database. That’s it.
Rest API for properties
First and foremost, we need some way to send user preferences to the OTM website and retrieve the relevant listings. I am creating a simple endpoint in Flask that will access the unofficial OnTheMarket API to retrieve data.
def search_properties(search_type, location_id, min_price, max_price, min_bedrooms, property_type):
    property_types = [
        'semi-detached',
        'terraced',
        'bungalows',
        'flats-apartments',
    ]
    search_types = [
        'to-rent',
        'for-sale',
    ]

    headers = {
        'authority': 'www.onthemarket.com',
        'accept': 'application/json',
        'accept-language': 'en-US,en;q=0.9,ur;q=0.8,zh-CN;q=0.7,zh;q=0.6',
        'cache-control': 'no-cache',
        'content-type': 'application/json; charset=utf-8',
        'dnt': '1',
        'pragma': 'no-cache',
        'referer': 'https://www.onthemarket.com/to-rent/property/london/?max-price=1250&min-bedrooms=1&min-price=100',
        'sec-ch-ua': '"Not_A Brand";v="8", "Chromium";v="120", "Google Chrome";v="120"',
        'sec-ch-ua-mobile': '?0',
        'sec-ch-ua-platform': '"macOS"',
        'sec-fetch-dest': 'empty',
        'sec-fetch-mode': 'cors',
        'sec-fetch-site': 'same-origin',
        'user-agent': 'Mozilla/5.0 (Macintosh; Intel Mac OS X 10_15_7) AppleWebKit/537.36 (KHTML, like Gecko) Chrome/120.0.0.0 Safari/537.36',
    }
    params = {
        'search-type': search_type,
        'location-id': location_id,
        'min-price': min_price,
        'max-price': max_price,
        'min-bedrooms': min_bedrooms,
        'prop-types': property_types,
    }
    r = requests.get('https://www.onthemarket.com/async/search/properties/', params=params, headers=headers)
    r.raise_for_status()
    data = r.json()['properties']
    return data
The above function accesses the OTM’s endpoint and returns data in JSON format.
@app.route('/find', methods=['POST'])
def find_properties():
    refined_properties = []
    return_msg = {}
    try:
        form_data = request.form.to_dict()

        properties = search_properties(
            search_type=form_data['search-type'],
            location_id=form_data['location-id'],
            min_price=int(form_data['min-price']),
            max_price=int(form_data['max-price']),
            min_bedrooms=int(form_data['min-bedrooms']),
            property_type=form_data['prop-type']
        )

        for property in properties:
            if 'display_address' in property:
                address = property['display_address']
                price = property['price']
                property_link = property['property-link']
                image = property['cover-images']['default']
                refined_properties.append(
                    {'title': address,
                     'price': price,
                     'url': 'https://www.onthemarket.com{}'.format(property_link),
                     'image': image,
                     })
        return_msg = {'status': 'OK', 'msg': refined_properties}
    except Exception as ex:
        return_msg = {'status': 'FAIL', 'msg': str(ex)}
    finally:
        return jsonify(data=return_msg)
Then, I iterate the records and just extract the required data points. You could connect OTM’s API directly, up to you. I found this way much better and cleaner. Anyways, our API is ready but you can’t connect it with VoiceFlow because it is running locally. So what’s the solution? Well, use ngrok for HTTP tunneling. After running the Flask app, I will just initiate ngrok by using ngrok http 5000. Make sure your Flask app is already running. If all goes well you will see something like the following:

Let’s check whether the API is working, head on to Postman, and test the POST request:
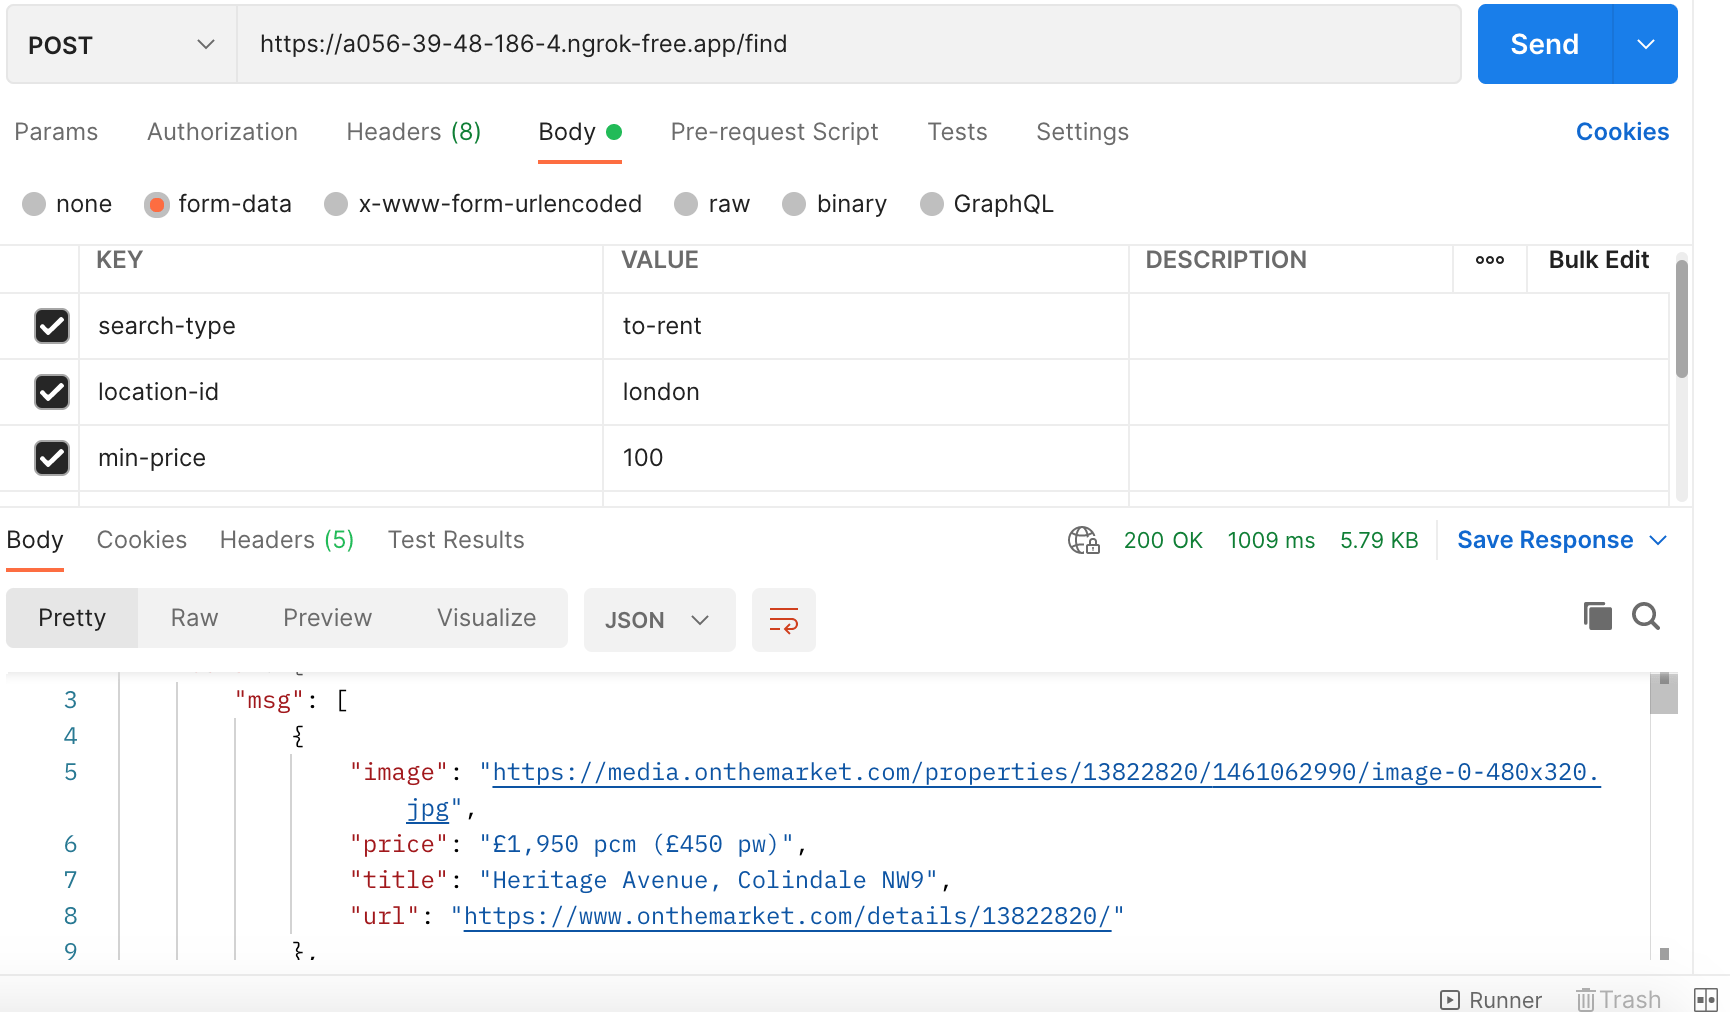
As you can see, it returned the required response
VoiceFlow Designer
Creating Project and Adding a Greeting Node
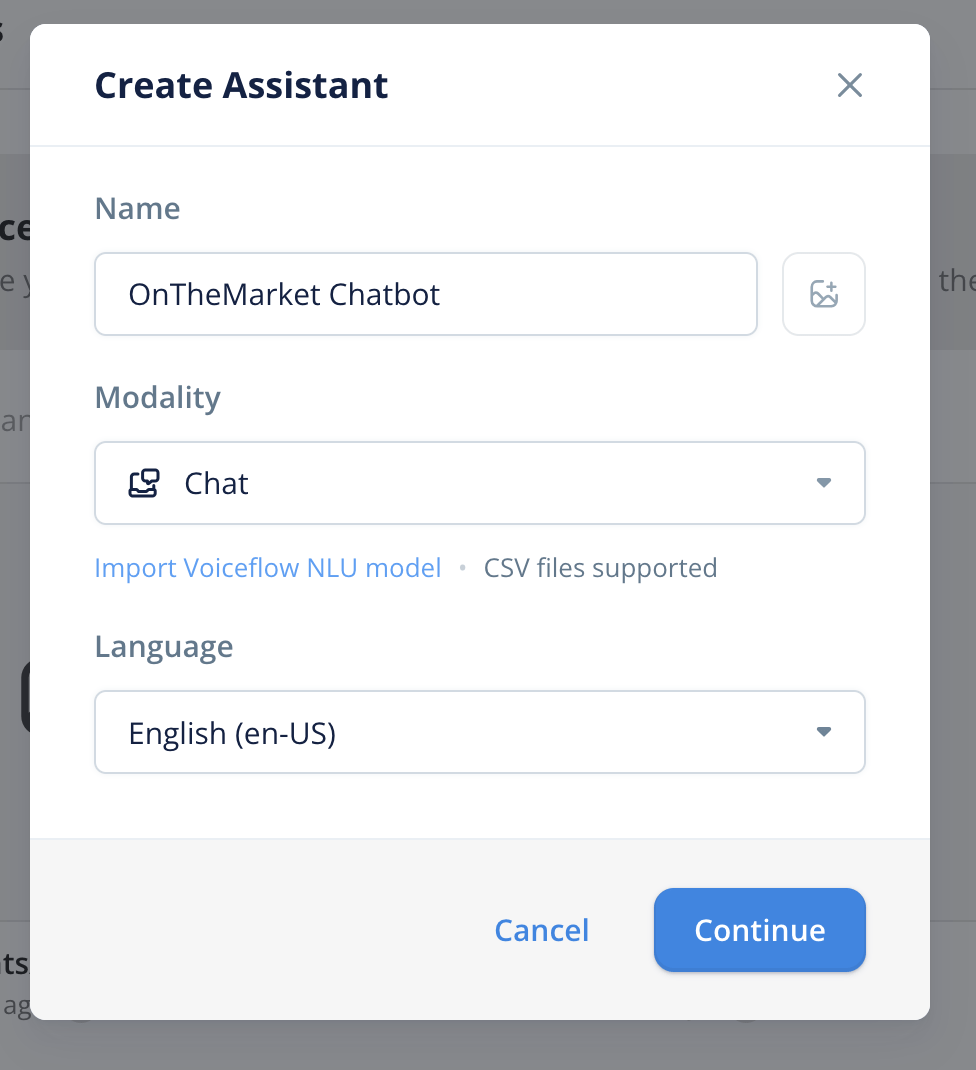
Alright, now it’s time to create our first chatbot. If you have not signed up yet, click here to do so. Assuming you are successfully registered, visit https://creator.voiceflow.com/ and hit the New Assistant button. Once you do it, you will see a dialog box like the one below. Enter your bot details.
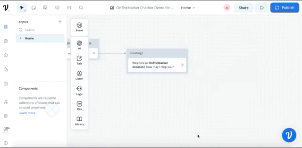
When you open the designer first time it will appear like the below, select all and hit the delete button to clear the entire canvas.


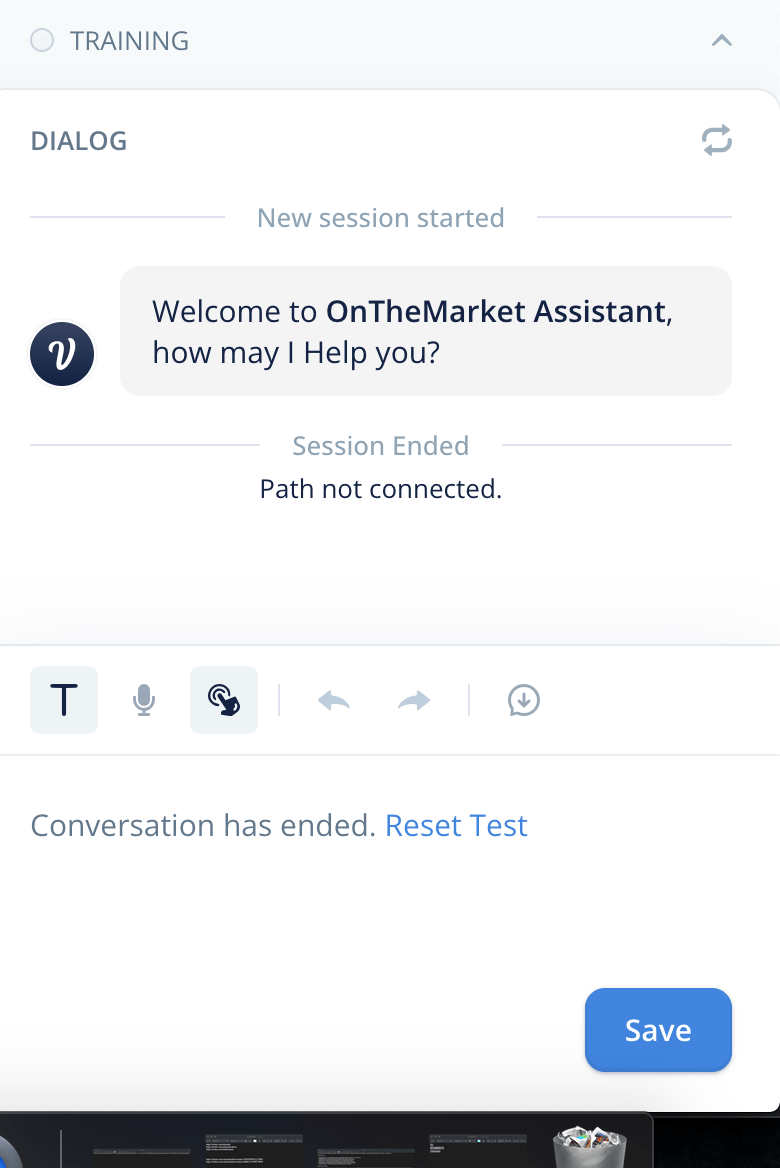
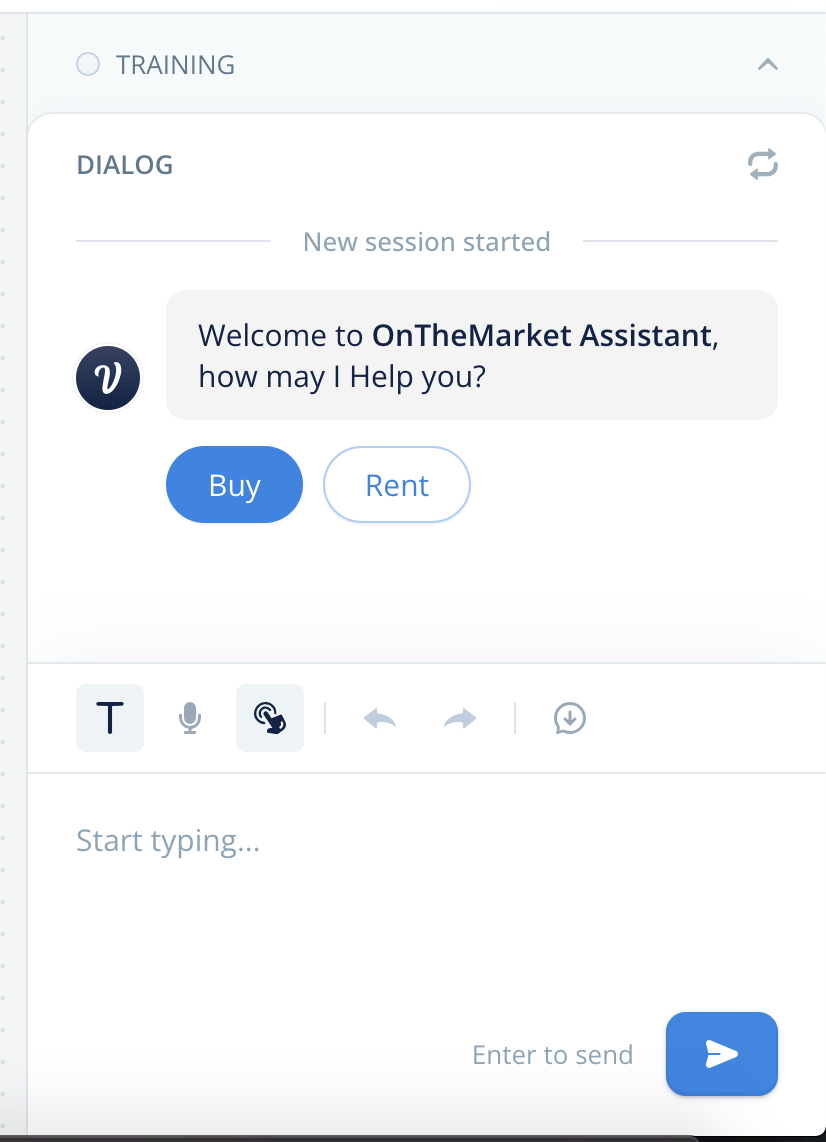
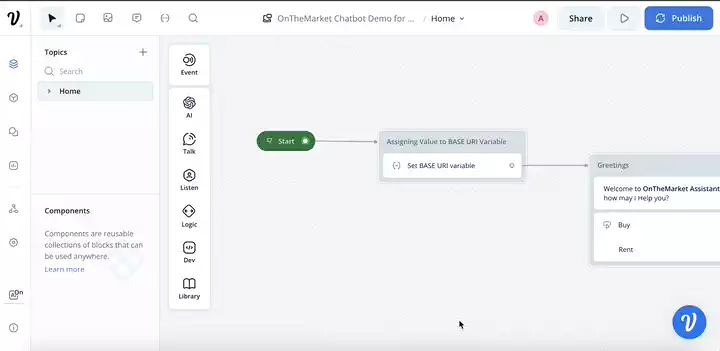
The very first thing I am going to do is to add a welcome message and then run the bot.
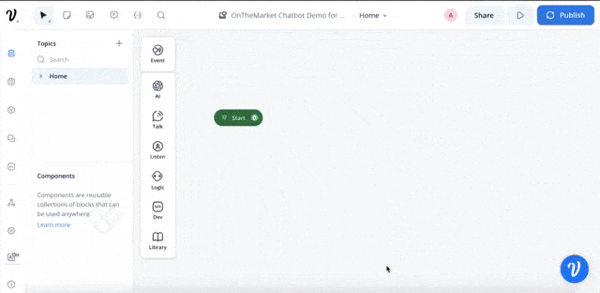
I added a Text Node for greetings and then gave it a test run after connecting the start node. There will always be an undeletable start node. Cool, isn’t it?
Now, before I move further, I want to let the bot know about the URL of my API endpoint. Since I prefer a configurable/modularized code, I will assign the base URI to a variable.
Variables
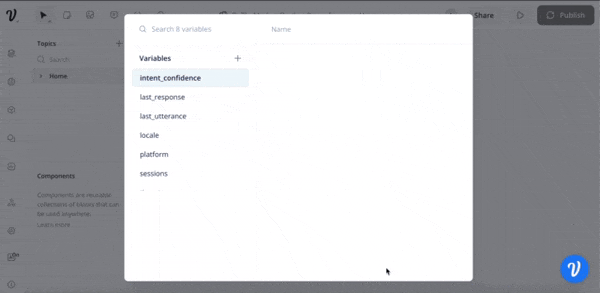
VoiceFlow has a concept of variables. If you want to work on VoiceFlow you must be well equipped with this concept. Variables in VoiceFlow can hold values that are available in other steps. There are multiple ways you can create a variable in VoiceFlow. The easiest way is to go to the Variables section(Press M) which opens a dialogue box like the one below:
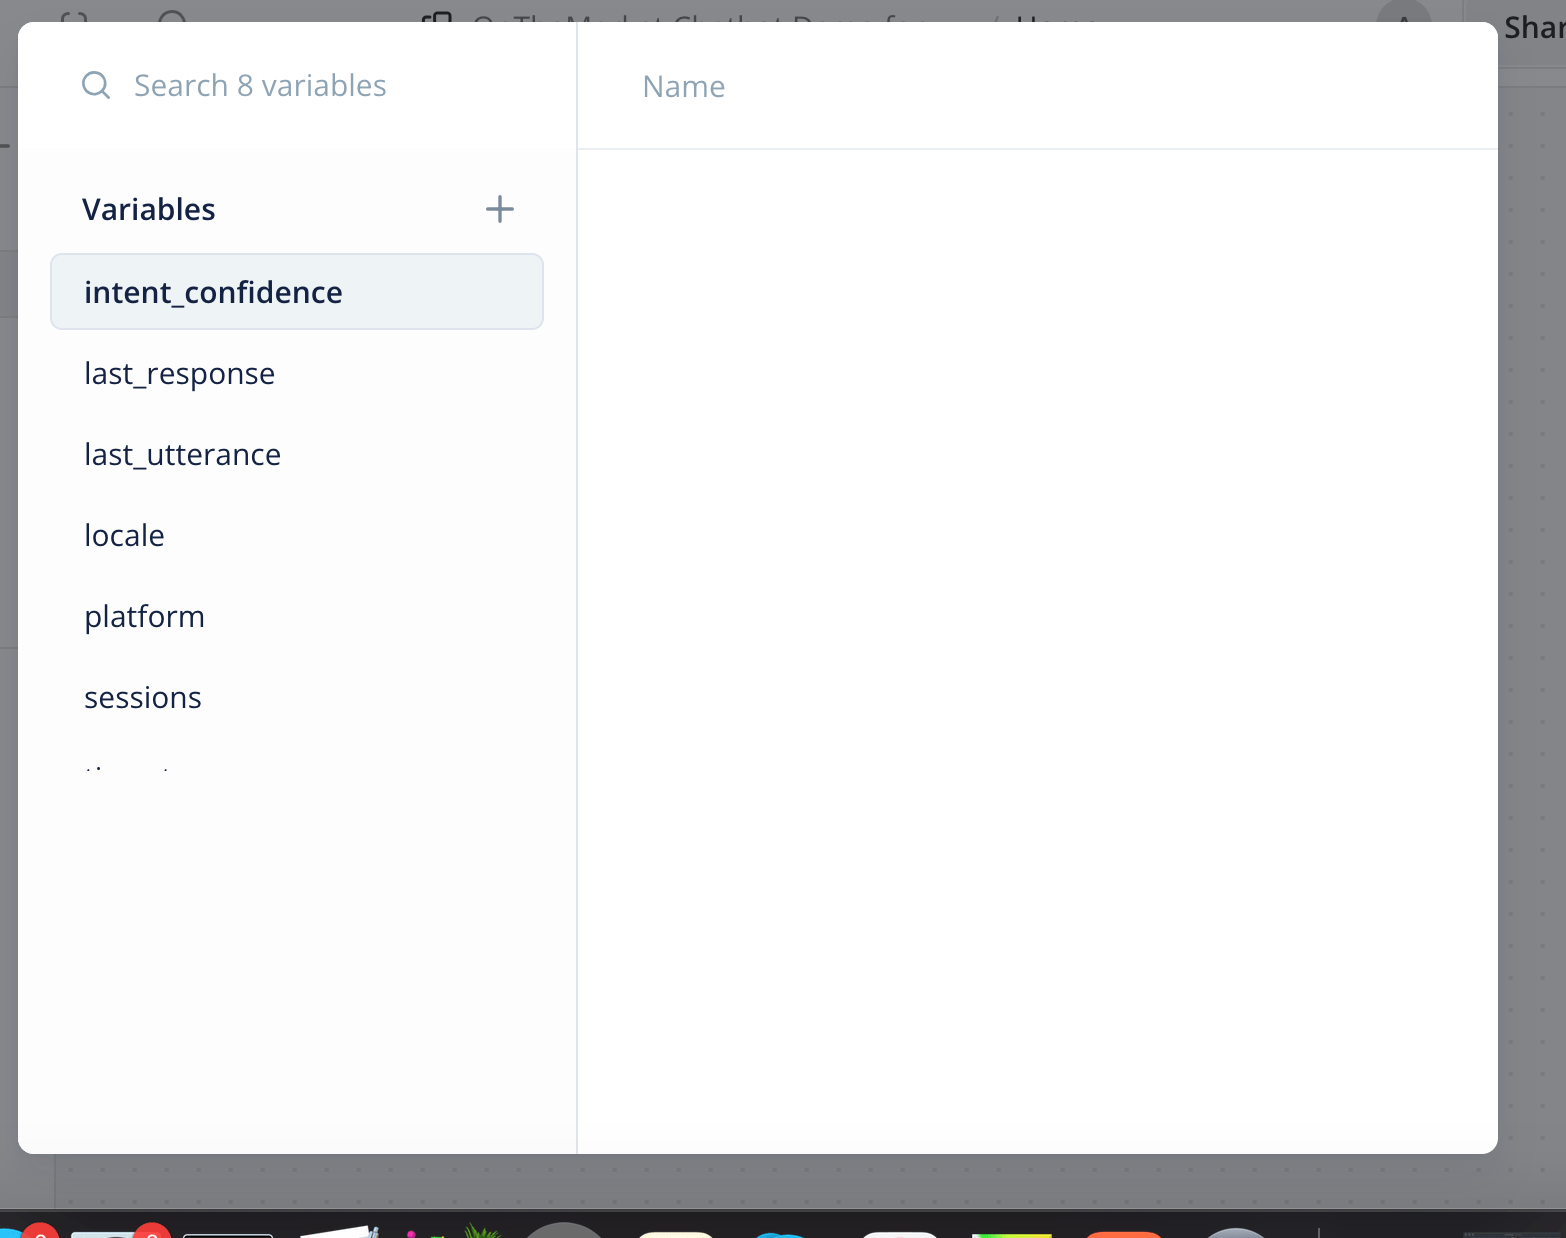
What you see above are default or system variables offered by VoiceFlow. Let’s add a variable BASE_URI
The variable has been created but not initialized! You can either use the Set step to assign a variable or you can do it in JavaScript. Yes… VoiceFlow can manipulate things in JavaScript as well!
Do note that I have added the URL within double quotes. VoiceFlow expects all strings within double quotes otherwise it does not set at all. VoiceFlow also provides you the option to debug variables which helps you understand how things are working. For clarity purposes, I am giving a static image of the debugging section.
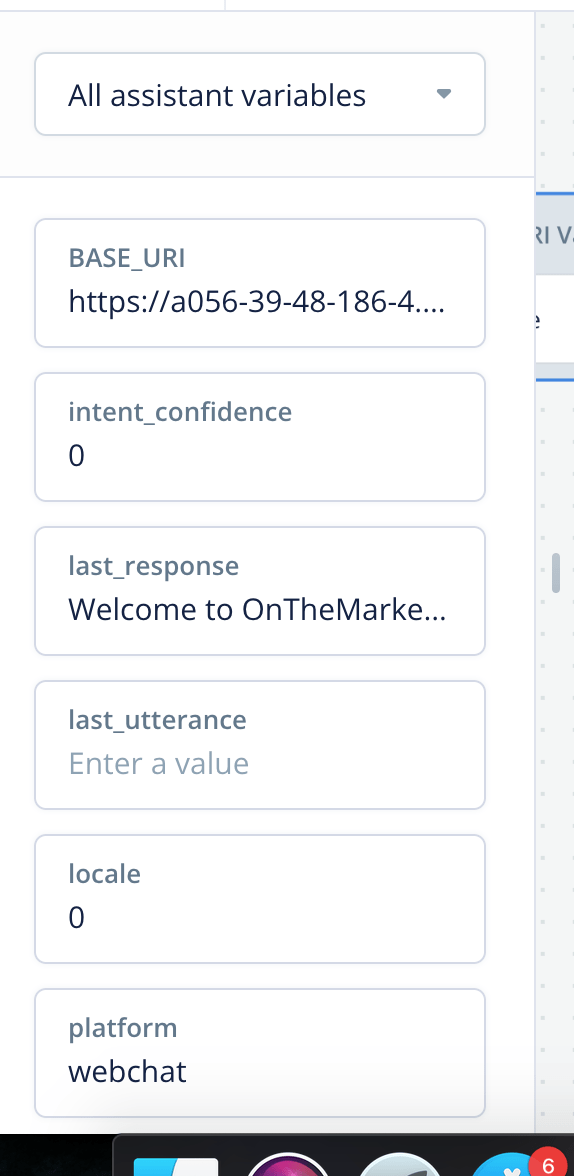
As you can see, BASE_URI is set to ngrok URL. The last_response variable contains the value returned by the chatbot. Though last_utterance is empty here, its value is set when a user enters his response. You can also use markdown syntax to format text, like the below:
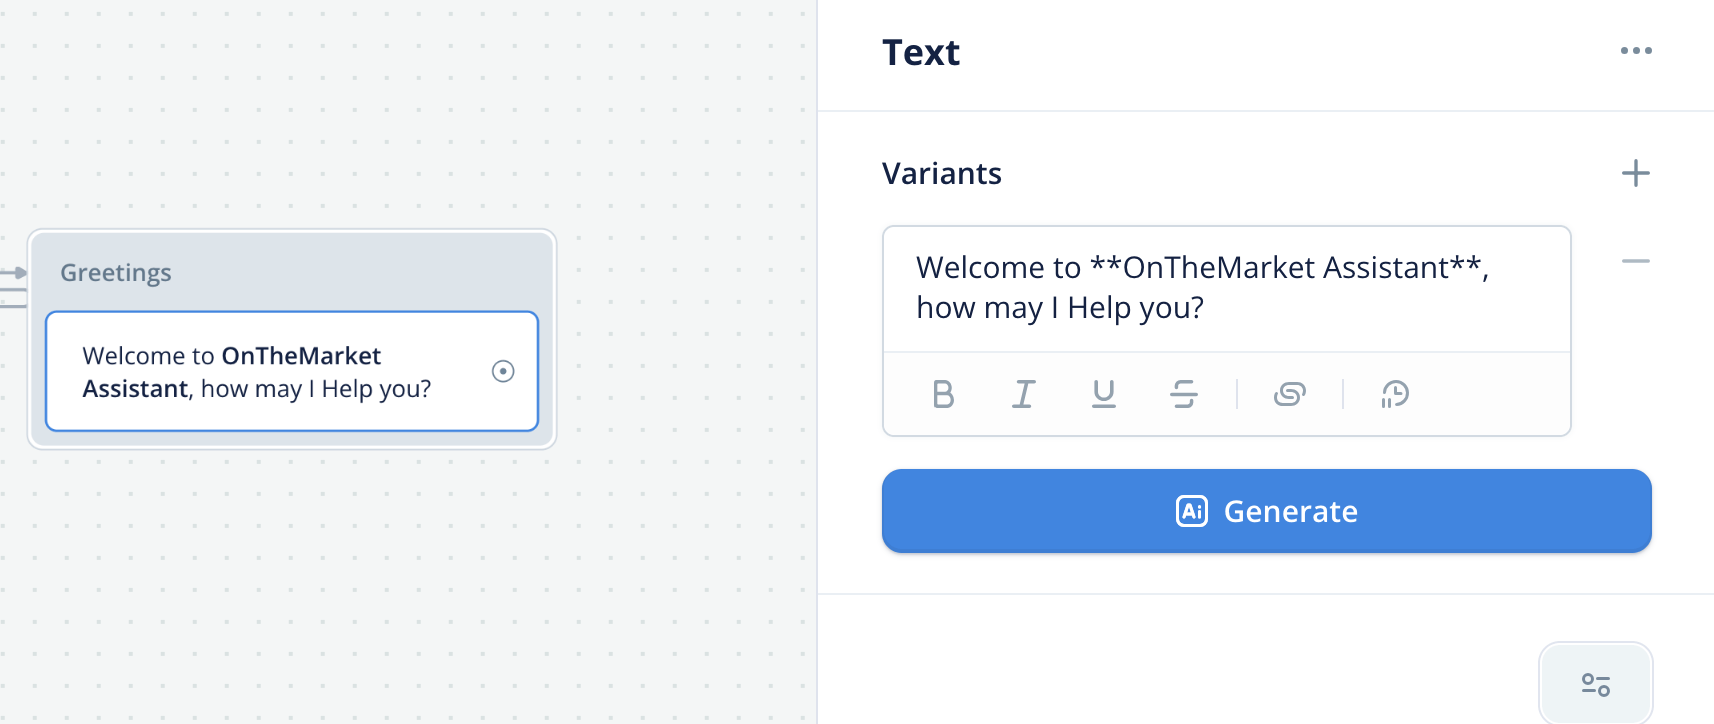
And it will appear like the below:
Now, let’s add buttons for Buy and Rent
A couple of things are happening here: We are adding two buttons and then assigning a new variable search_type and then assigning values to it. These values will help to make the API call figure out whether someone wants to buy or seeking a property for rent. This is how buttons are rendered:
And this is how they are rendered:
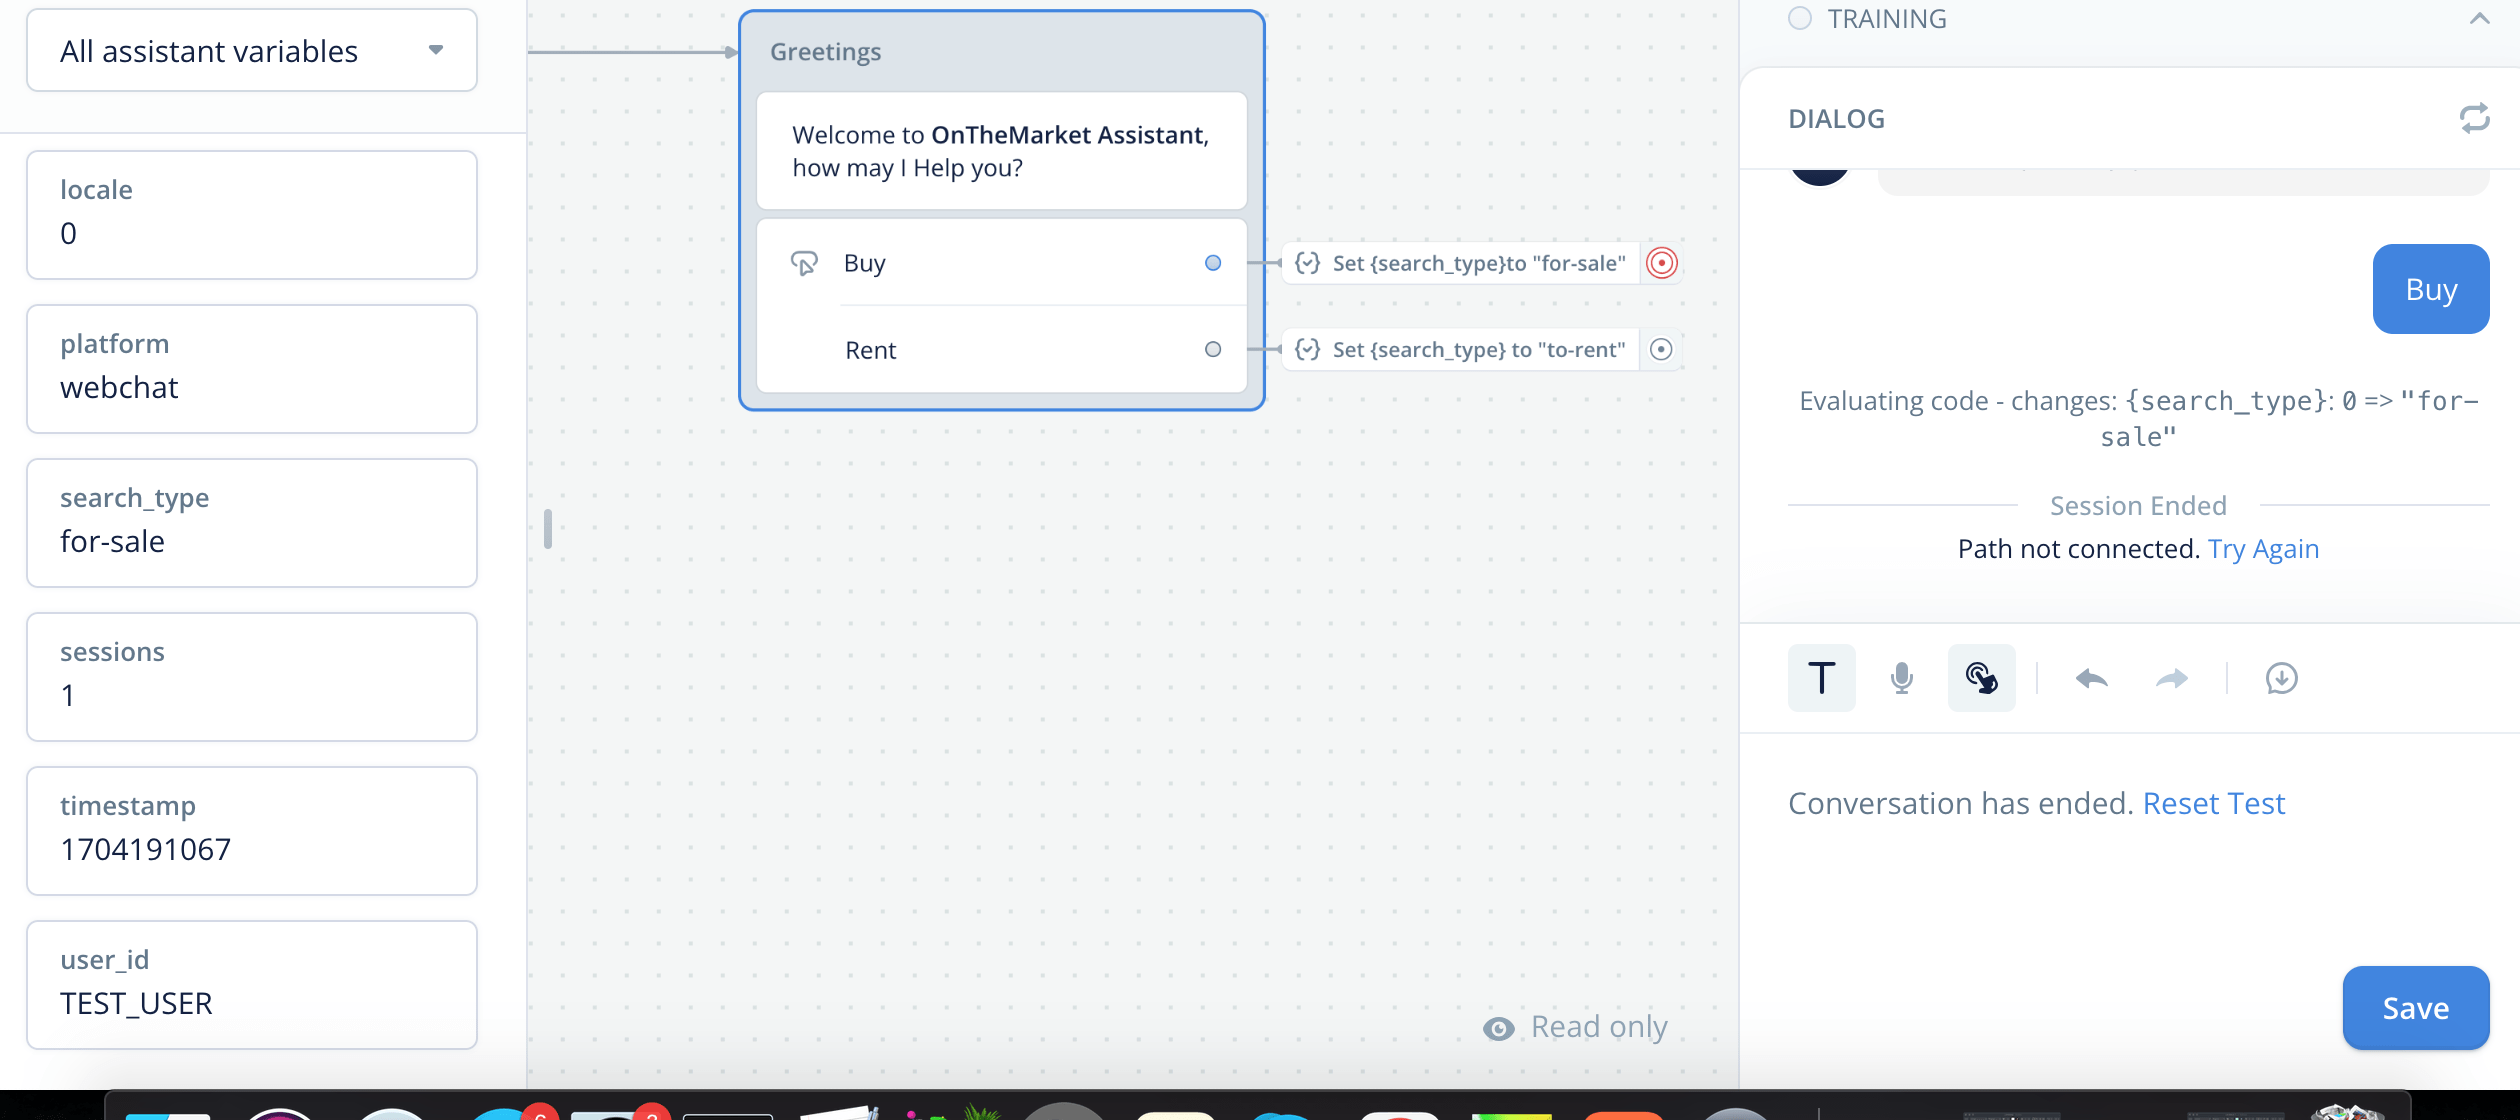
Notice the search_type value now set to for-sale
JavaScript and Buttons
Now I want to let the user know what he opted for. One simple way is to just display the value behind the search_type value but it does not look good if you are setting non-human-friendly values. The best option is to display a value based on what he selected. For that purpose, we will be using the JavaScript step.
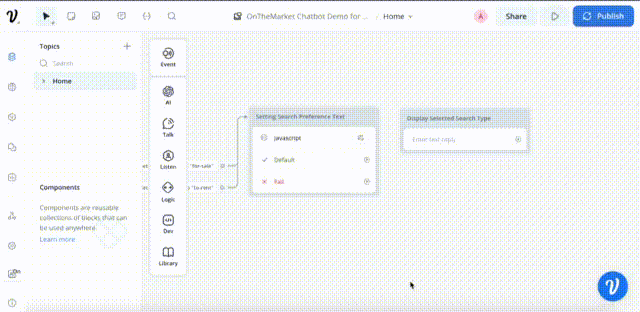
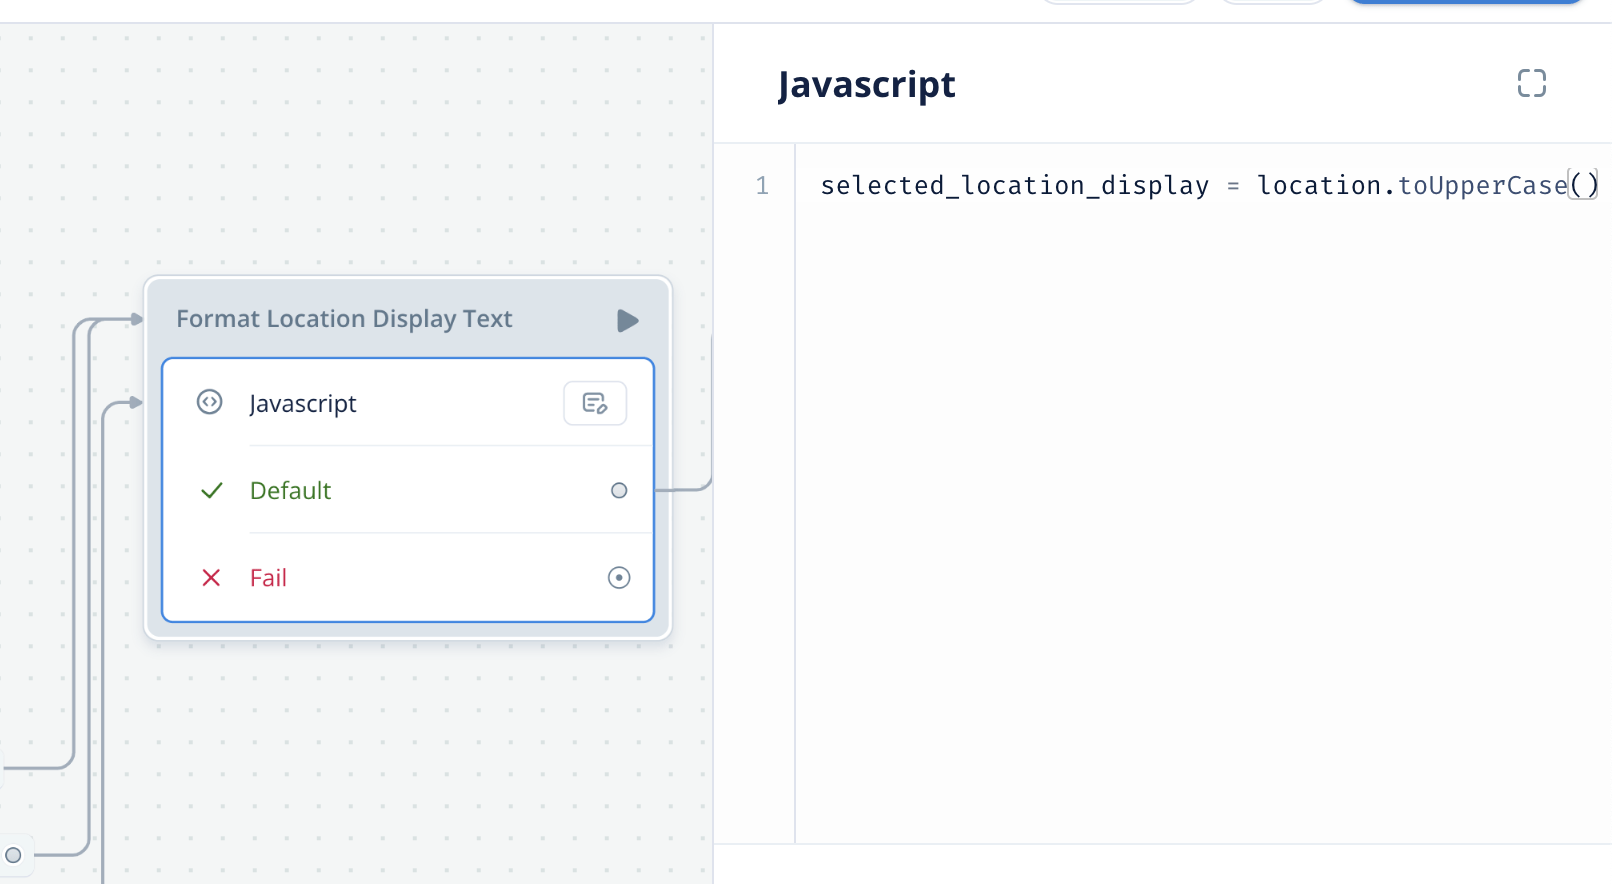
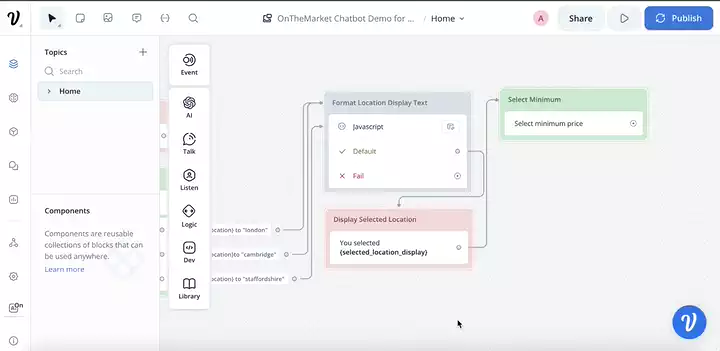
As you can see we introduced a new variable search_type_text within JavaScript and then created in the VoiceFlow system in the Text step. You could create the variable by going into the Variables section too. In either case, the variable must be created in VoiceFlow. The JavaScript step can not create a new VoiceFlow variable. Once it is created, you can display the formatted text in the bot. Next, we will select the desired location and store the selected value in location variable
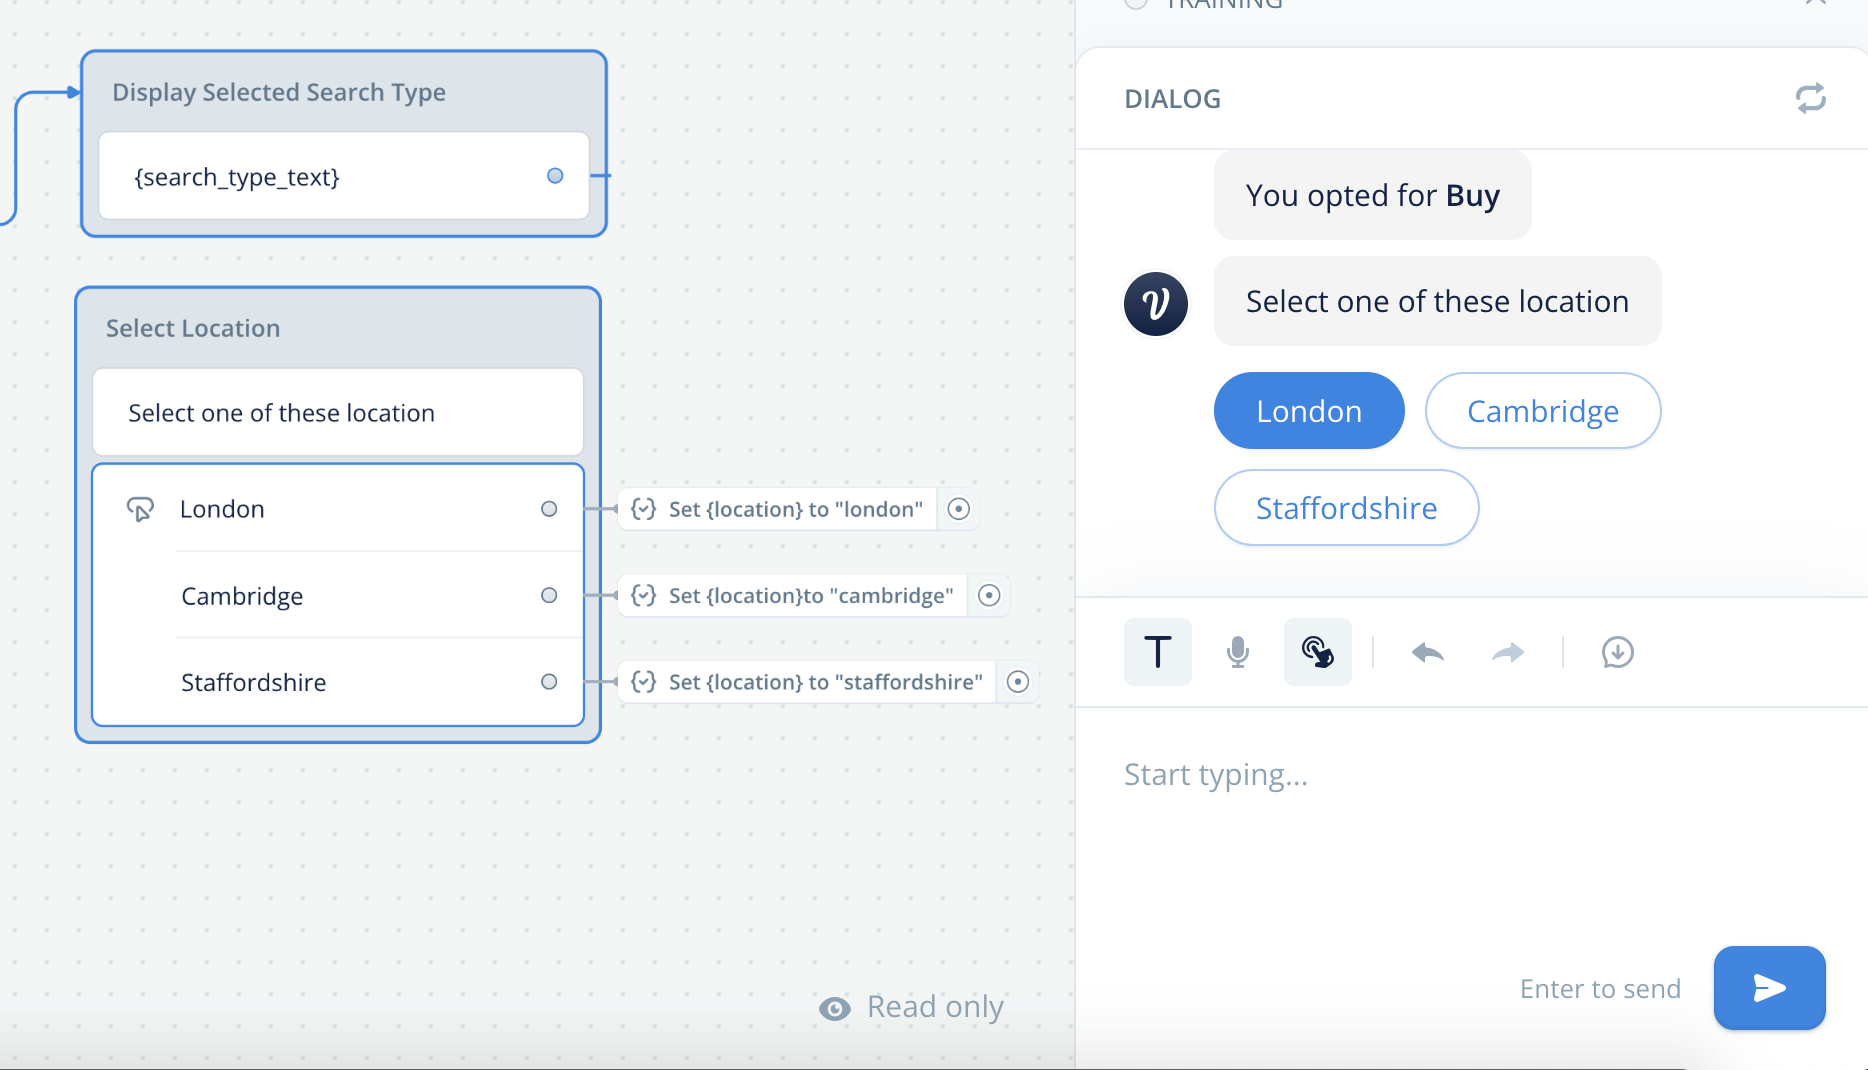
Whatever location is selected by the user, the info is stored in location a variable. Now we will be using the JavaScript step again to format the selected location for the display.
BTW, you can assign a certain color to a block or set of blocks. For instance, I assigned a pinkish color to all steps that display variable values.

Capture/Entities
Now we need to fetch the user’s preferences for minimum, maximum price, and number of bedrooms. I will show for minimum price only because it is the same for others.
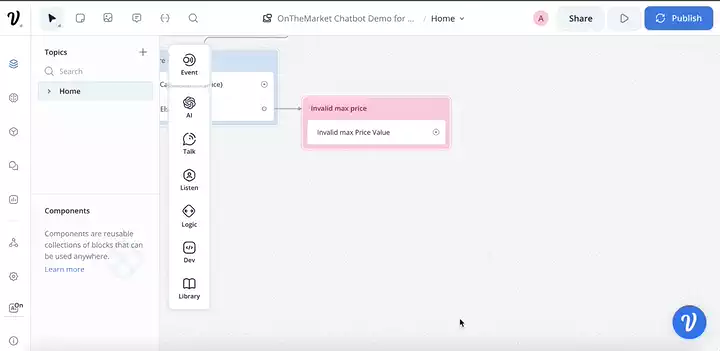
Here I introduce the concept of Entities. Besides variables, VoiceFlow gives you the option to restrict the user input against a certain format. Here I am creating an entity min_price of the type Number . You can define your own format as well but for our requirement, the number format is enough. It also supports, Name, Phone, Email, and a few other formats as well. Similarly, we will capture the value of max_price and no_of_bedrooms
The Capture step has also an option of No Match which actually gets activated if the required data format is not found.
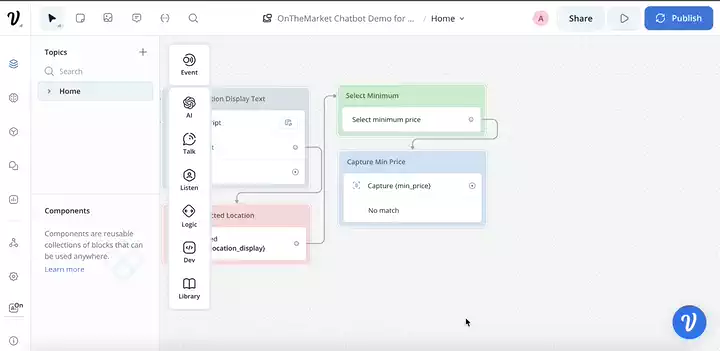
Notice it asks for training when running the bot. It is because I added a new entity here. If things go wrong, it should ask to enter the minimum price again. One way is to connect the Invalid max price block by connecting with the arrow back to the Select Minimum block, another option is to use the Action option to connect the blog which makes it a cleaner approach.
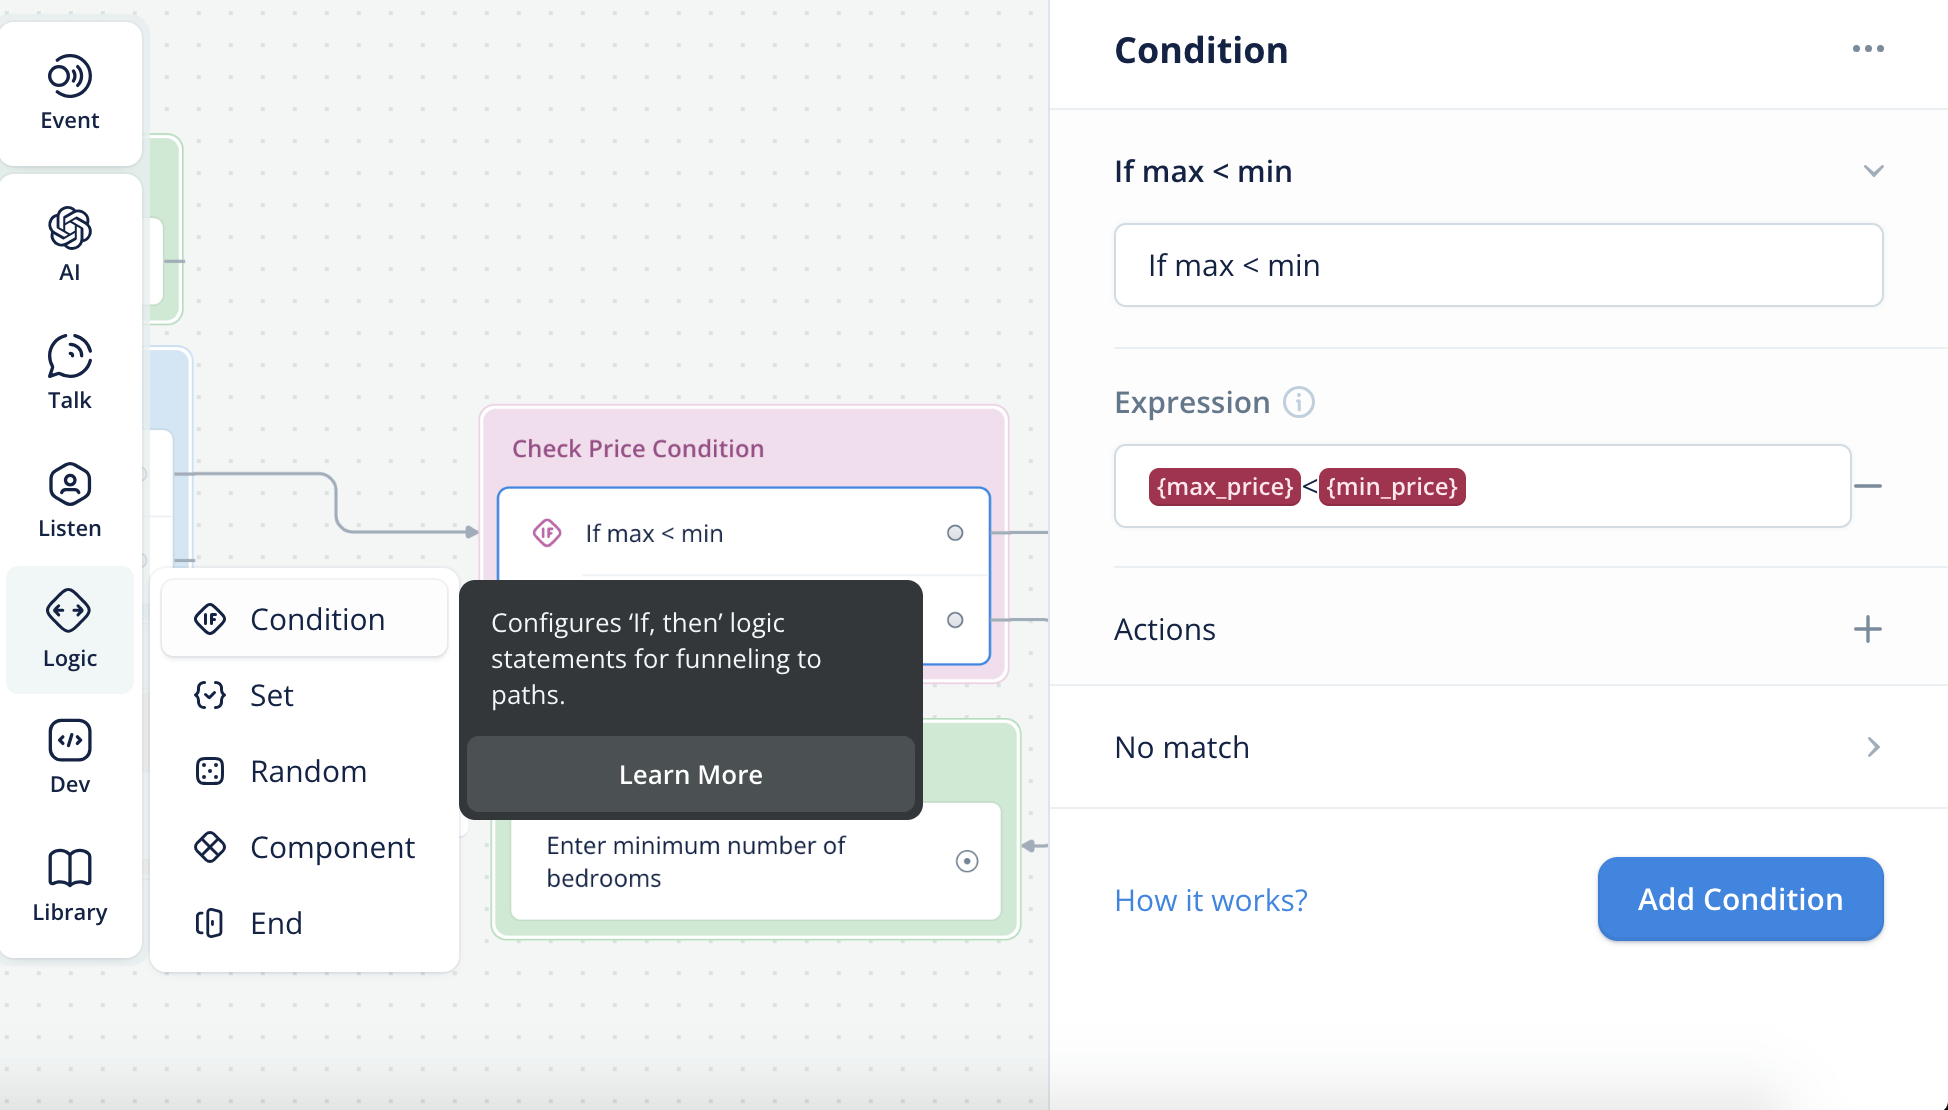
Condition
VoiceFlow also provides you the option of adding a condition, IF/ELSE kind of thing. Adding a condition is pretty easy. All you have to do is to add a Condition step.
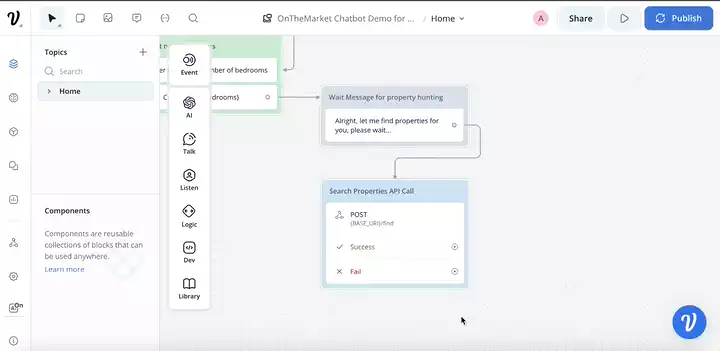
API
VoiceFlow gives you the facility to interact with 3rd party tools with the help of the API step. As the name suggests, this step is responsible for making an HTTP call and fetching the response for further action. In our case, it is to make the call to the API endpoint I introduced above.
As you can see, after passing the required parameters it returned a JSON payload. Notice the returned data is changed if you change the searching criteria, sweet. Now the next step is to display the data.
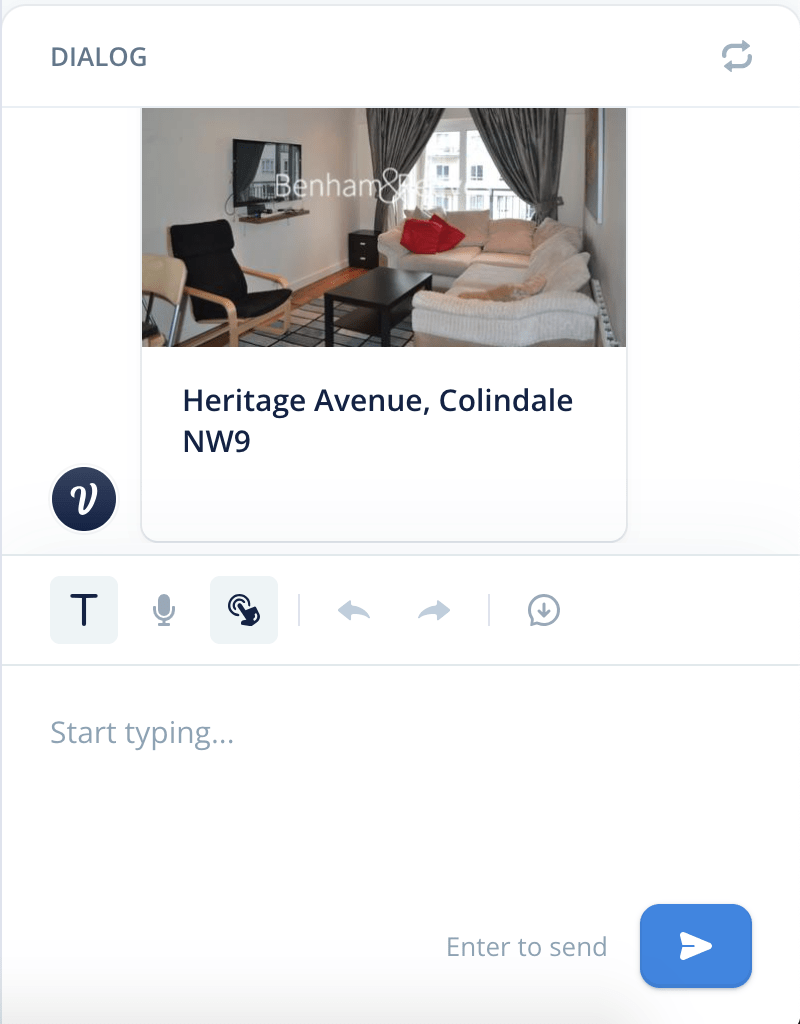
Carousel
Carousel is one of the visual elements offered by VoiceFlow to show multiple items. This is how a carousel appears in the chatbot window:
But this is not what I want. Actually, I want to generate these carousel items dynamically and for that, we will be using Custom Actions.
Custom Actions
Custom Actions allow you to integrate 3rd party tools within VoiceFlow. It also allows you to render different VoiceFlow elements in JavaScript. First, you will create a custom action and you will name it a carousel and then you will add the following code in the JavaScript step.
selected_properties = []

carousel_dynamic = {
  layout:"Carousel",
  cards : []
}

function createCard(title, image, description) {
  let cardContent = {
    "title": title,
    "description": {
      "text": description
    },
    "imageUrl": image,
    "buttons": [
      {
        "name": "I am interested",
        "request": {
          "type": "property_selected",
          "payload": {
            title
          }
        }
      }
    ]
  };
  return cardContent;
}

for(let i=0;i< searched_properties.length;i++) {
  let GBPFormatter = new Intl.NumberFormat('en-US', {
  style: 'currency',
  currency: 'GBP',
  minimumFractionDigits: 0,
  maximumFractionDigits: 0
});

  carousel_dynamic.cards.push(createCard(searched_properties[i].title, searched_properties[i].image,searched_properties[i].price))
}
// carousel_dynamic.cards.push(card,card)
// carousel_dynamic.cards.push(createCard('title', 'https://webbjenkins.imgix.net/PRA11696/images/apcc_PRA11696_IMG_00.jpg', 'description'))

carousel_dynamic = JSON.stringify(carousel_dynamic)
Well, this is not exactly my code. I just refined the code given in one of the videos of VoiceFlow. Now, if you run this, this is how it would look like:
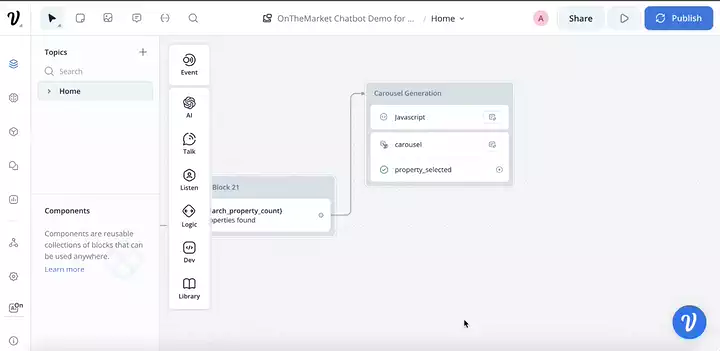
Here, it is generating carousel items at runtime with the help of JavaScript and the Custom Action step.
Now the next step is to capture contact details. It is the same as capturing min/maximum price and bedrooms. The captured data is sent via a POST call to the backend API and saved in a CSV which then is displayed on a page.
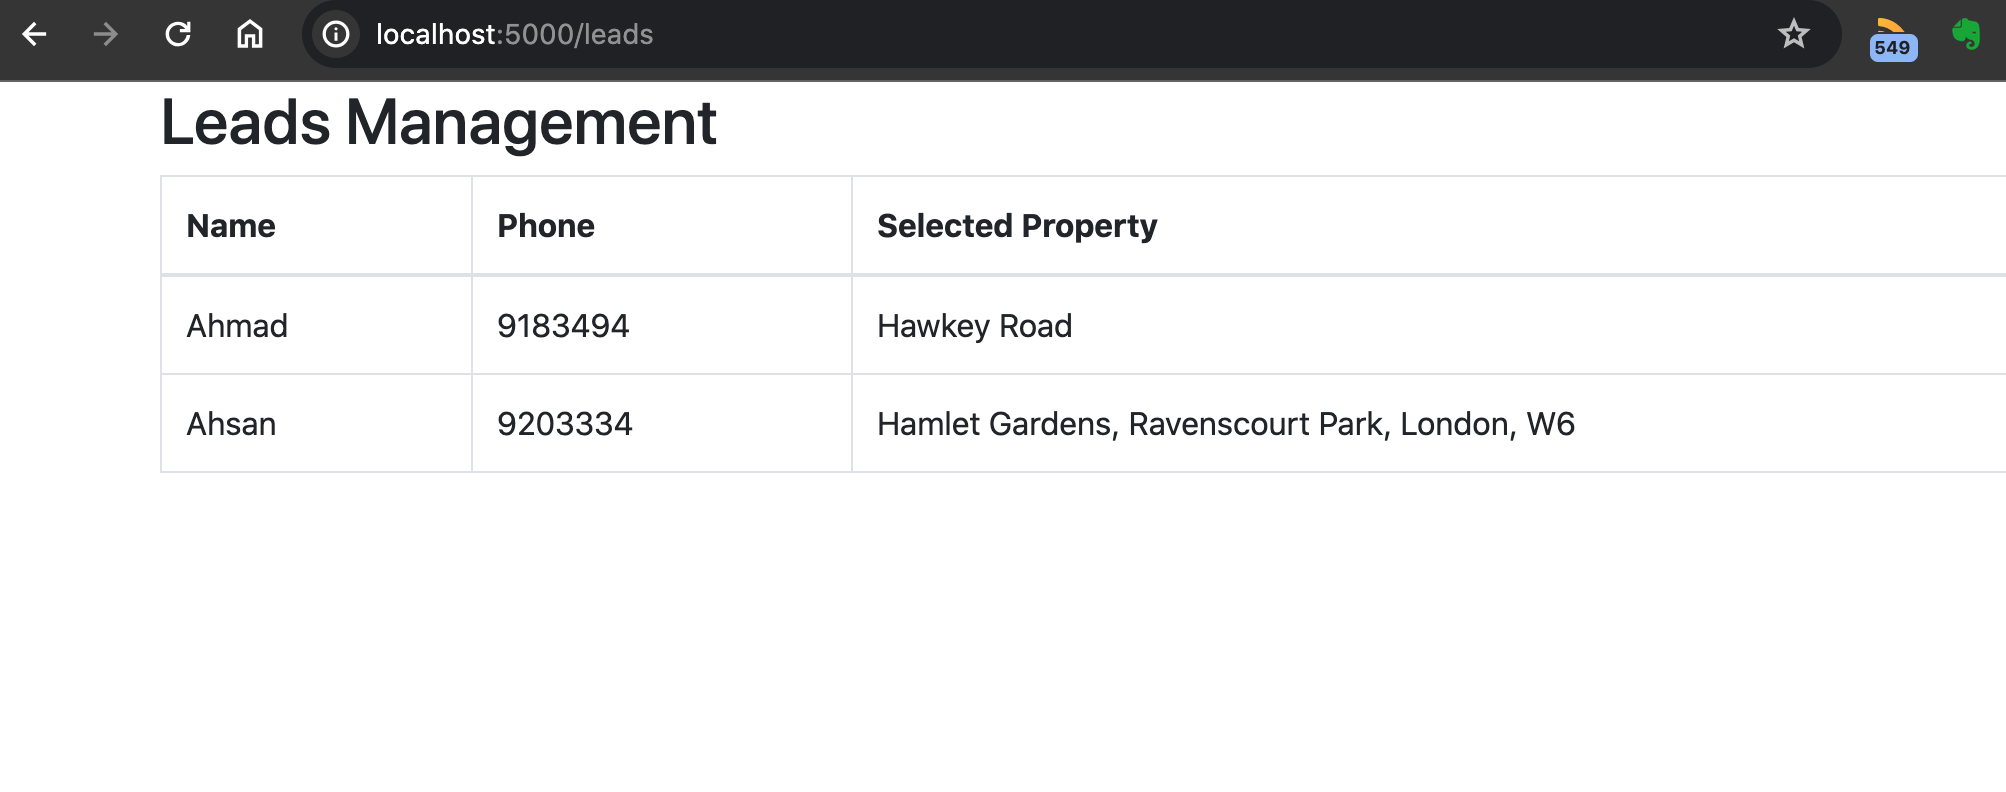
Cool! You can replace CSV with MySQL or any other DB, up to you. You can also shoot an email to both the potential client and the site Admin. You can also add the email to a newsletter so that you can send details of the new properties. There are endless possibilities. Now let’s give it a run from the start!
Web Integration
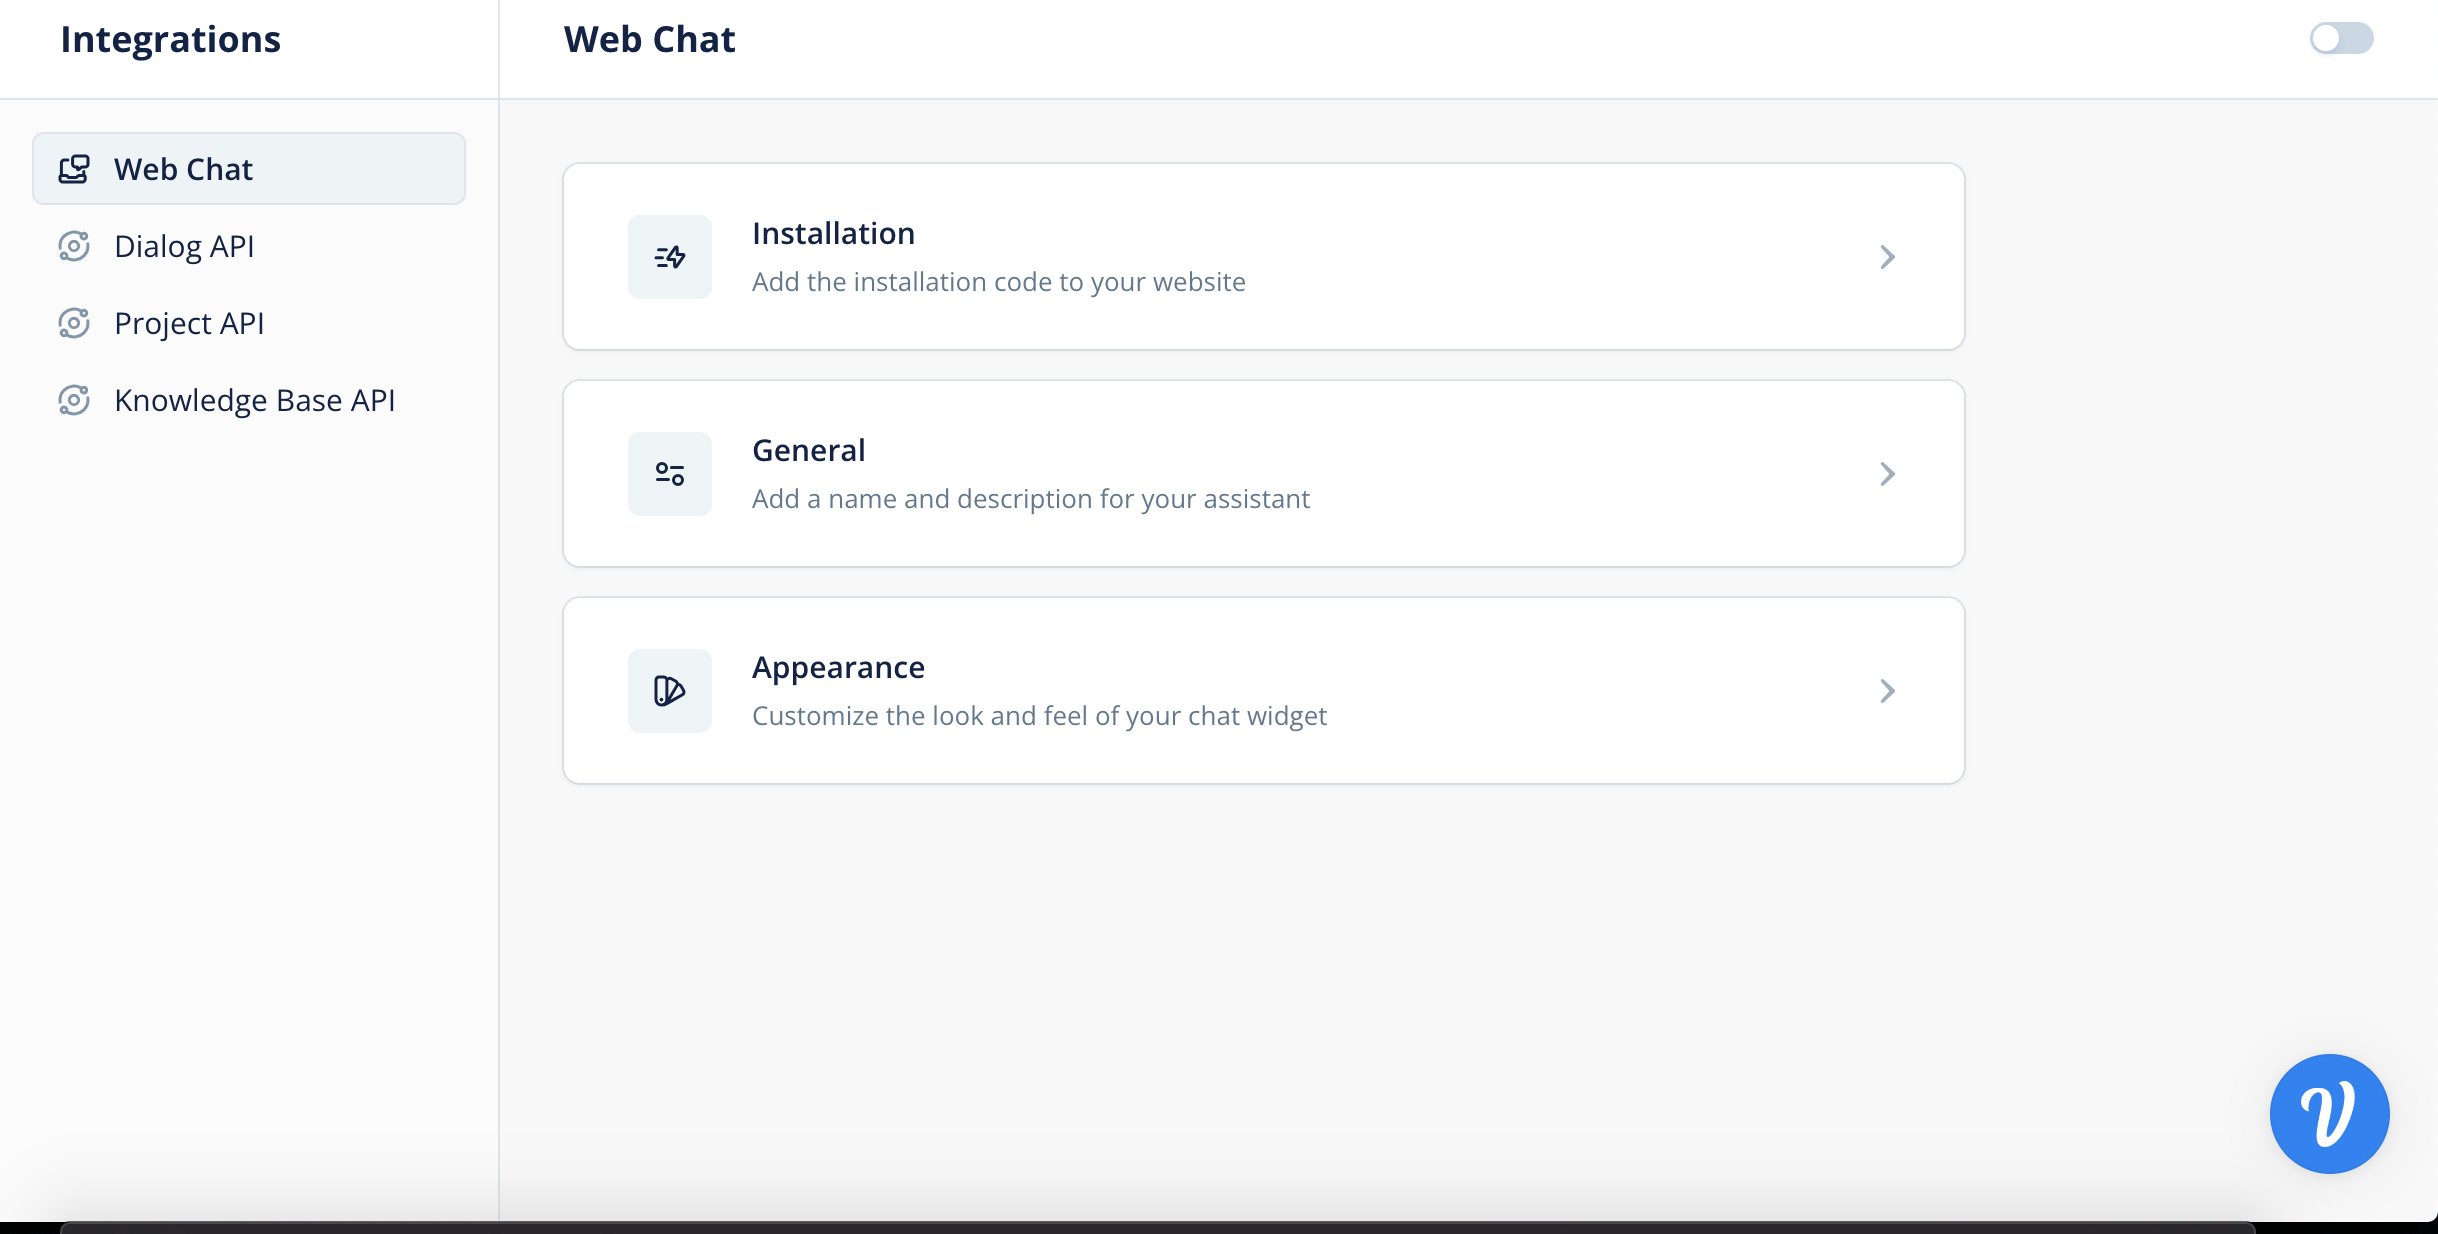
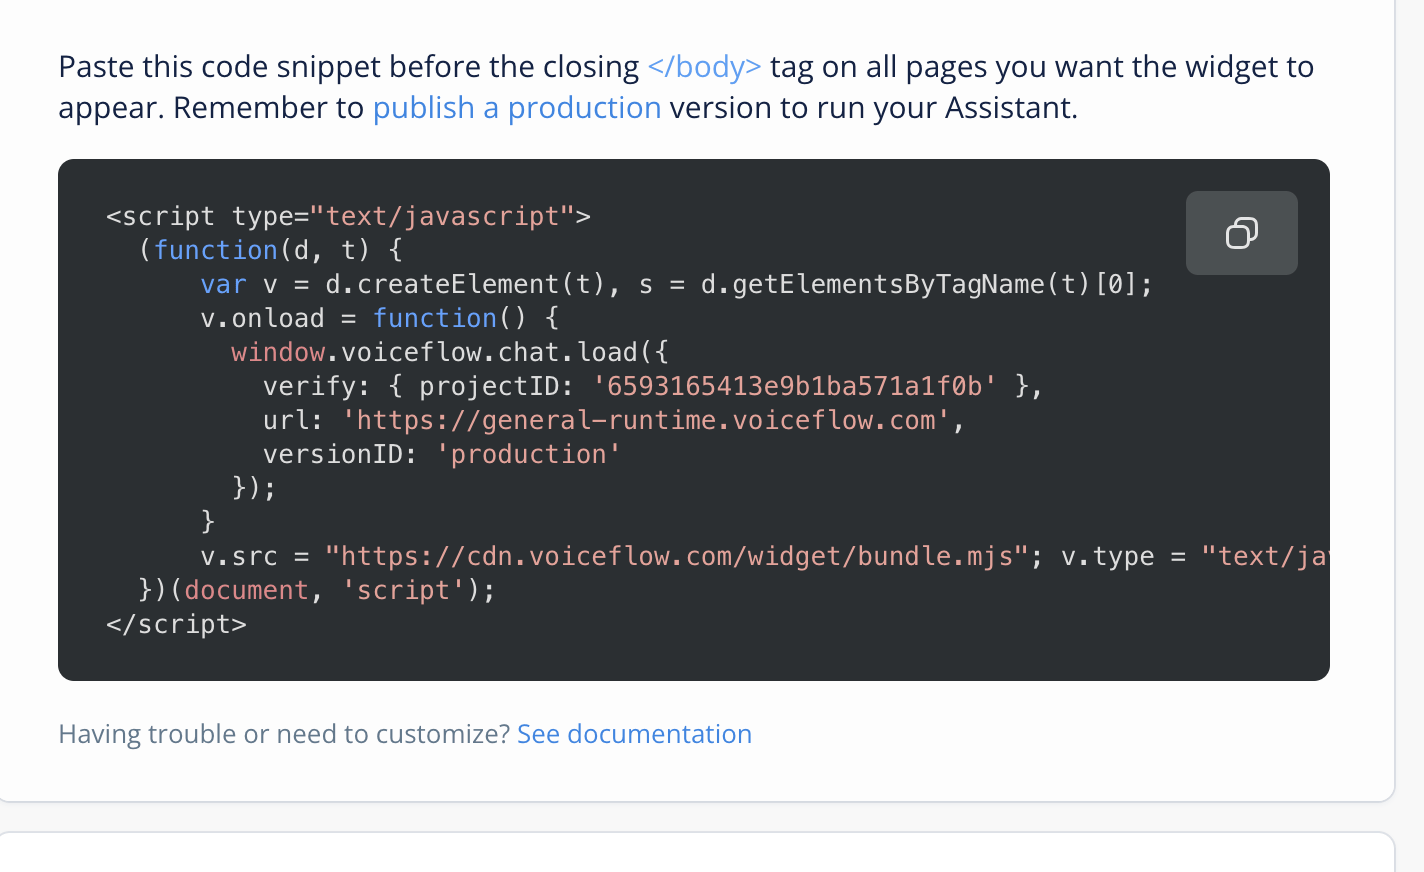
Now the bot is ready, it’s time to integrate it into your website. Click on the Integration option(Press 5) on the Designer. When you open it you find 3 sections: Installation, General, and Appearance. The first thing I am going to do is to install the widget on a web page but before you even do that, you have to publish your bot.
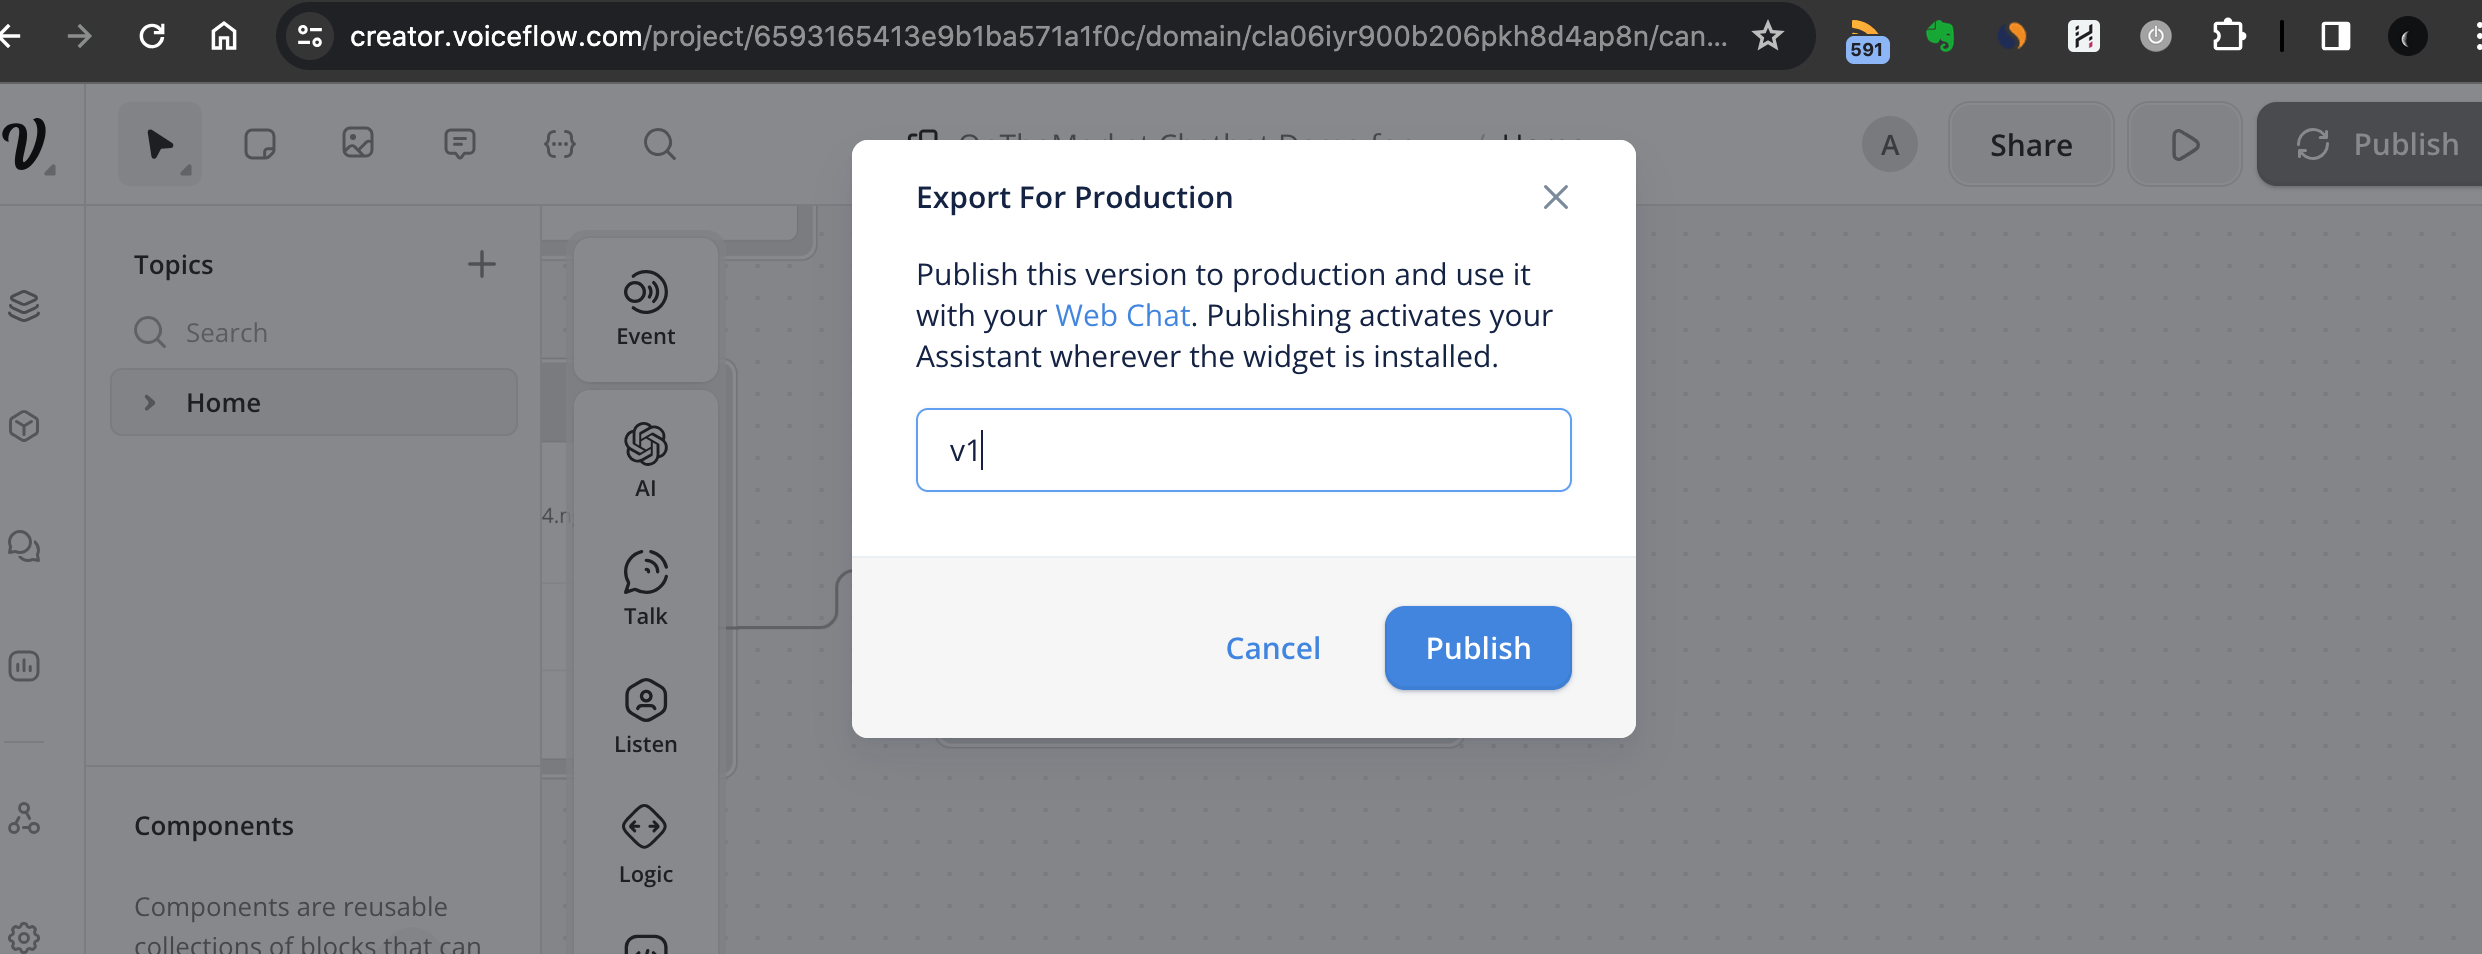
So head on to the Designer option(Press 1) and hit the Publish button. When you do it, it asks to version your bot which is totally optional.
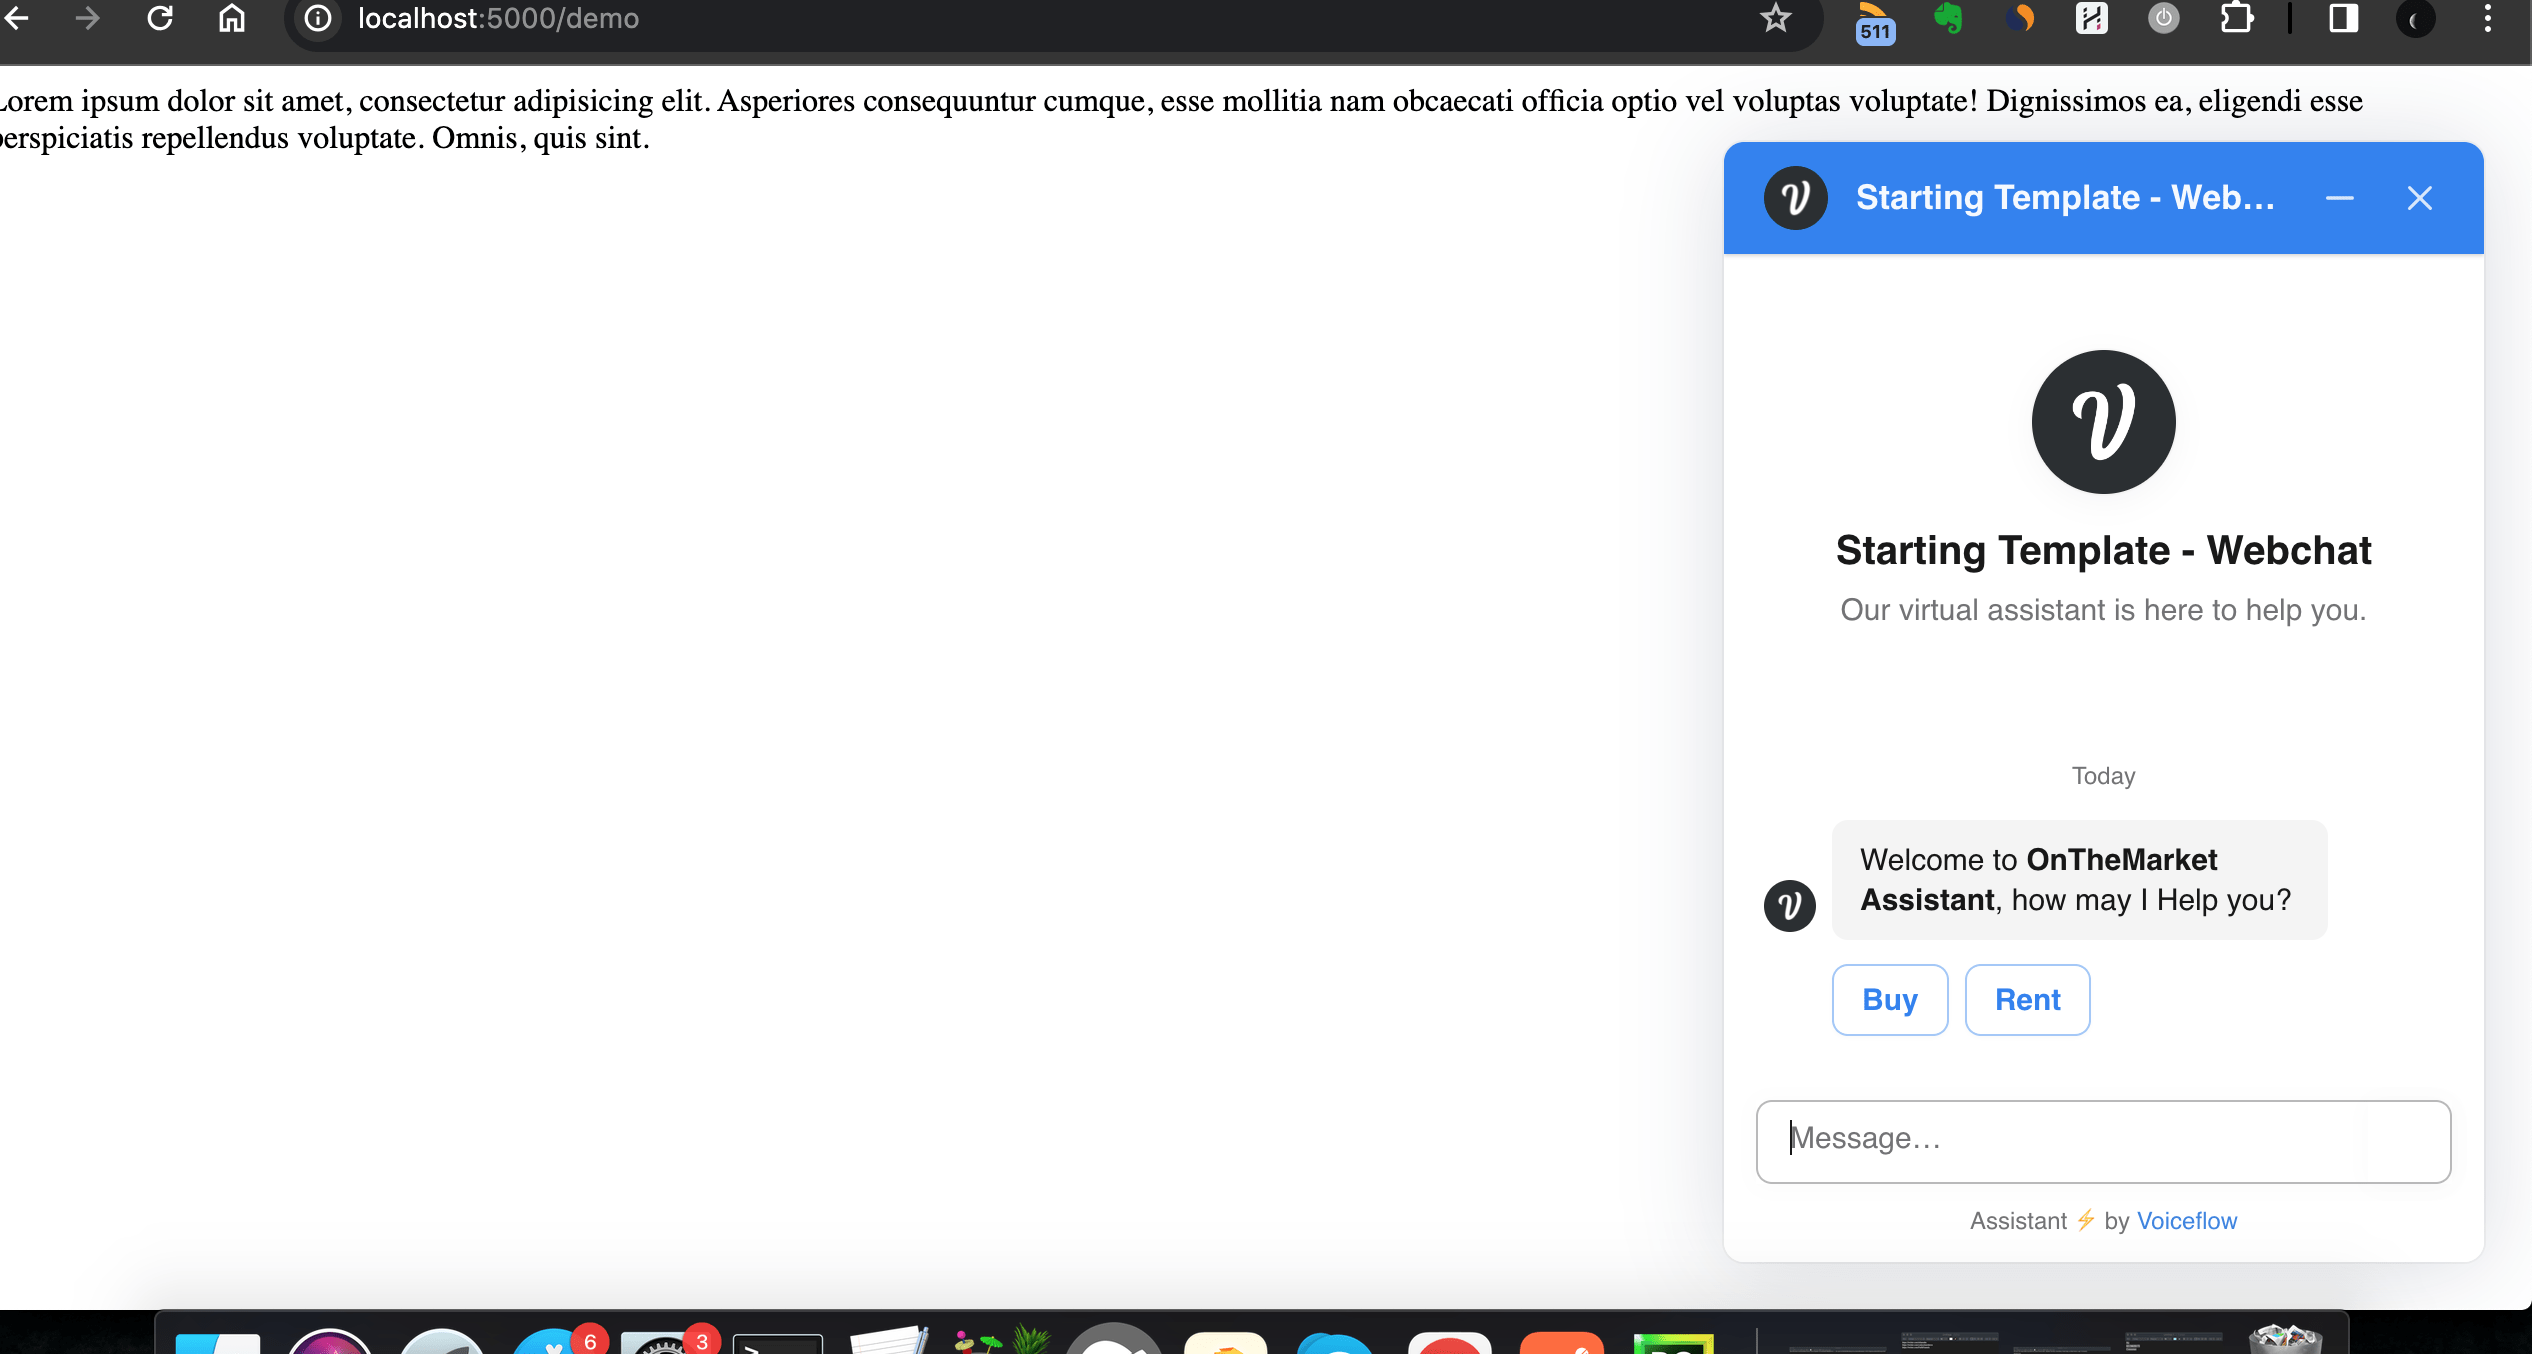
After a successful publish it asks to embed the widget which leads to the integration page I shown above. So I followed the instructions and put the chat widget on the page. I created a new endpoint, called Demo and put the code in it.
and here is the demo page endpoint:
@app.route('/demo', methods=['GET'])
def demo():
    return render_template('demo.html')
When I access this page it shows the chat window like the one below:
But…it does not look so good. How about adding some branding-related stuff and customizing it? First I will change the message: Starting Template – Webchat in the General section.
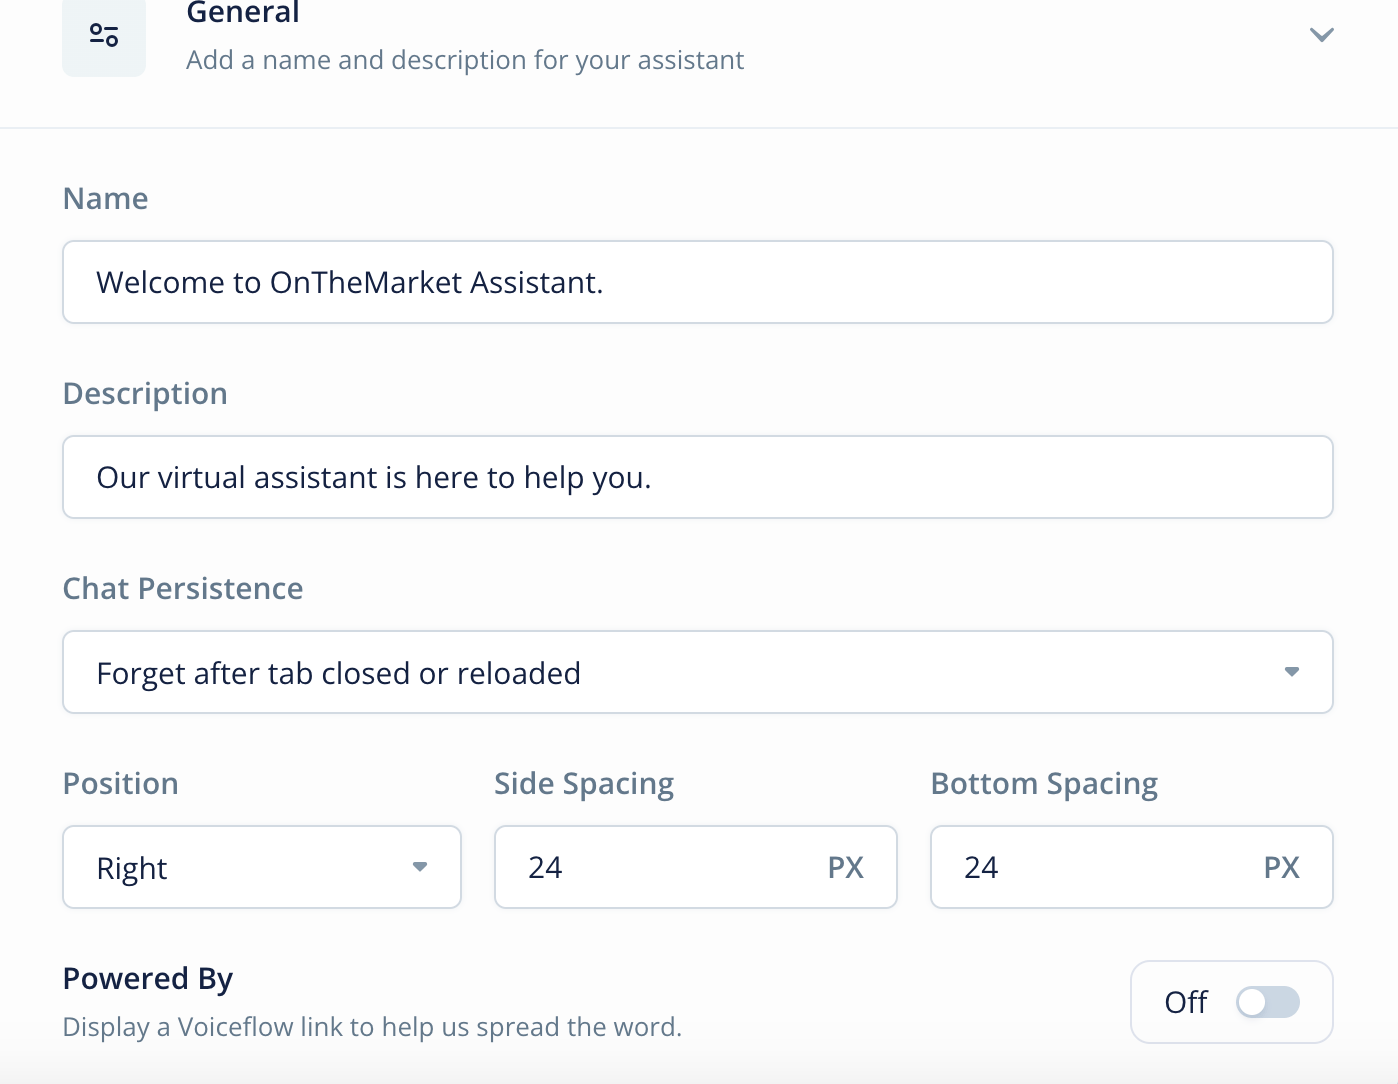
As soon as I do it, it will instantly reflect on the chat widget. You can enable Powered By Option if you want. After refreshing the page, the chat window looks like the below:
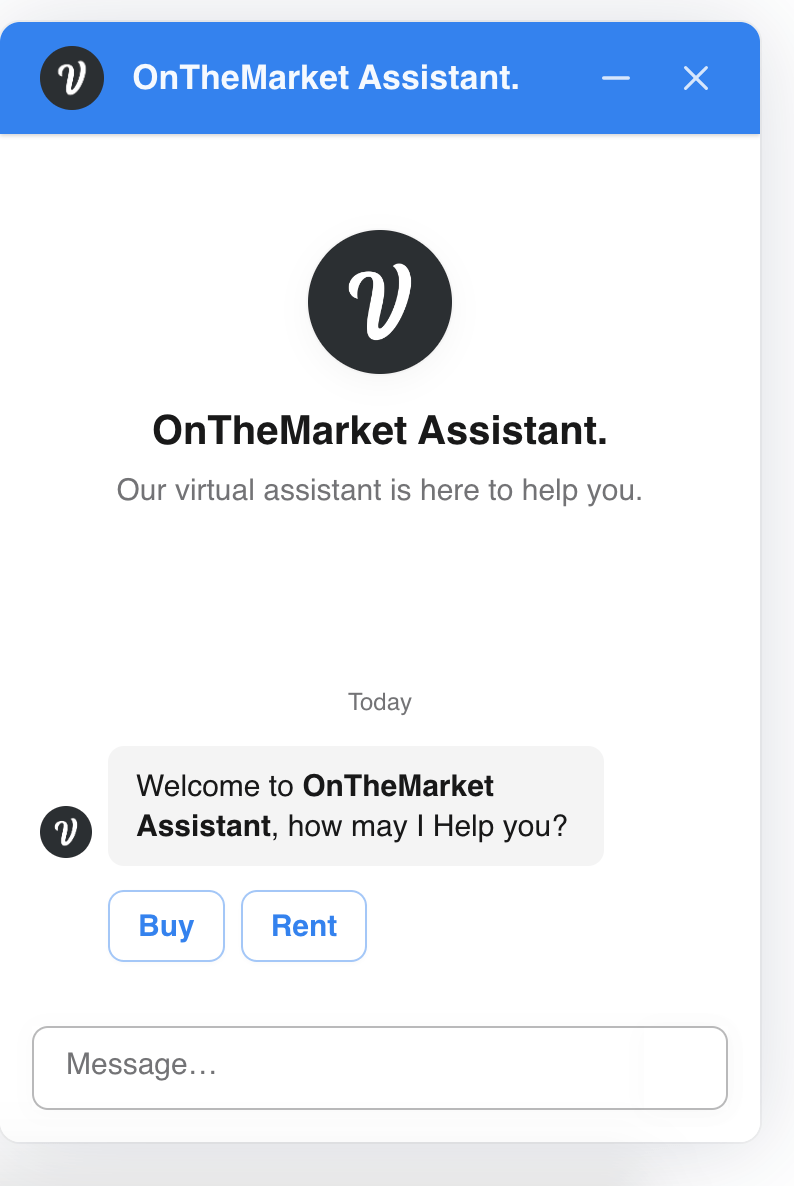
But it is not enough. I would like to change the color theme and icons. For that, I will open the Appearance section. After making changes, our bot will look like the below:
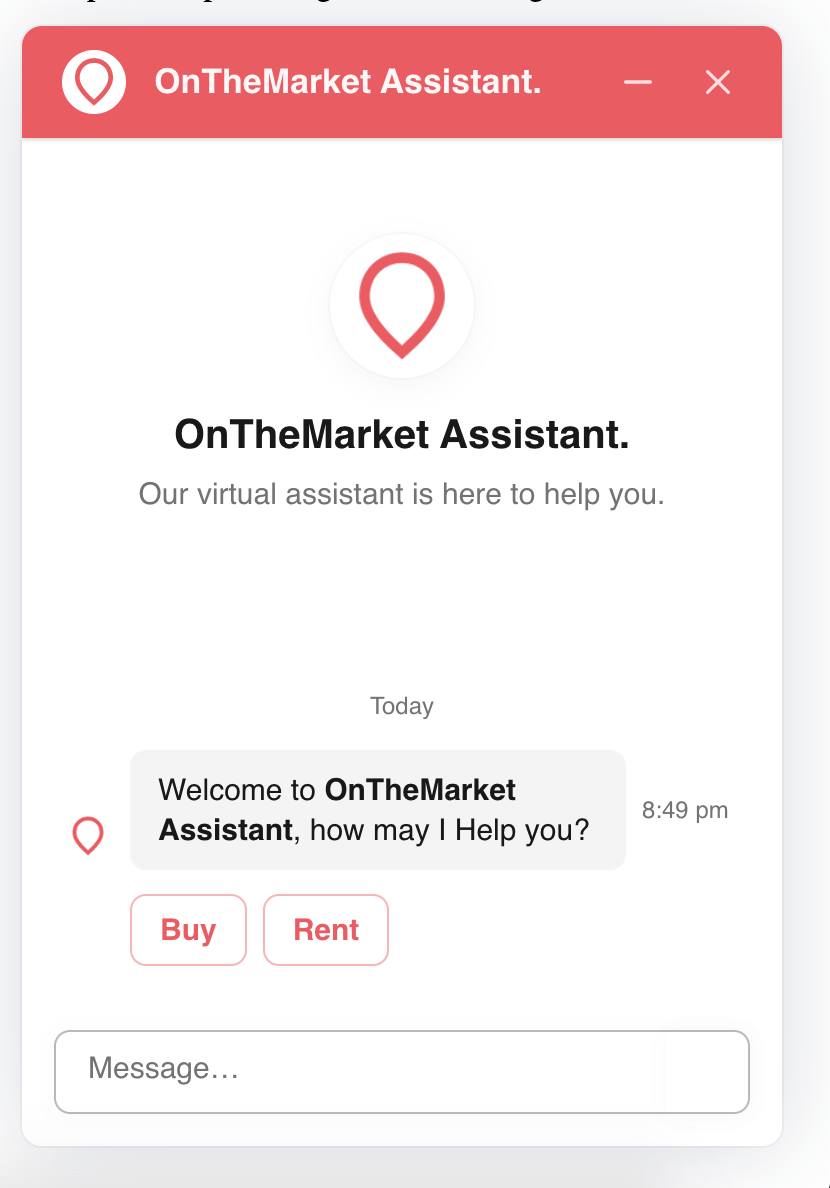
Does it not look good? I matched the OnTheMarket website color theme and used its icon here. Want to see this chatbot in action? Well, watch the demo video I shared above. One thing! You must publish every time you make changes in the bot designer otherwise it will keep showing the old version. Visit here to learn more about it.
Conclusion
In this post, I gave you a beginner-level comprehensive overview of the VoiceFlow platform and how you can create a chatbot by leveraging it. It is a basic-level bot. You can customize it by adding more checks and validation or integrate some 3rd party CRM into it. So that’s it, the end of a very long post. Like always, the code along with the VoiceFlow .vf file is available on GitHub