A few months back, a friend of mine who runs multiple online stores called me after a long time. After the usual chit-chat, I asked about how his online sites were doing. He told me that he had recently started a new site; his first time on Shopify and running Ad campaigns did not yield any results. Previously, he had used OpenCart and WooCommerce for other sites.
Around February/March, I had completed a course on implementing website tracking, with a particular focus on server-side tracking using Google Analytics 4 (GA4), Google Tag Manager (GTM), and Stape. Since I was looking for an opportunity to apply what I had learned in a real-world project, I offered to review his setup and see if I could identify any issues. He agreed and gave me access to the store.
The store was set up by a mutual friend who was running a digital agency and was in the performance marketing space. In fact, right after completing the course, I had made a call to the same friend(the performance marketing specialist) to hand me a website where I could test and verify what I had learned in the course. I offered him free-of-cost service and even asked him to collabrate so that he could see my implementation. For some reason, he got defensive and wondered what I could possibly implement that he hadn’t already. He said he had already implemented CAPI that was recording events. In short, he did not hand over a website
Most probably, he thought that I was entering his territory when I said I would improve Ads’ performance and thought I could steal his clients away. I will discuss in a while why a GTM(Google Tag Manager) tracking specialist is not an enemy but a friend of performance marketing experts and could work hand-in-hand as an assistant to improve both ROAS and the shopping store’s performance.
Alright, so after getting all necessary access to Shopify, GA4, Tag Manager, and Meta Business Suite, I began my inspection.
Before I get into details, allow me to explain what tracking is, its importance, what are server and client side tracking and how the job of a tracking specialist complements the job of a performance marketing specialist.
What Is Tracking
Tracking is the process of capturing and measuring specific user behaviors on your website or app(e:g., button clicks, page views, or purchases). GA4 and GTM are the tools most commonly used to carry out these tasks. GTM acts as a data collector while acts as a data receiver and reporting engine. There are two types of tracking when it comes to the implementation of website tracking: client-side or browser-side and server-side.
Client/Browser side tracking
It collects user behavior(clicks, page views, file downloads, or purchases) directly from the user’s browser(web or mobile) using JavaScript. The information is collected by Google Tag Manager(GTM), which then becomes available for GA4, Meta Pixel, TikTok Pixel, and other platforms. It is the de facto standard used by almost all websites that implement GA4, Meta Pixel, and others.
Server-side tracking
In server-side implementation, the data is moved from the user’s browser to your own server, which, then, after processing, is forwarded to GA4, Meta, or TikTok by using their respective conversion APIs. You could use server-side tracking tools like Stape, Taggrs, or the respective CAPIs of different platforms. In our case, it is Meta’s CAPI that was implemented to track server-side events in Meta Business Suite.
Client-side tracking vs Server-side Tracking
Now that you know what each kind of tracking is, let’s talk about a bit of comparison:
| Feature | Client-Side Tracking | Server-Side Tracking |
|---|---|---|
| How it Works | Data collection is done directly in the | |
| user’s browser via JavaScript | Data is sent from the user’s browser to your own cloud server first, which then processes it and forward to 3rd party platforms(Meta, TikTok, etc) | Data Accuracy | Lower. |
| Easily blocked by Ad blockers, privacy browsers(e.g., Brave), and browser policies like ITP | Higher. | The data moves through your own domain, bypassing standard Ad blockers and extensions | Site Performance | Could be degraded because 3rd party JavaScript tracking code is installed on your site, thus could increase the page load time | Faster. |
| The browser loads a lightweight tracking script; the rest of the work is done by your server | Cookie Lifespan | Short. |
| Safari/Firefox restrict 3rd party cookies to 1 to 7 days | More reliable with first-party cookies | |
| Technical Complexity | Low. Very accessible for marketers; usually involves pasting a snippet into the header or using a basic tag manager. | High. It requires backend configuration and a custom subdomain and ongoing server maintenance costs |
The bottom line is, if you need a quick zero-cost setup, client-side is the default, but if your goal is to set accurate information to platforms like GA4 and Meta for a higher ROAS, then server-side tracking is the answer.
GTM tracking specialist vs performance marketing specialist
As I mentioned above, my friend who is in performance marketing got defensive when I said I could help improve the ROAS of his Meta Ad campaigns. He thought that I was going to take over his job, which is not true at all. The core job of a tracking specialist is to implement tracking across a website and an app to learn about user behavior. We actually work as assistants and an aid to the performance marketing team by implementing proper tracking events. Our job is NOT to create Ads or campaigns or write ad copy or create assets. It is the marketer’s job. We do what Meta asks for to improve a campaign’s performance: improving Data Quality Score(DQS)
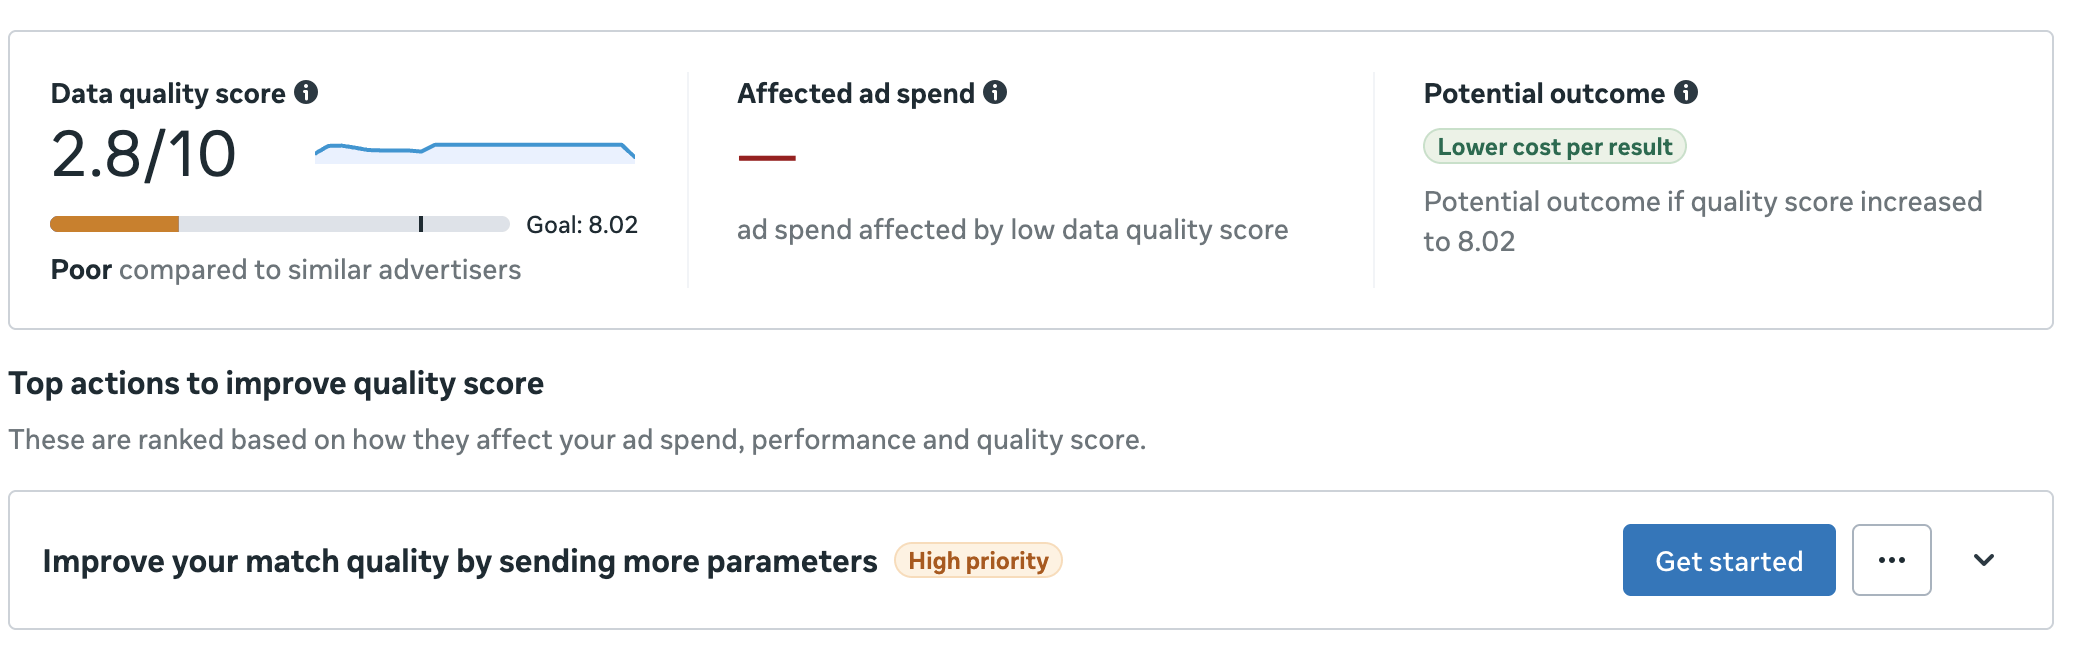
And what is DQS? Meta explains itself:
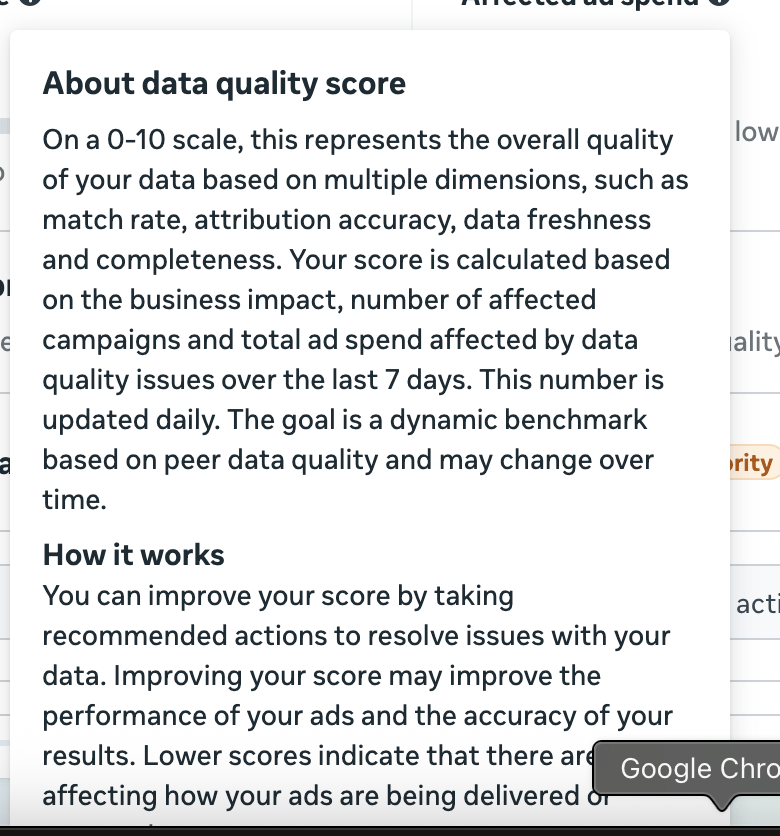
We may use tools like Stape Site Auditor, but the issue with this tool is that it only works if there’s a Stape based server side tracking. If a site has a custom CAPI implementation, then it does not give any hint or still scores low, just like it happened with my friend’s website and a couple of other potential clients’ websites I had audited in the past who had implemented CAPI on their websites.
My Approach
Before implementing anything new, I had to decide my approach to implementing server-side tracking.
One of the options was to use a managed server-side tagging platform like Stape, which provided features like a hosted GTM server container, first-party cookie management, and a one-stop to route events to multiple platforms.
However, the store itself had no tracking implemented, and my friend was not interested in paying monthly for this service. As I mentioned above, my goal is to implement optimized tracking and events for Meta; therefore, I had to find an alternative way.
To avoid using any 3rd party service, I have implemented a lightweight custom endpoint in PHP(after all, why not? I am a developer!). All events from Shopify Custom Pixel are delivered to the server where they are processed and then sent to Meta’s CAPI endpoint.
It is important to mention that this does not serve as a substitute for Stape. Server-side managed tracking solutions have a lot of additional functionalities that become useful when working on larger projects that require more advanced tracking. However, in this case, there was no need for them. A custom solution served the purposes of the client and at the same time gave me full control of the data sent to Meta.
Initial Audit
Check Existing Data Quality Score
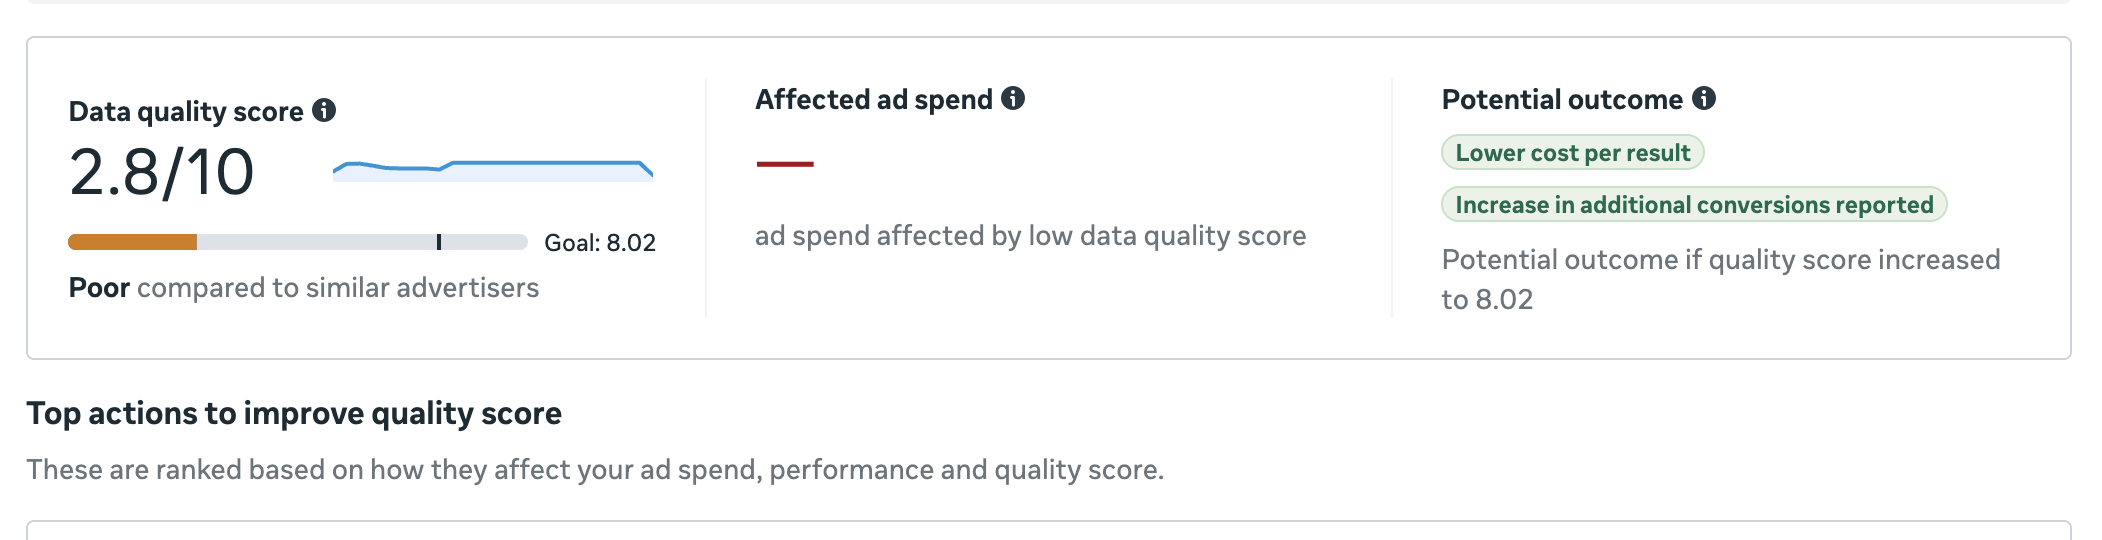
The very first thing I did was to check the existing Data Quality Score. Head over to Facebook’s event manager, select your desired Ad account, and in the Overview section, click on the View Recent Activity link below the graph, and you see a screen like this:
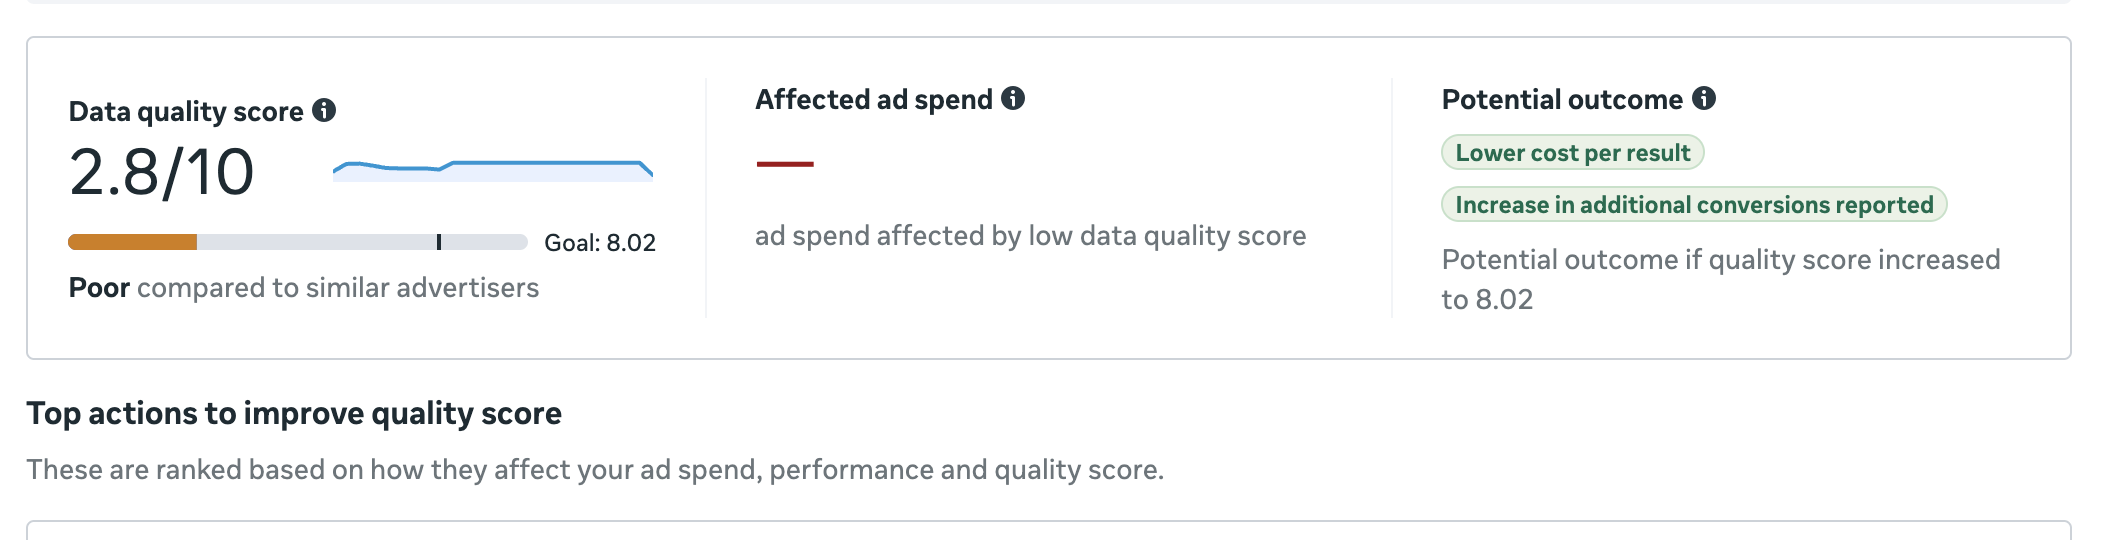
The scorecard tells you the current score, and the Potential outcome section tells you the job of a GTM Tracking Specialist: to improve this score as much as possible and reach up to a score of atleast 8.02. GTM tracking specialist does not care about how you manage a campaign, create ad sets or creatives, or select an audience. The tracking helps you reach a wider audience at the same or lower cost, as you can see in the screenshot above.
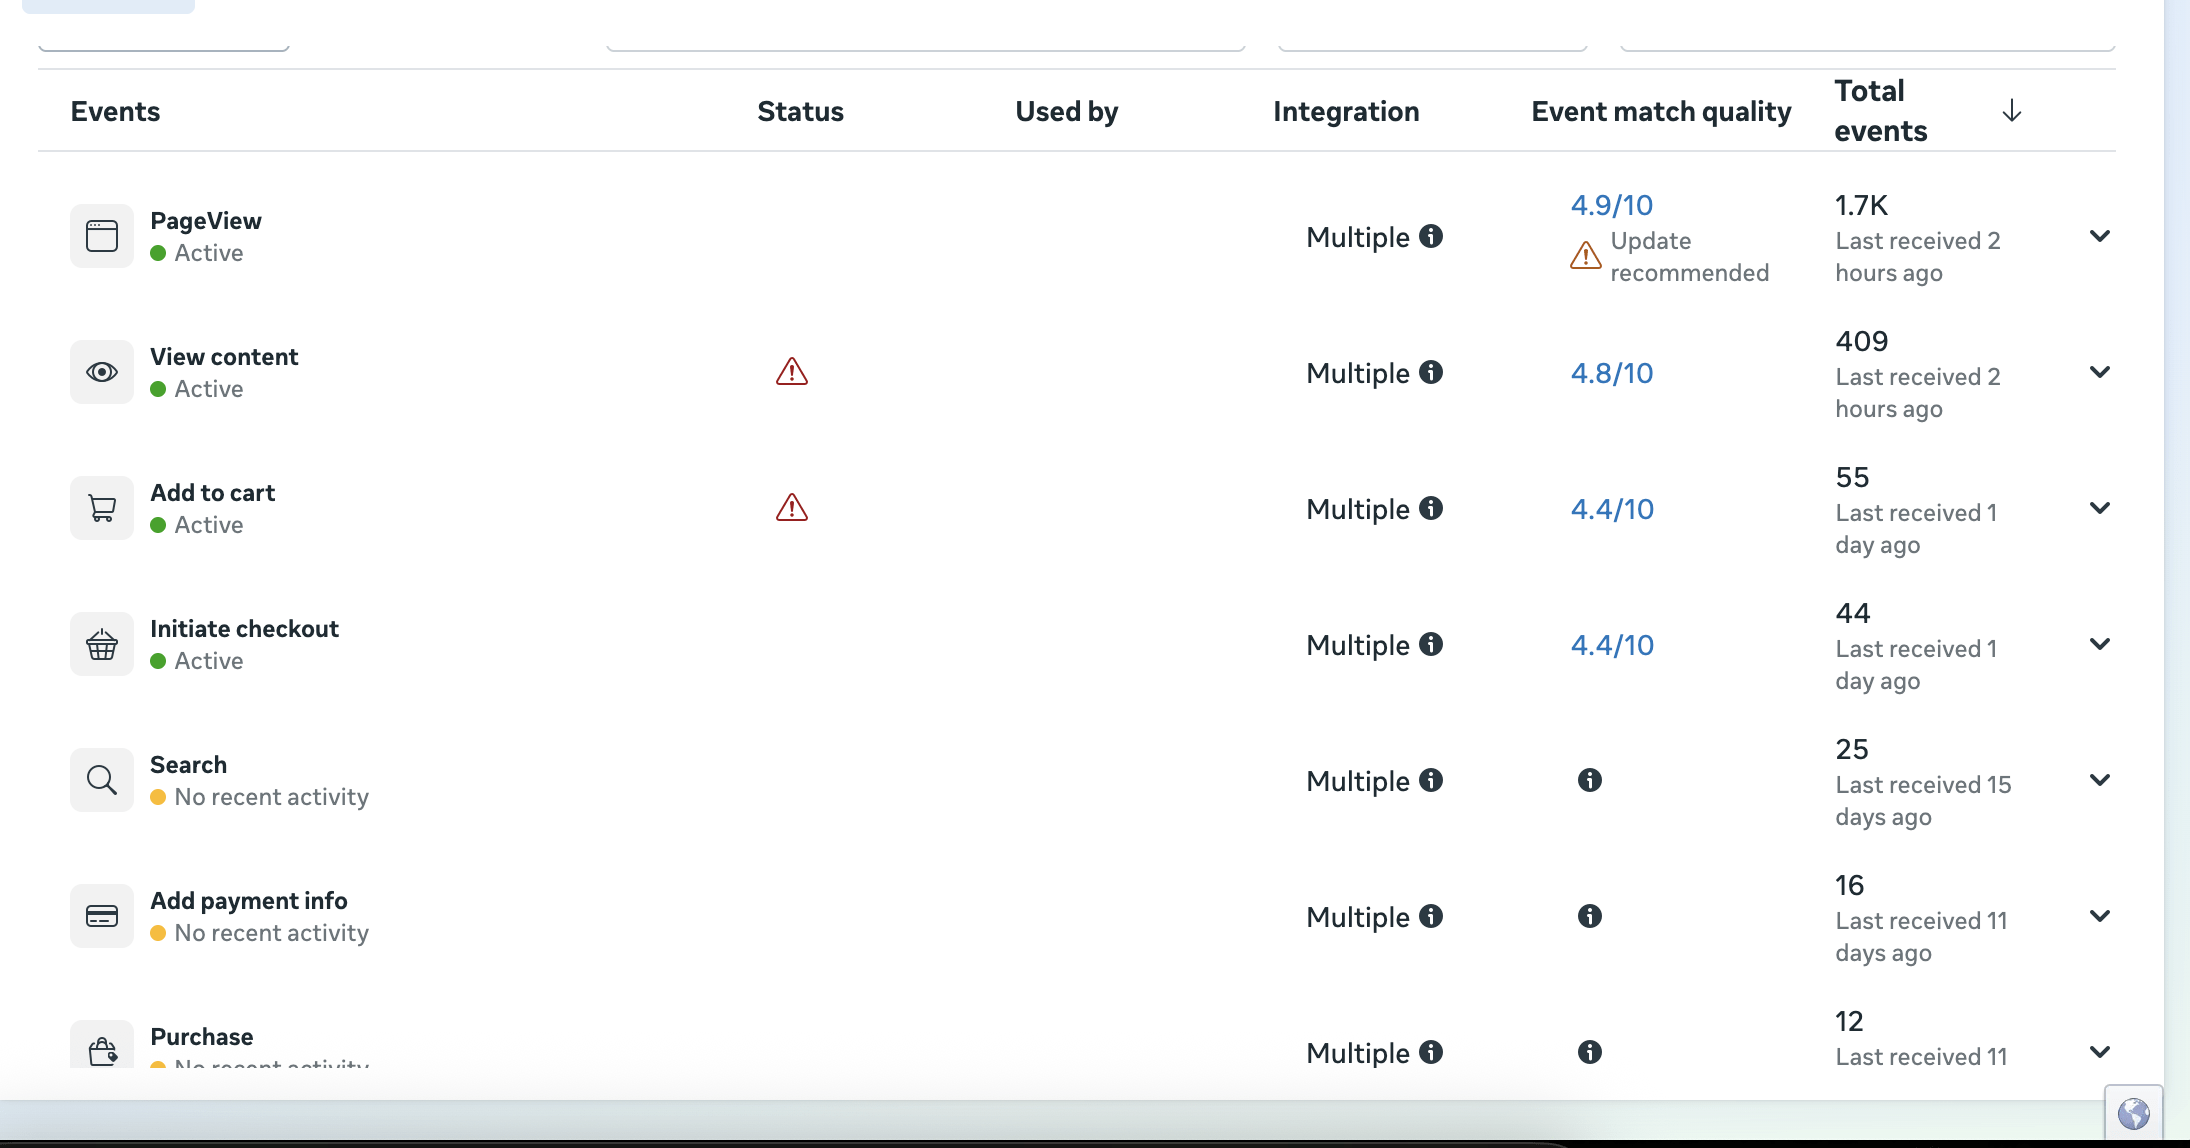
Scroll down further, and you’ll see each tracked event along with its Event Match Quality score and the specific issues affecting that event.
Checking existing GA4/GTM setup
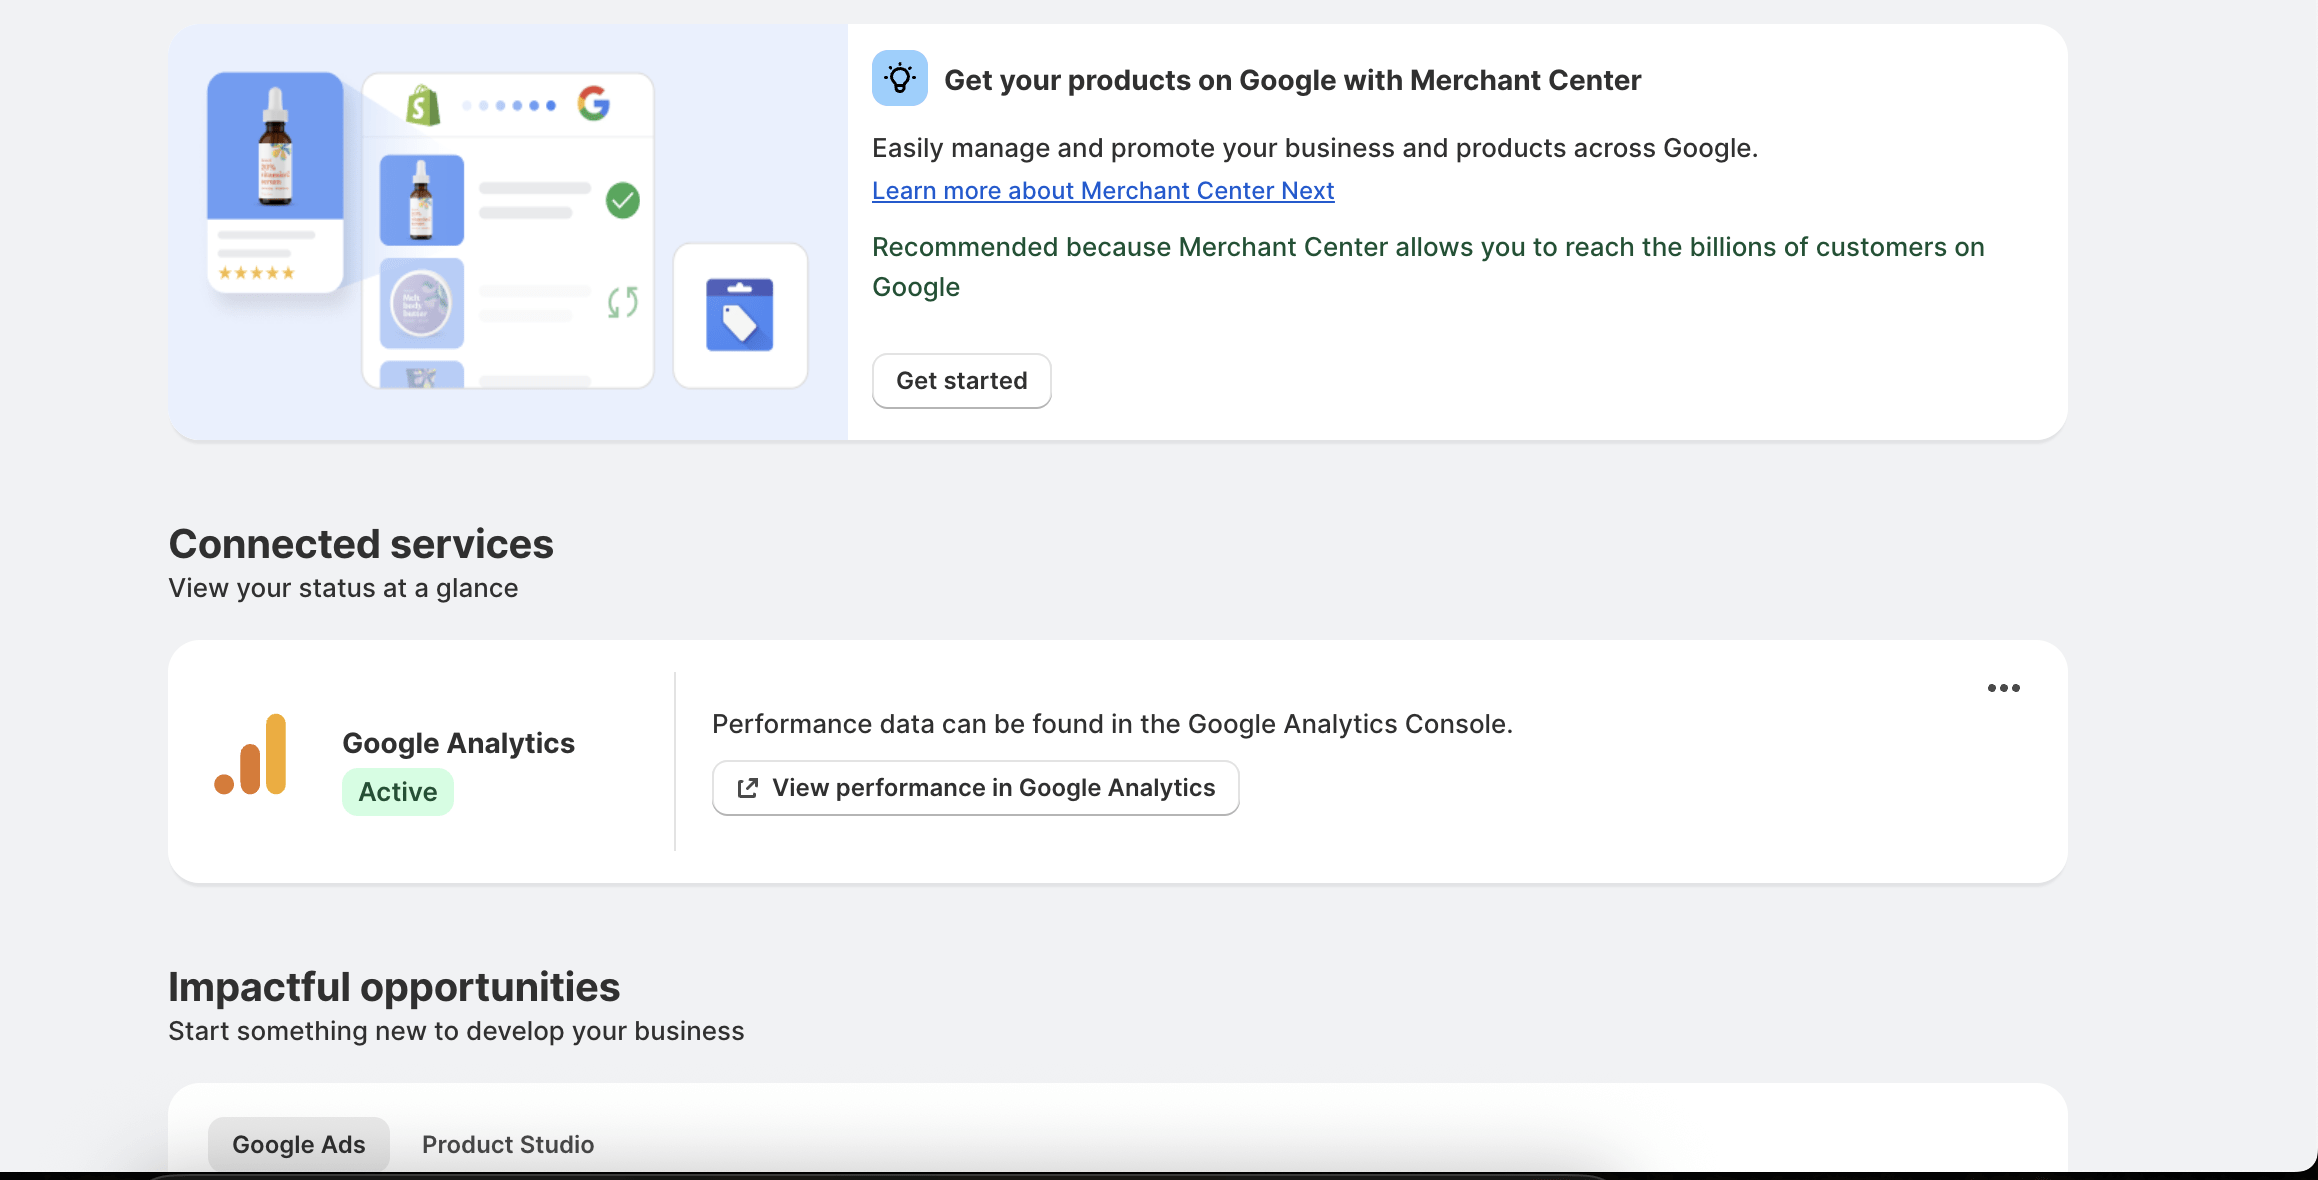
The very first thing I checked was how GA4 tags were implemented and how they were sending event information to GA4. Surprise, Surprise, Surprise! There was no GA4 tag installed at all. It was using the default/official Google/Youtube app that connects with the Google service. GA4 was active here(Click to see the larger image).

Implementation
After completing the first audit, I began to rebuild my tracking system in a structured manner. It wasn’t just about firing the tags, but also about making sure the correct events were captured, pushed through GTM, and sent to GA4 and Meta with relevant data.
Disabling existing GA4 and Meta Pixel
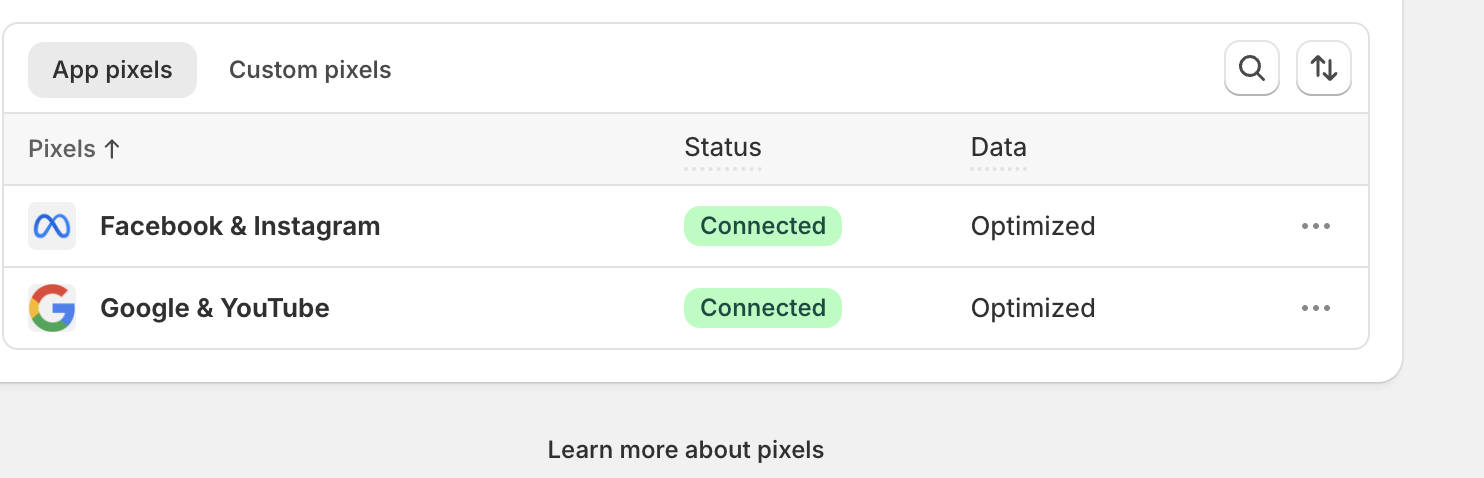
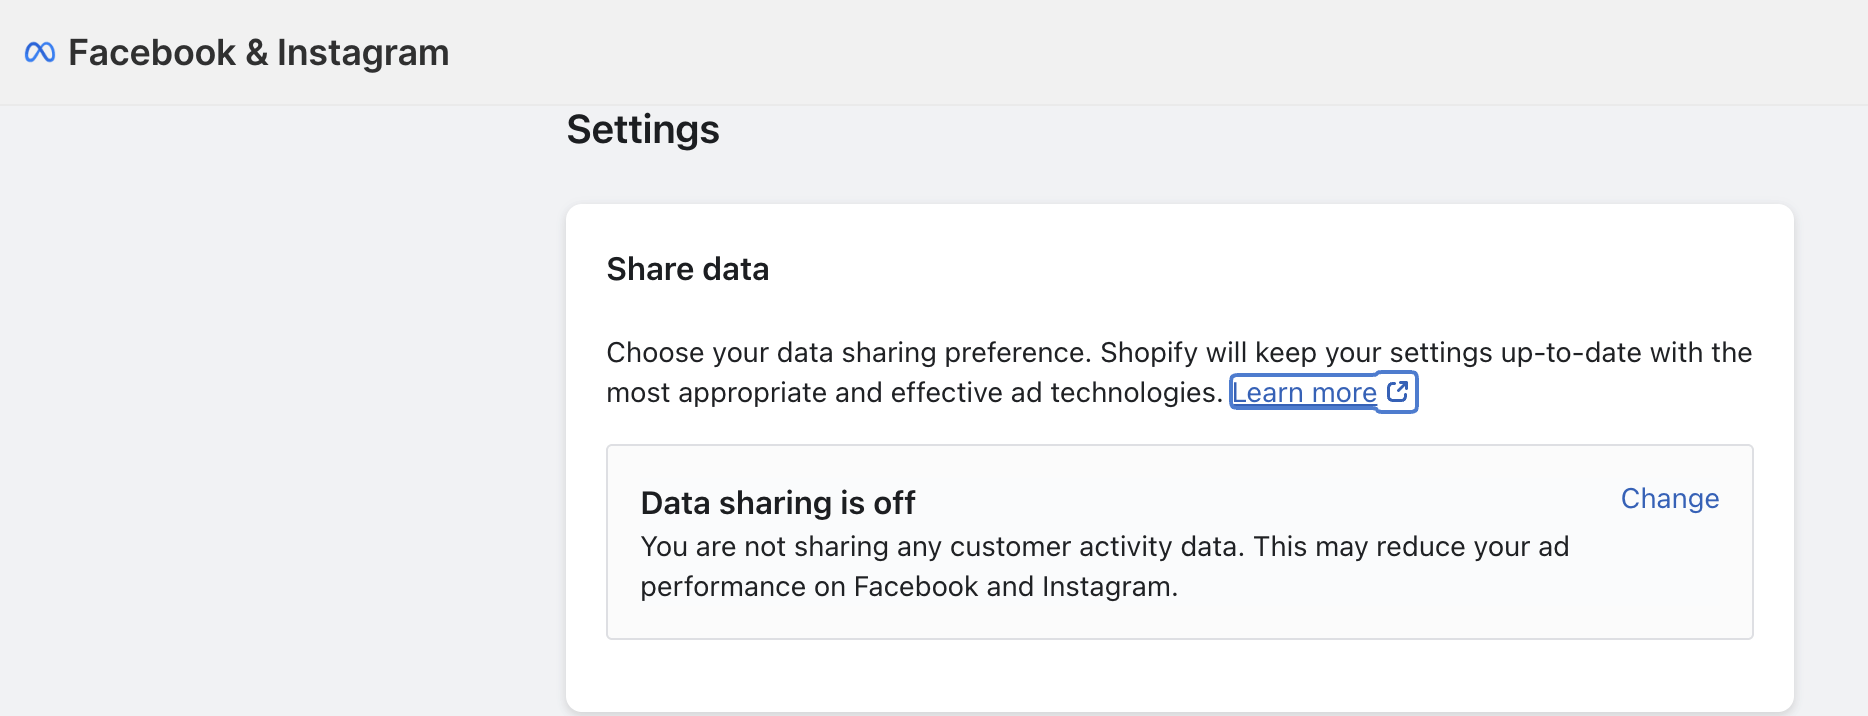
Shopify’s built-in Google Analytics and Facebook/Instagram connections were disconnected so that there would be no duplicate tracking. From this point on, GTM would be the only thing sending any data to GA4 and Meta. These apps send event data, which we are going to send on our own by sharing more data(Click to see the larger image).
After disconnection
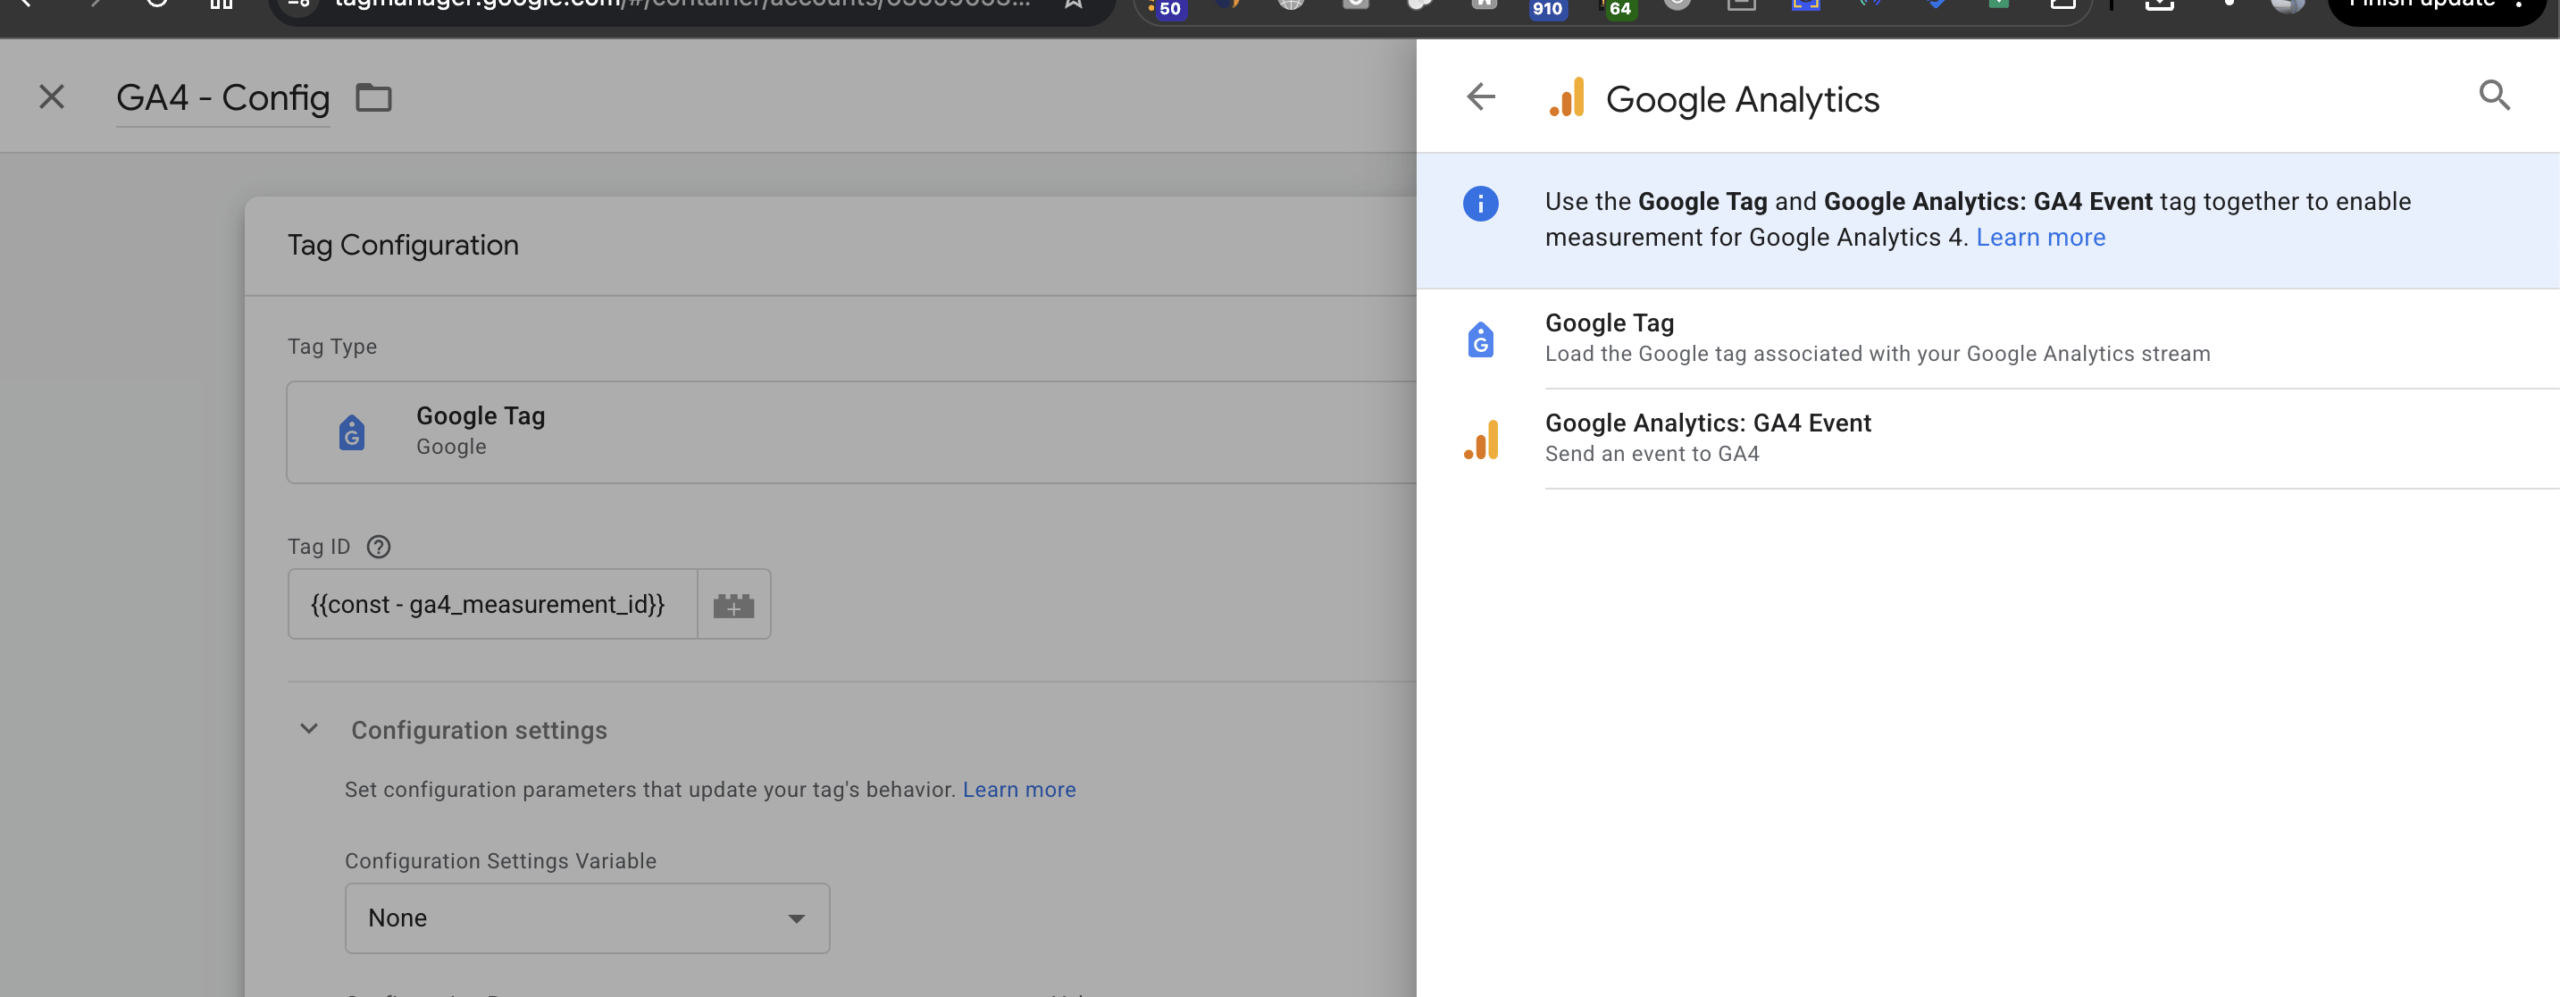
Setting Up GTM as the Control Layer
After that, I used Google Tag Manager as the central layer for managing tracking.
Instead of adding separate scripts for every platform, GTM becomes the place where events are received, processed, and then sent to GA4 and Meta.
Debugging GTM in Shopify’s Sandboxed Environment
Another difficulty that I faced while working with this project was Shopify’s Custom Pixel sandbox. While the tracking code runs fine in the sandbox, the debugging of such a code is not as simple as for the normal GTM implementation process. This is because tools like Google Tag Assistant and GTM Preview Mode might not be able to recognize the GTM container.
This initially made me think I had configured GTM incorrectly, but after investigating further, I discovered that the issue was caused by Shopify’s sandbox rather than my implementation
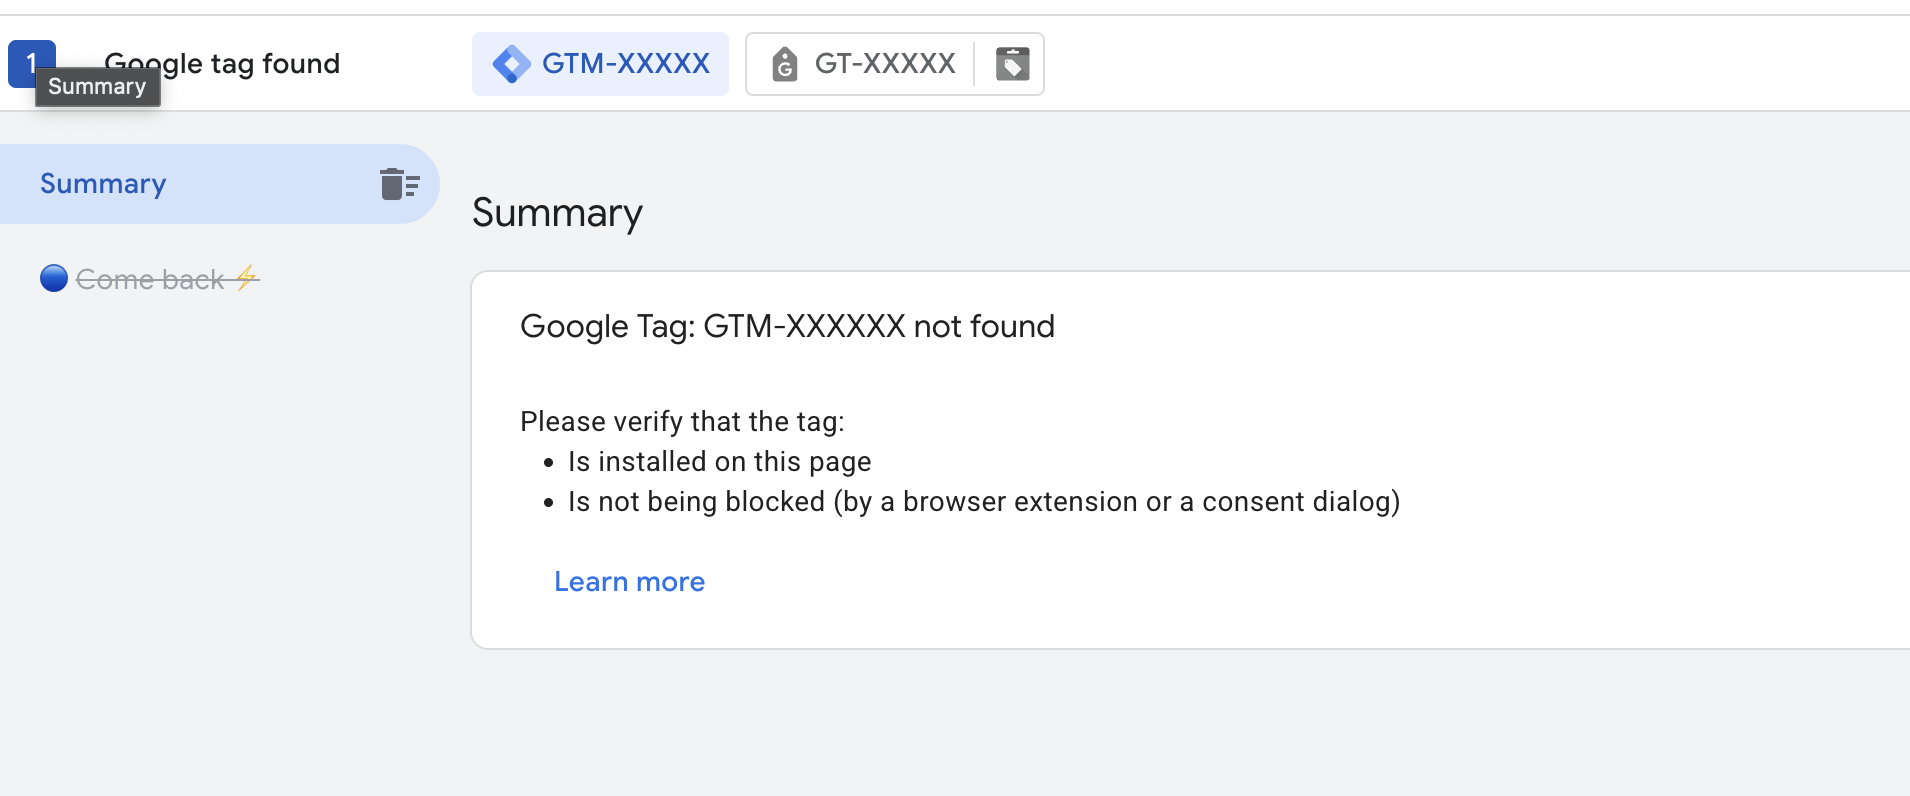
After a bit of research and experimentation, I found the Data Layer Check Plus Chrome Extension. Beside inpecting thedataLayer, it can also temporarily inject GTM container code into the storefront, allowing me to debug tags normally. As you can see, the tag was fired when the page was loaded.
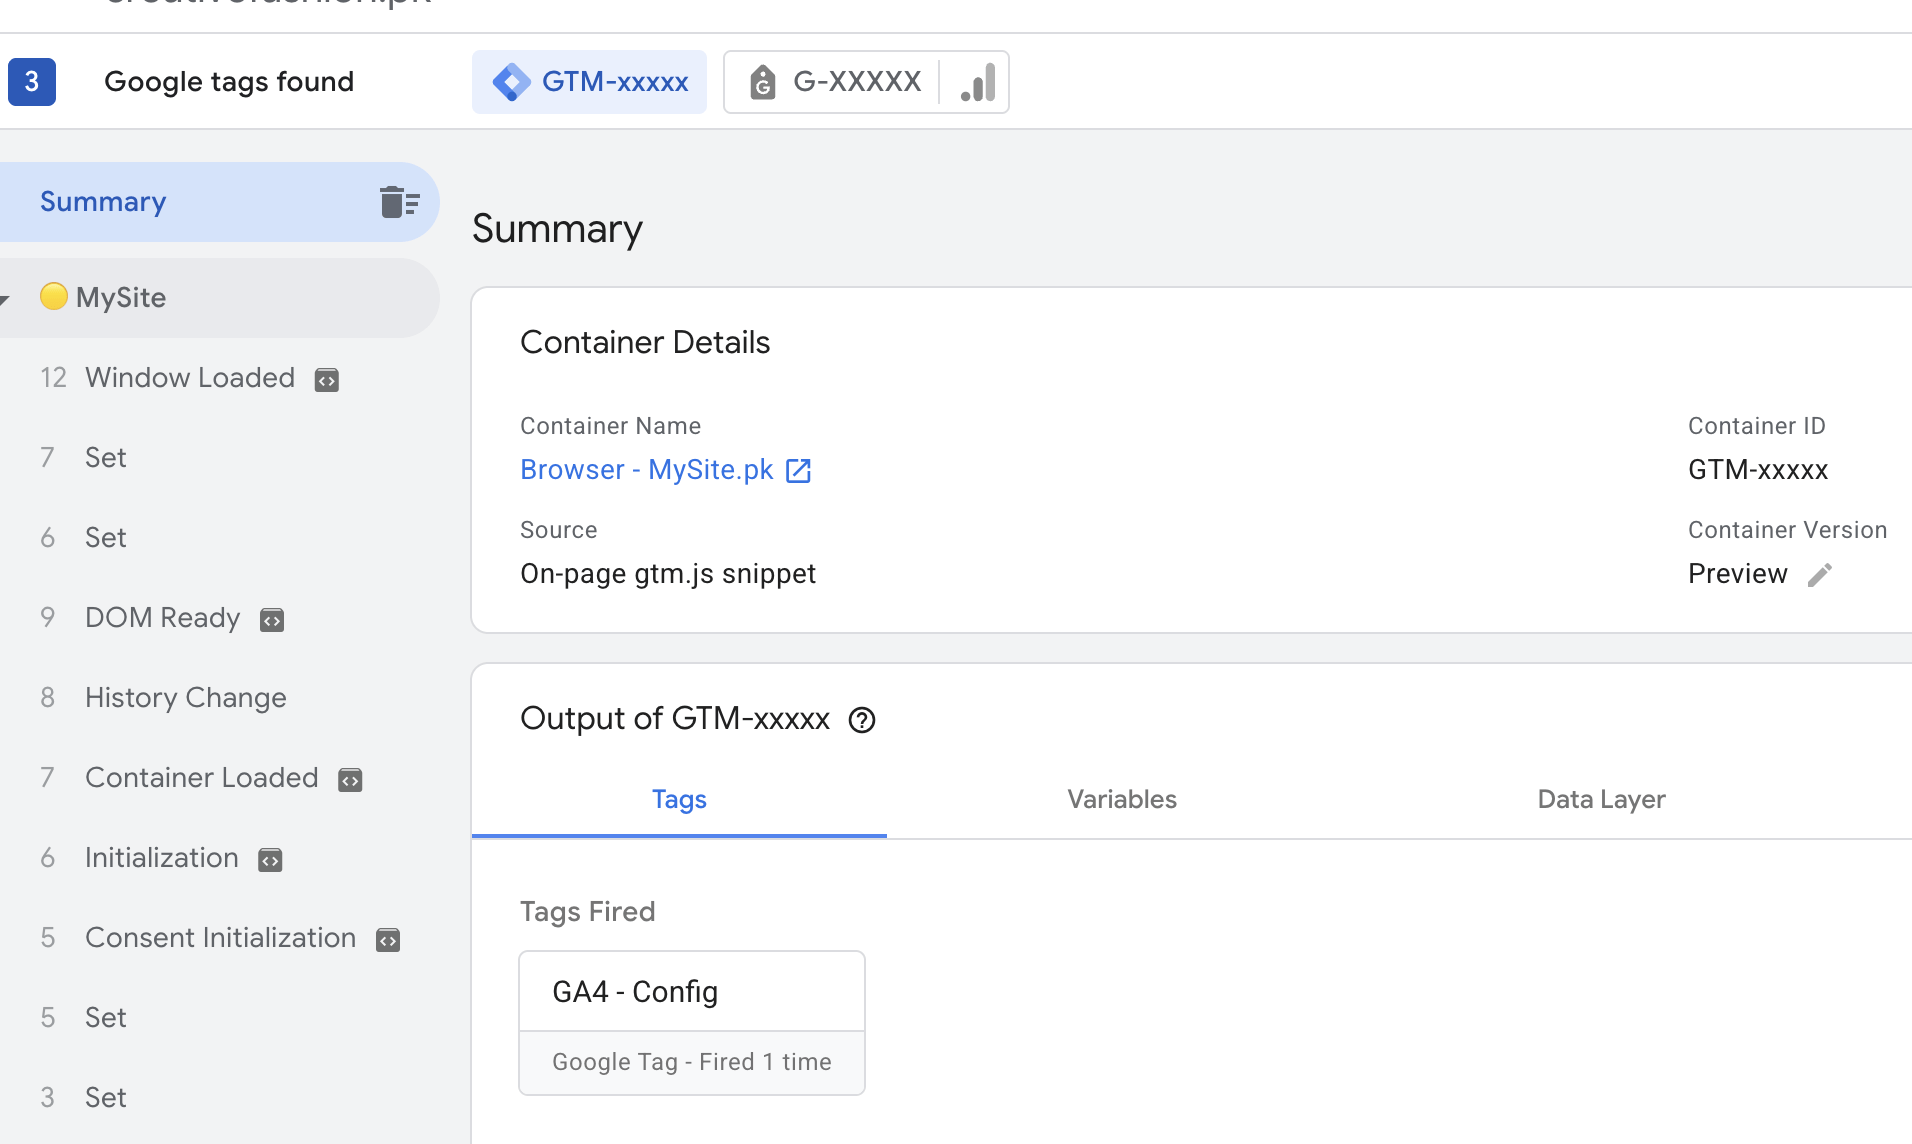
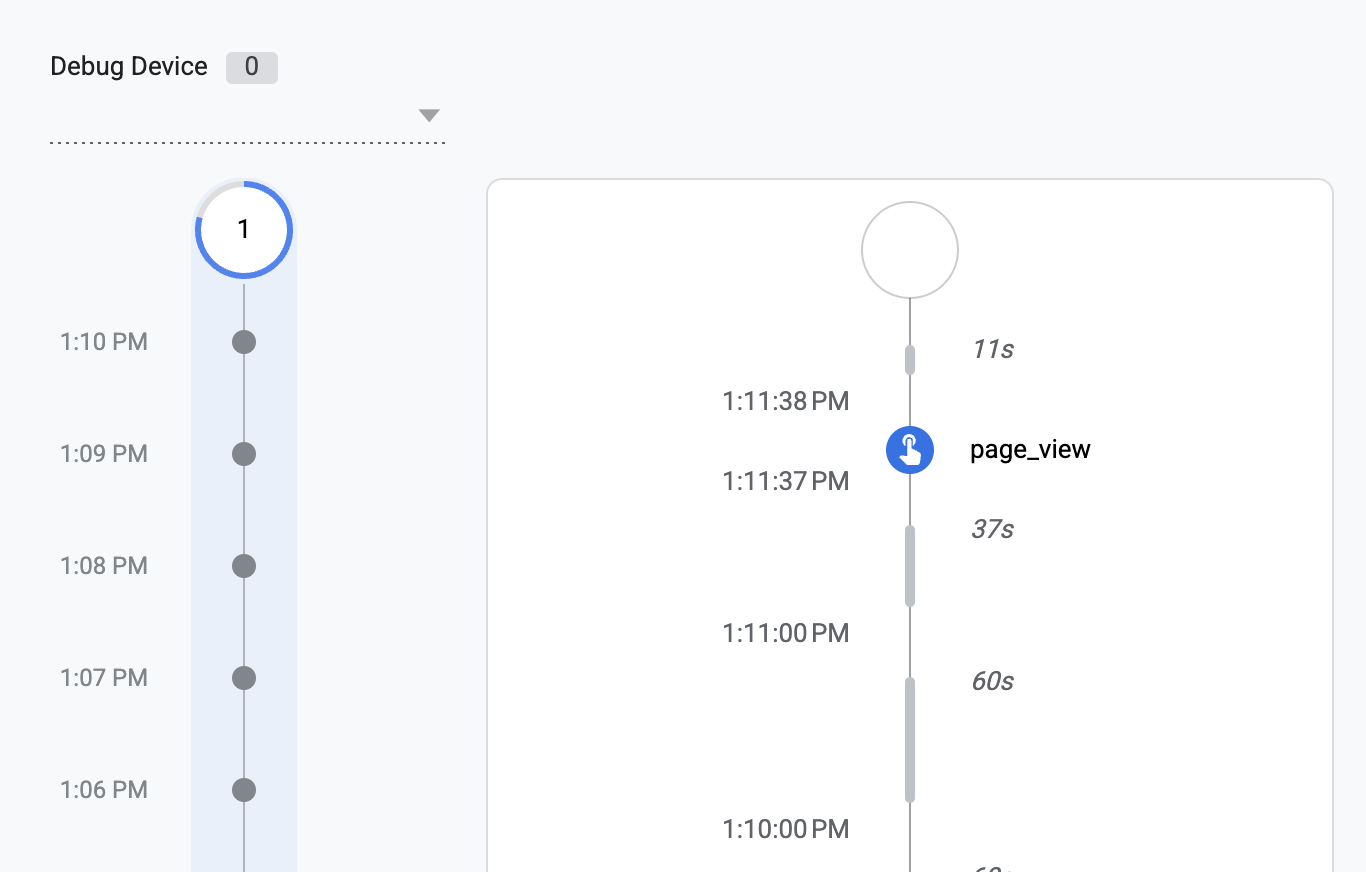
GA4’s Debug View shows that the page_view event was fired.
Implementing Browser-Side Tracking
Capturing Shopify Custom Events
Shopify exposes customer events such as product views, add to cart, checkout, and purchase through the Custom Pixel API, but it does not automatically structure those events in a way that is ready for GTM, GA4, and Meta. I wrote a custom JavaScript layer to extract the relevant information, normalize it to a consistent format, generate additional identifiers where needed, and push everything to the data layer for downstream processing.
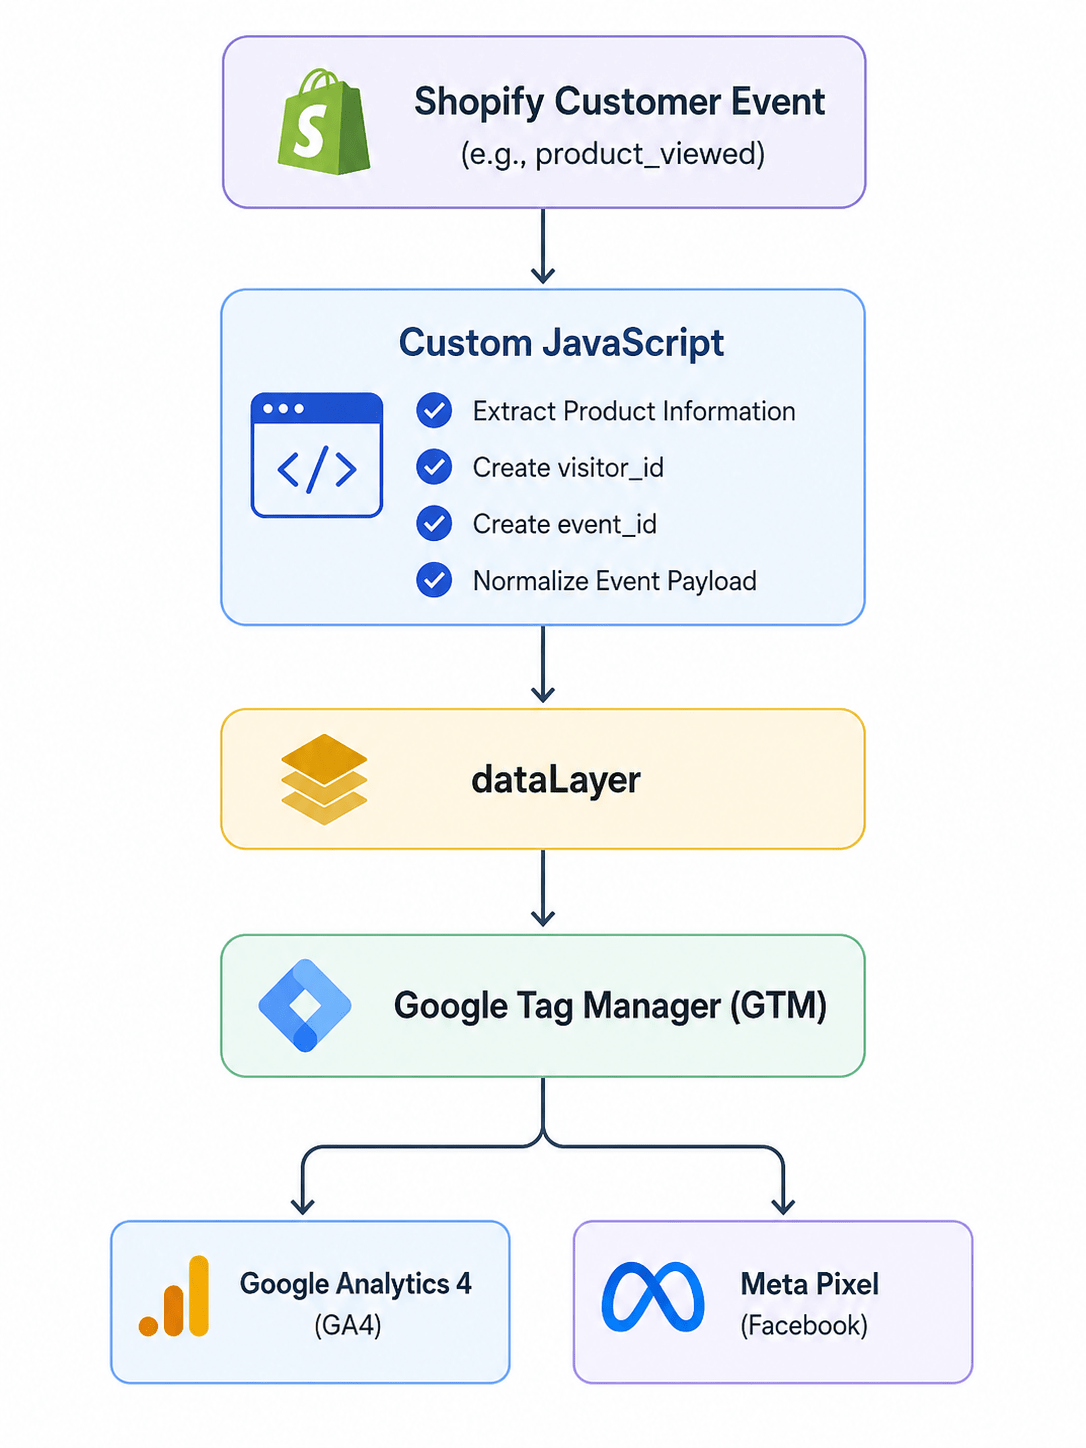
Mapping Events to GA4 and Meta
| Shopify | GA4 | Meta |
|---|---|---|
| product_viewed | view_item | ViewContent |
| product_added_to_cart | add_to_cart | AddToCart |
| checkout_started | begin_checkout | InitiateCheckout |
| checkout_completed | purchase | Purchase |
Creating a Persistent Visitor ID
One limitation of browser based that visitors are often anonymous unless they are logged in or complete a purchase. To better understand visitors’ journey across multiple pages and sessions, I implemented a customvisitor_id
The first time someone visits, a random UUID is generated and stored in local storage of the browser. The same identifier is used on subsequent visits, or a new one is generated if the old one was removed. This provides a consistent identifier for that browser without relying on cookies. Every browser event sent to both GA4 and Meta includes this visitor_id. In Meta, it is sent as external_id, allowing the browser and server events to share a consistent identifier and providing Meta with an additional identity signal to improve event matching.
Do remember this identifier is generated by code rather than provided by the user; it complements but does not replace strong identity signals like user email, phone, or Meta’s own fbp and fbc cookie values. Below are the screenshots of GA4 Debug View and Meta’s Test Events.
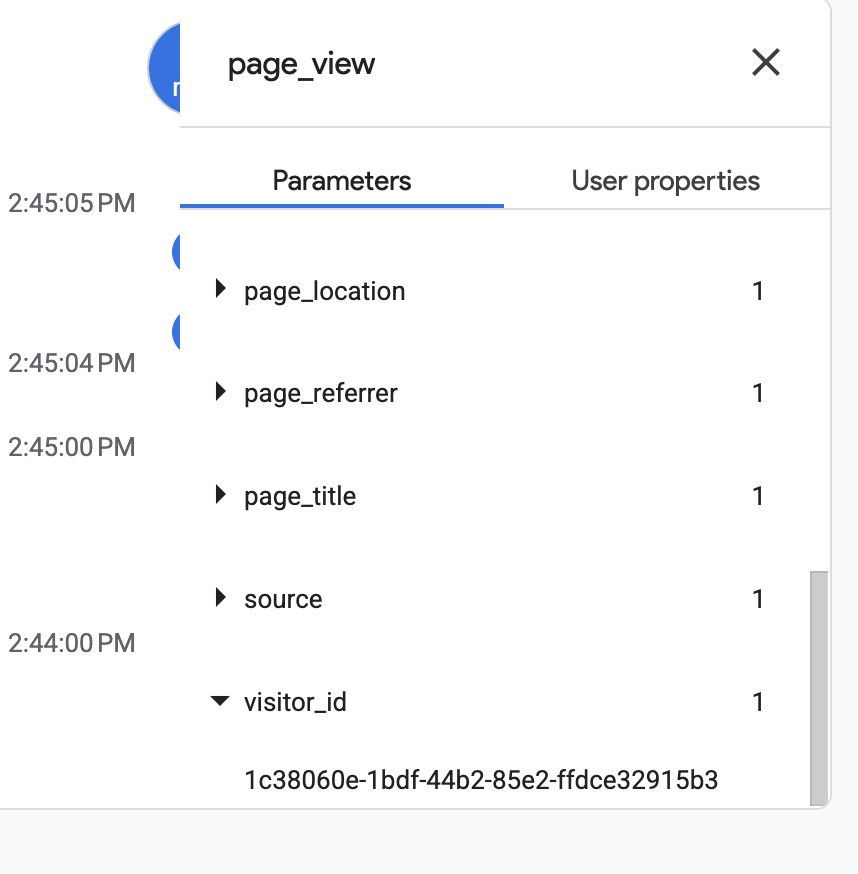
and Meta Test Events:
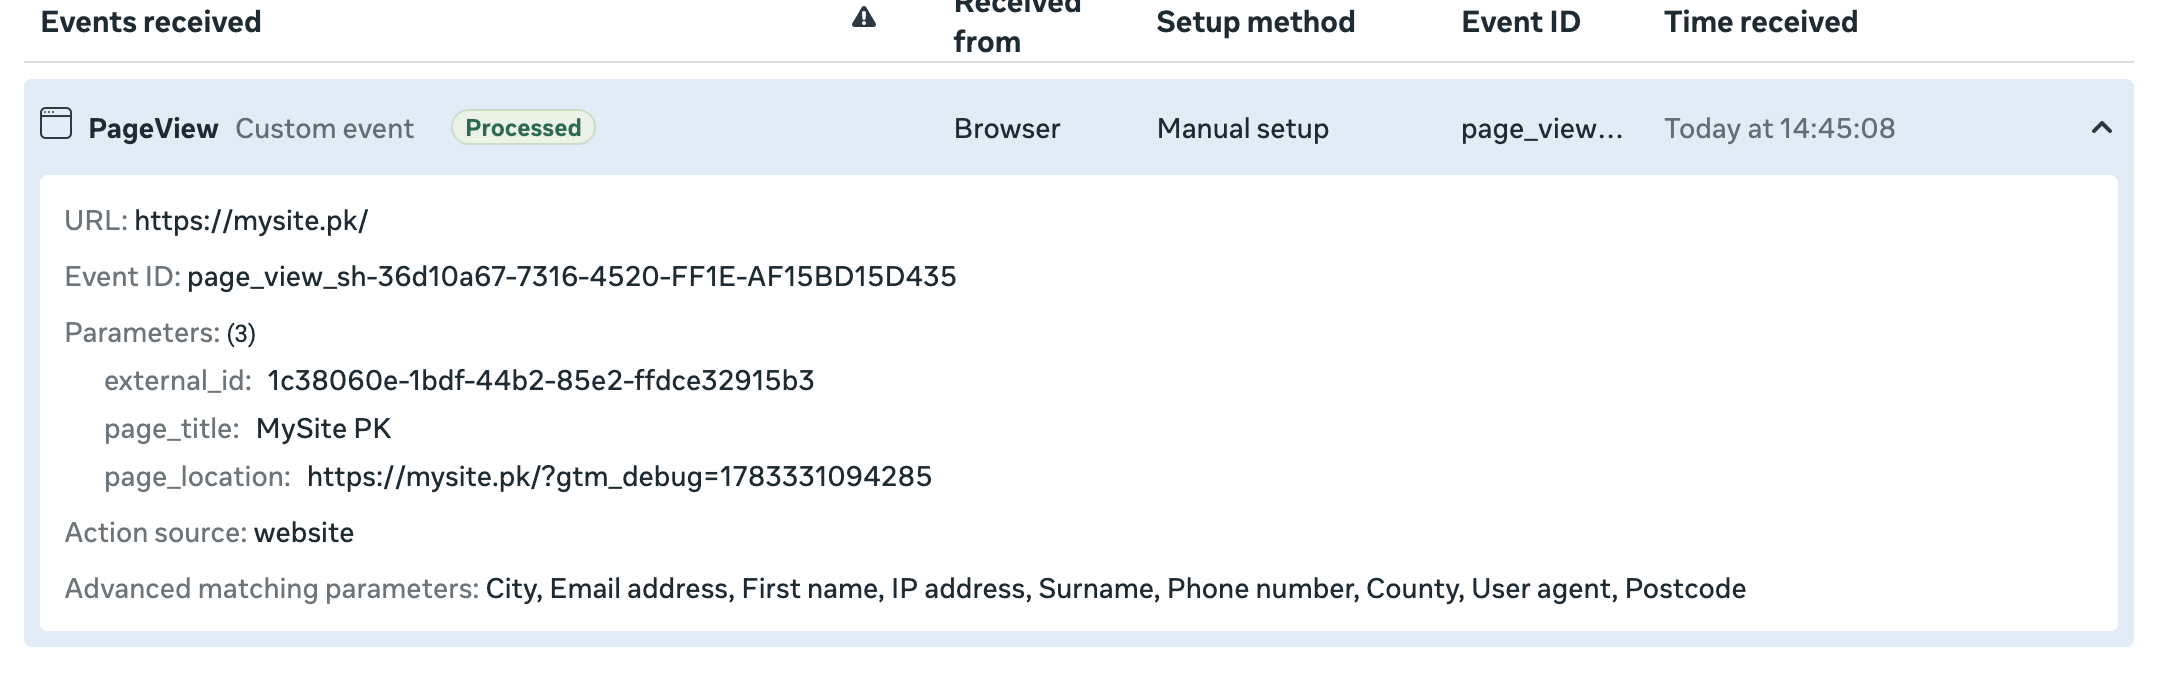
Notice the value of both visitor_id an external_id is the same.
Important: In the implementation used here,visitor_id refers to an arbitrary unique identifier saved in the browser’s local storage. This does not include any personally identifiable information (PII), like a user’s name, email, or telephone number. Nevertheless, depending on your country and local laws regarding privacy (GDPR, ePrivacy Directive or equivalent legislation), collecting identifiers or using analytics/advertising tracking may require user consent prior to initiating any tracking operations. Always make sure that your implementation adheres to the relevant privacy laws governing your company and its users.
Generating Unique Event IDs
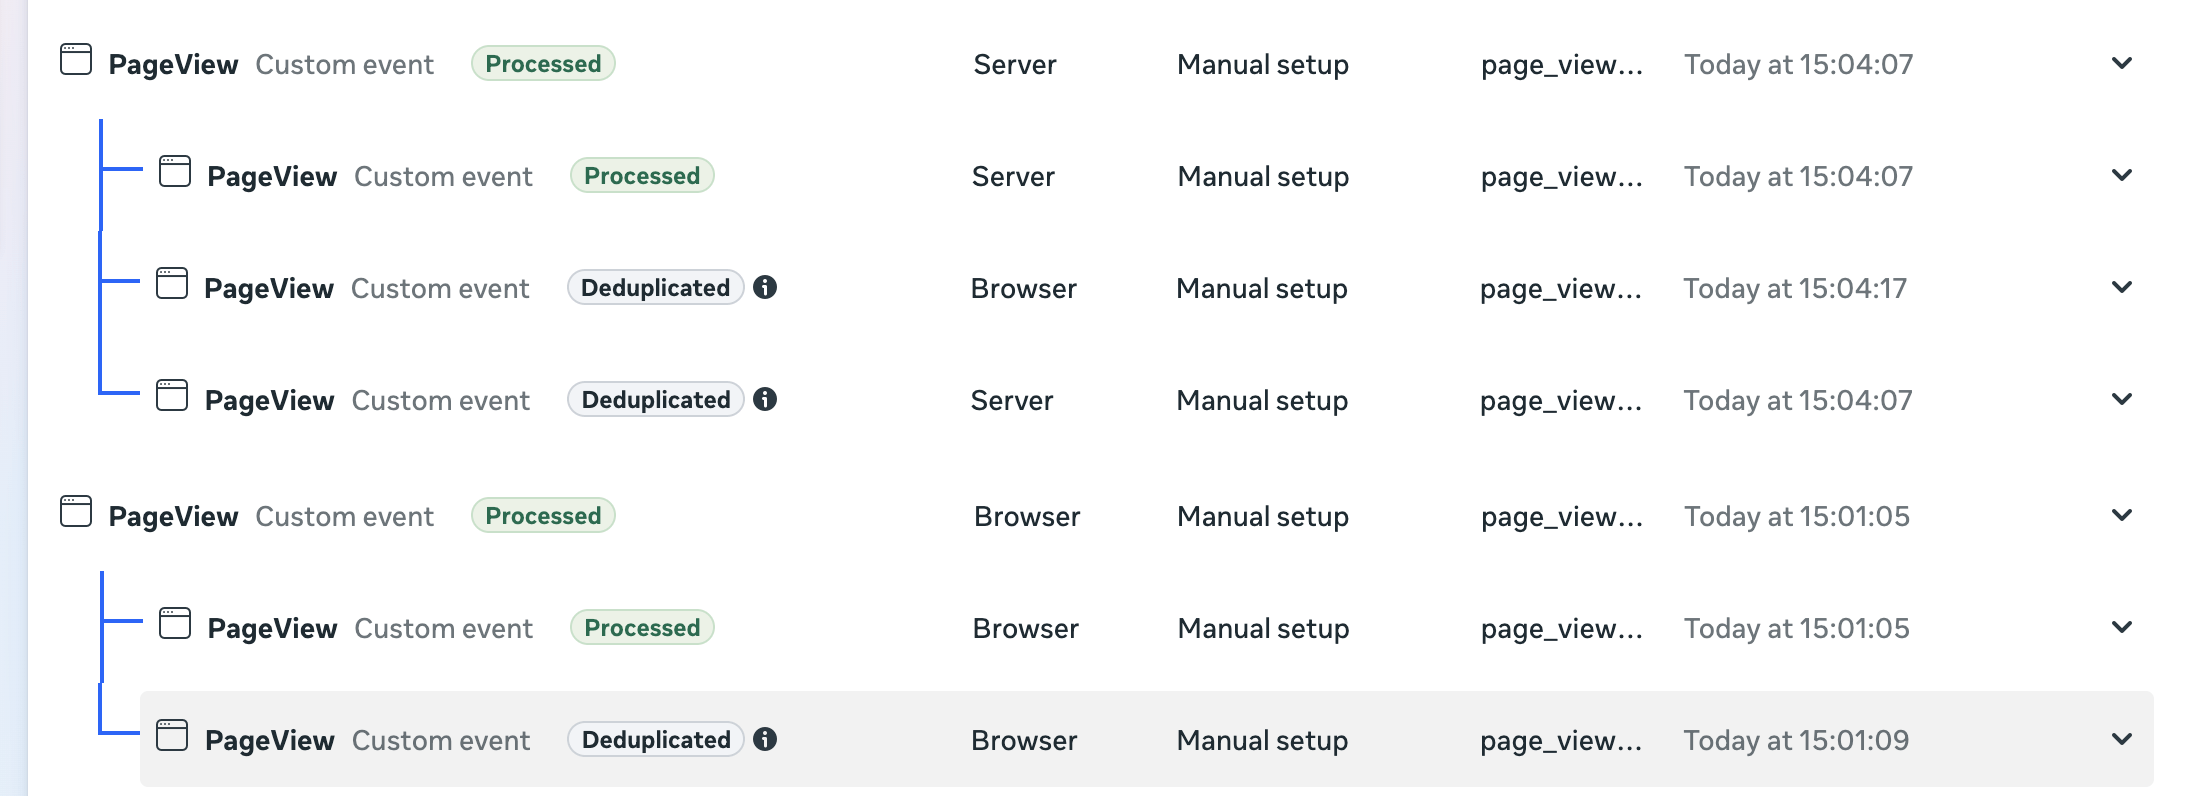
Since the same event is sent from both the browser and server, I also generated a unique event_id for every event. This allows Meta to recognize that both the browser and server events represent the same user action and deduplicate them correctly, preventing duplicate conversions from being counted. 

Notice the event ID of both browser and server events. After a while, Facebook marks them as Deduplicated, telling Meta that both events had the same IDs, hence must be counted as a single event.
Like this:

Sending Custom Parameters
| Parameter | Why |
|---|---|
| visitor_id | Identify repeat visitors |
| event_id | Deduplication |
| page_title | Reporting |
| page_location | Navigation |
| content_ids | Products |
| value | Revenue |
| currency | Purchase value |
That’s how they appear in Debug View:
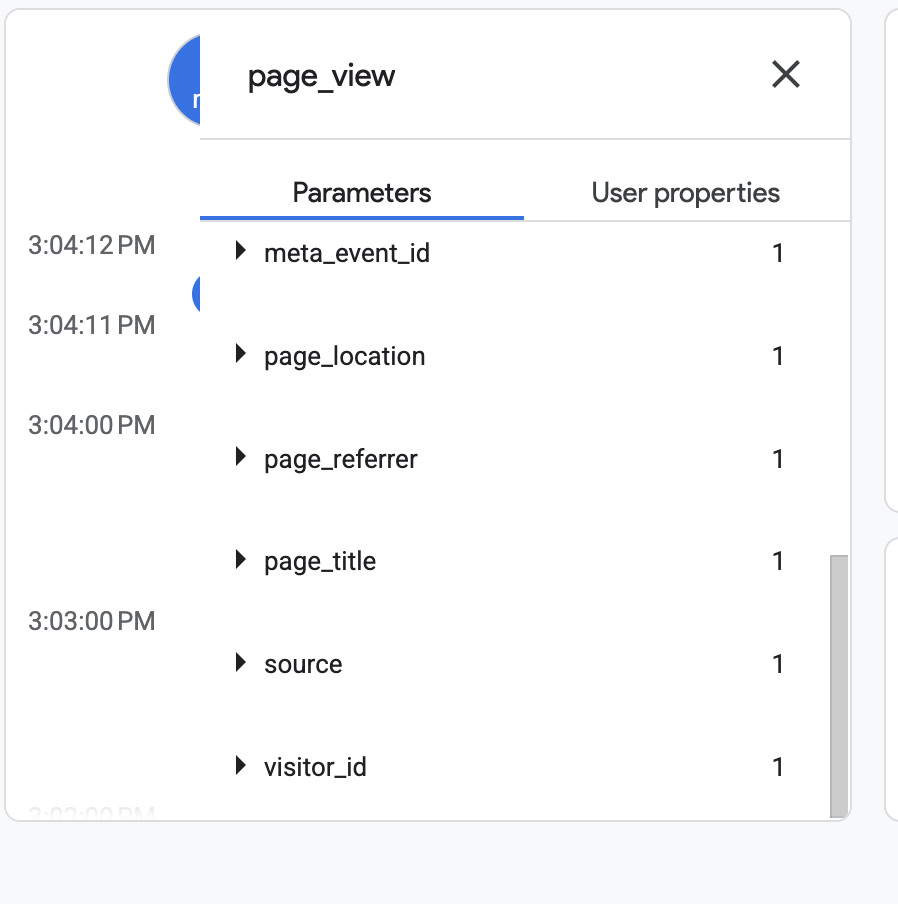
Implementing Server-Side Meta CAPI
Since the client did not want to use a paid server-side tagging platform, I built a lightweight PHP endpoint, hosted on his shared hosting server, to receive browser events and forward them to Meta using the Conversation API. This gives me full control over the payload while keeping the implementation simple and cost-effective.
Forwarding Events to Meta
Whenever an event occurs, the Custom Pixel sends the event data to the CAPI endpoint. The server then enriches the payload with identity signals such as fbp, fbc, external_id, IP address, and User-Agent before sending it to Meta’s Conversion API.
Event Deduplication
Since we are generating a unique event ID and sending both browser and server events, it lets Meta recognize that both events are the same, hence deduplicate them.
Event Verification in Meta Test Events
Just like GA4 provides Debug View, Meta provides Test Events to debug events at runtime. Following the implementation, I utilized Test Events from Meta to ensure that all browser and server events were being received properly. This also helped me ensure that deduplication was functioning correctly.
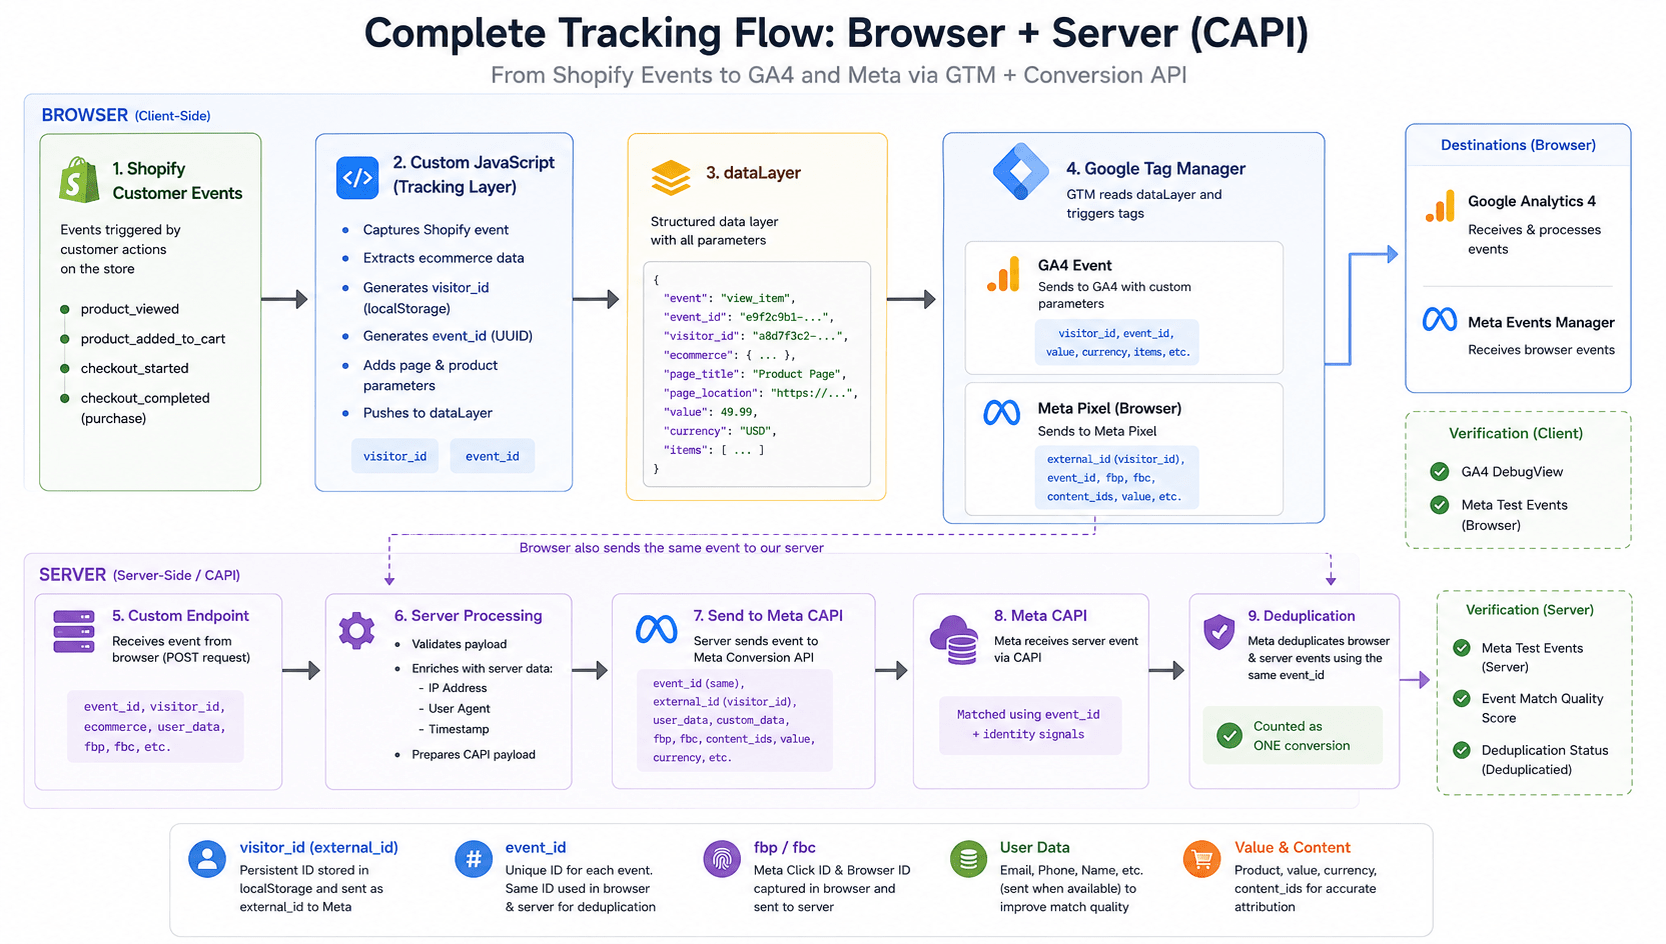
Complete Tracking Architecture
At this stage, both browser-side tracking and server-side tracking were being done simultaneously. The following diagram shows the entire process from start to finish regarding a particular user event from the Shopify Custom Pixel to Google Tag Manager and then finally to my server endpoint.
Results
Once the implementation had been done, I gave Meta time to process all the events(It usually takes from a few days to a couple of weeks, depending on website traffic), after which I revisited the website using the Events Manager. One of the changes that stood out was the Data Quality Score (DQS).
Prior to the execution of the action plan, the score was a clear indication that Meta wasn’t getting enough information from some events. With the help of browser-side tracking, setting up a custom server-side Conversion API endpoint, enriching events with more identities, and deduplication of events, the Data Quality Score increased tremendously.
The screenshots below show the difference before and after the implementation.
Before
After
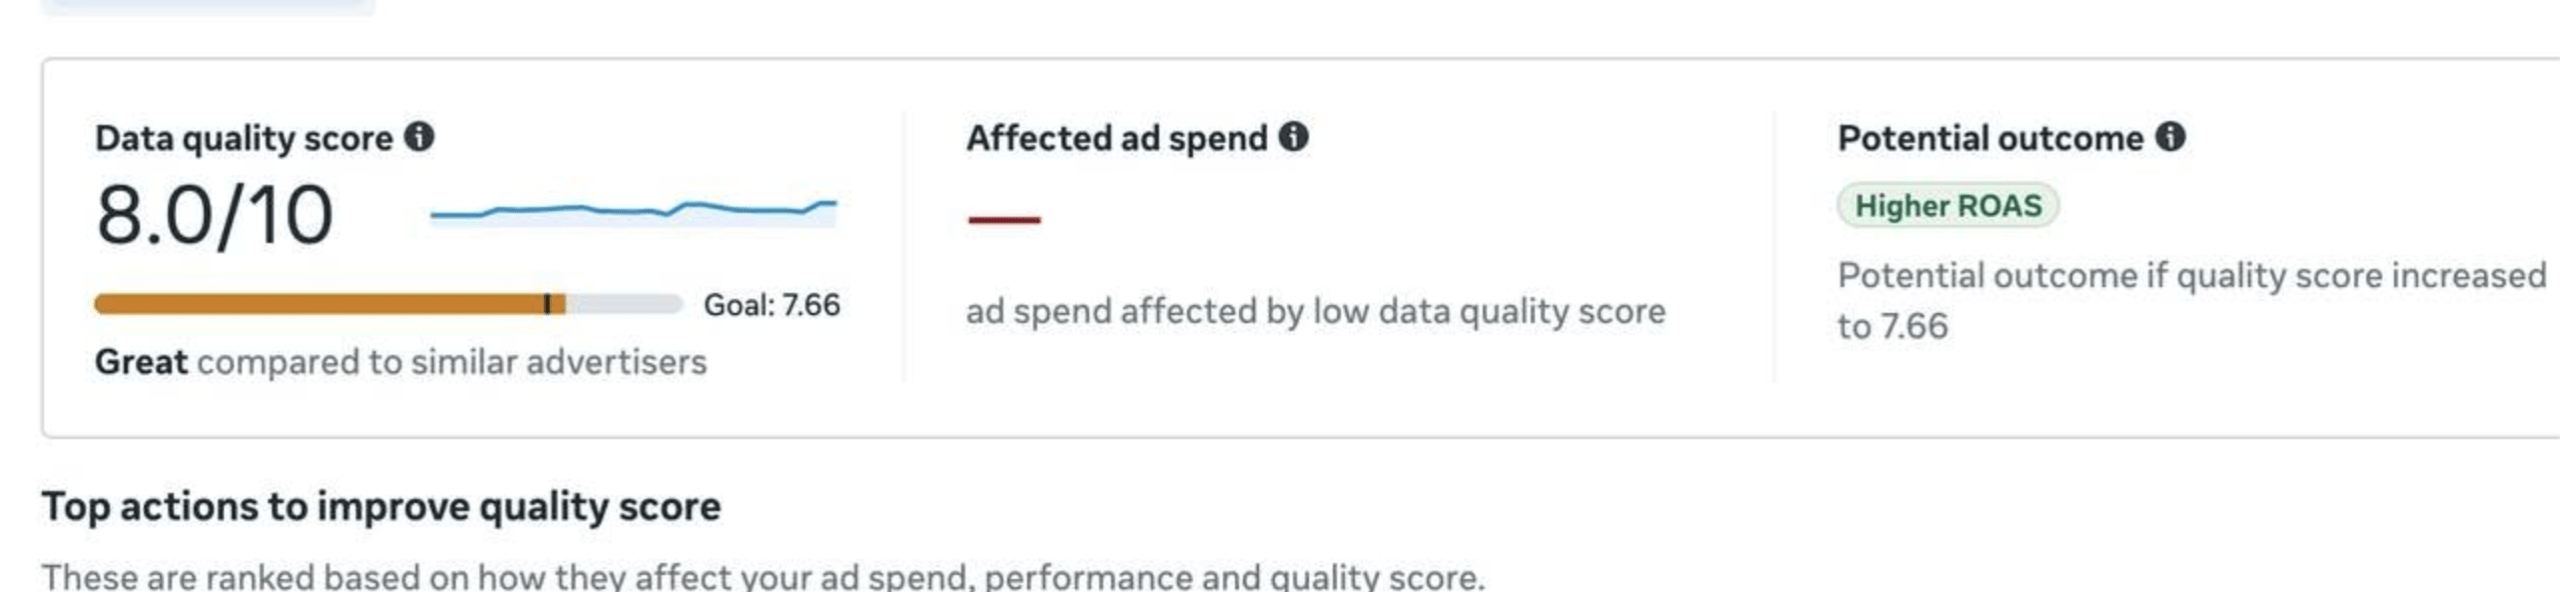
Though the Data Quality Score has seen substantial improvements, there is still room for optimization. With the gathering of additional quality event data, Meta has enhanced signals on user behavior, making the audience matching process better for its AI-driven ad system. The screenshot speaks for itself: Higher ROAS.
Lessons Learned
- Even when a browser event fires successfully, there is no guarantee that the server-side event works correctly.
- Debugging becomes harder in the case of Shopify’s Custom Pixel sandbox as compared to a regular GTM setup.
- Event de-duplication relies on using the same event_id for both browser and server-side events.
- Identity information, such as fbp, fbc, and external_id, can help increase the quality of the data shared with Meta.
- Testing must be done via GA4 DebugView and Meta Test Events.
- Implementation of technical aspects can be verified instantly, but it takes time for metrics like Data Quality Score, Event Match Quality, and advertising optimization to change.
Final Thoughts
This project started out as an attempt to get some practical experience after finishing the tracking course. But soon enough, I learned how important it is to implement in practice. Throughout this project, I learned that tracking is not only about firing events; it is all about gathering good data that will be used by advertising and analysis platforms with confidence.
Even though this particular implementation was not implemented using the managed GTM Server service called Stape, the process was pretty much the same: gathering good data, enriching it with identity signals, deduplicating browser/server events, and constantly validating the implementation.
One benefit I had working on this project was my experience as a software developer. When Shopify features were insufficient for my needs, I could supplement the implementation with JavaScript code, create my own server-side endpoint, create persistent visitor IDs, and customize the whole tracking workflow according to client needs rather than sticking to what Shopify provides.
If you have a Shopify website and you do not know whether your analytics and ads platforms receive correct and complete information from your site, auditing your implementation will be a smarter spend than raising your ad budget. Good data means good decisions.
🎁 Free Shopify GTM Container
To help Shopify store owners and developers get started, I’ve made the GTM Web Container used in this project available for free. It includes the GA4 ecommerce event setup, Meta Pixel configuration, variables, triggers, and event mappings discussed throughout this case study.
The container includes:
✓ GA4 Ecommerce Events
✓ Meta Pixel
✓ Custom Variables
✓ Triggers
✓ Event Mappings
✓ Ready to Import
👉 Download it for free from Gumroad: https://kadnan.gumroad.com/l/web-gtm-container-shopify
Want me to audit your tracking setup?
📧 Email: kadnan@gmail.com
or
📅 Schedule a free discovery call