In this post, I am going to talk about Celery, what it is, and how it is used.
What is Celery
From the official website:
Celery is a simple, flexible, and reliable distributed system to process vast amounts of messages, while providing operations with the tools required to maintain such a system.
Wikipedia says:
Celery is an open source asynchronous task queue or job queue which is based on distributed message passing. While it supports scheduling, its focus is on operations in real time.
In short, Celery is good to take care of asynchronous or long-running tasks that could be delayed and do not require real-time interaction. It can also be used to run scheduled tasks. A task is a piece of code that carries out a certain operation.
Celery Use cases
Celery could have many use cases, some of them are given below:
- Sending emails:- Instead of making a user wait after filling the registration form, you can hand over the email sending task to celery and show a Thank you page to the user. You might say, it does not take time to execute the email sending code but what if the email server is not responding, if you make this part synchronous, your site visitor will have to wait till the timeout occurs.
- Image/Other files Uploading and related information:- It is very common now to upload images or other kinds of documents via a webpage. Say you want to provide a facility to upload product information that includes product images. You also want to resize images as per your requirement and watermark them with your brand name. It does not look nice that a user waits during all these operations. All he wants is to see the text that his process is completed and move on. You can create multiple celery tasks to achieve your goal.
- Scheduled Tasks:- Celery can also act as a scheduler and could be used to perform periodic tasks.
Celery Concepts
The basic architecture of Celery is given below:

- Producer:- This app is responsible to push messages with all required information.
- Broker:- This module is actually served as a message queue, applications like Redis or RabbitMQ can be used here.
- Task:- A task is a Python function or task that is enqueued in the broker after serialization. The task function is then picked by a worker which is responsible to deserialize and then execute it. The default serialization format is JSON which you may change to
msgpack, YAML or pickle. - Backend:- This component is responsible to store the result produced by the function
Development Setup
Use pip to install Celery:
pip install celery
You also need a broker hence I am using the docker version of Redis.
docker run -d -p 6379:6379 redis
Now we have celery installed and Redis is up, let’s write some code.
As mentioned, every logical unit/function is termed as a task. I am writing a function that adds two numbers and returns the resultant.
from celery import Celery

BROKER_URL = 'redis://localhost:6379/0'
BACKEND_URL = 'redis://localhost:6379/1'
app = Celery('tasks', broker=BROKER_URL, backend=BACKEND_URL, )


@app.task(name='Add two numbers')
def add(x, y):
    return x + y
The “task” is defined, it’s time to run it. The function add will be enqueued in Redis, it will be with the help of delay() function that itself call apply_async() function that will serialize the function for further processing. Now it’s time to call it. In main.py I will be writing it like the below:
from tasks import add
result = add.delay(66, 4)
print(result.id)
As I mentioned that the delay actually sends the function to the queue for later processing. It accepts the same parameter as given in the original function.
tasks.py contains both the main logic and configuration. BACKEND_URL and BROKER_URL contains the paths of databases where relevant information will be stored. The @task decorator is responsible to convert a simple function into a task. You may set the name of the attribute to give a name to your tasks.
Now, let’s run the main.py to enqueue the task. When I run, it produces results like below:

As you can see it returns a task id. At Redis end it stores things like the below:
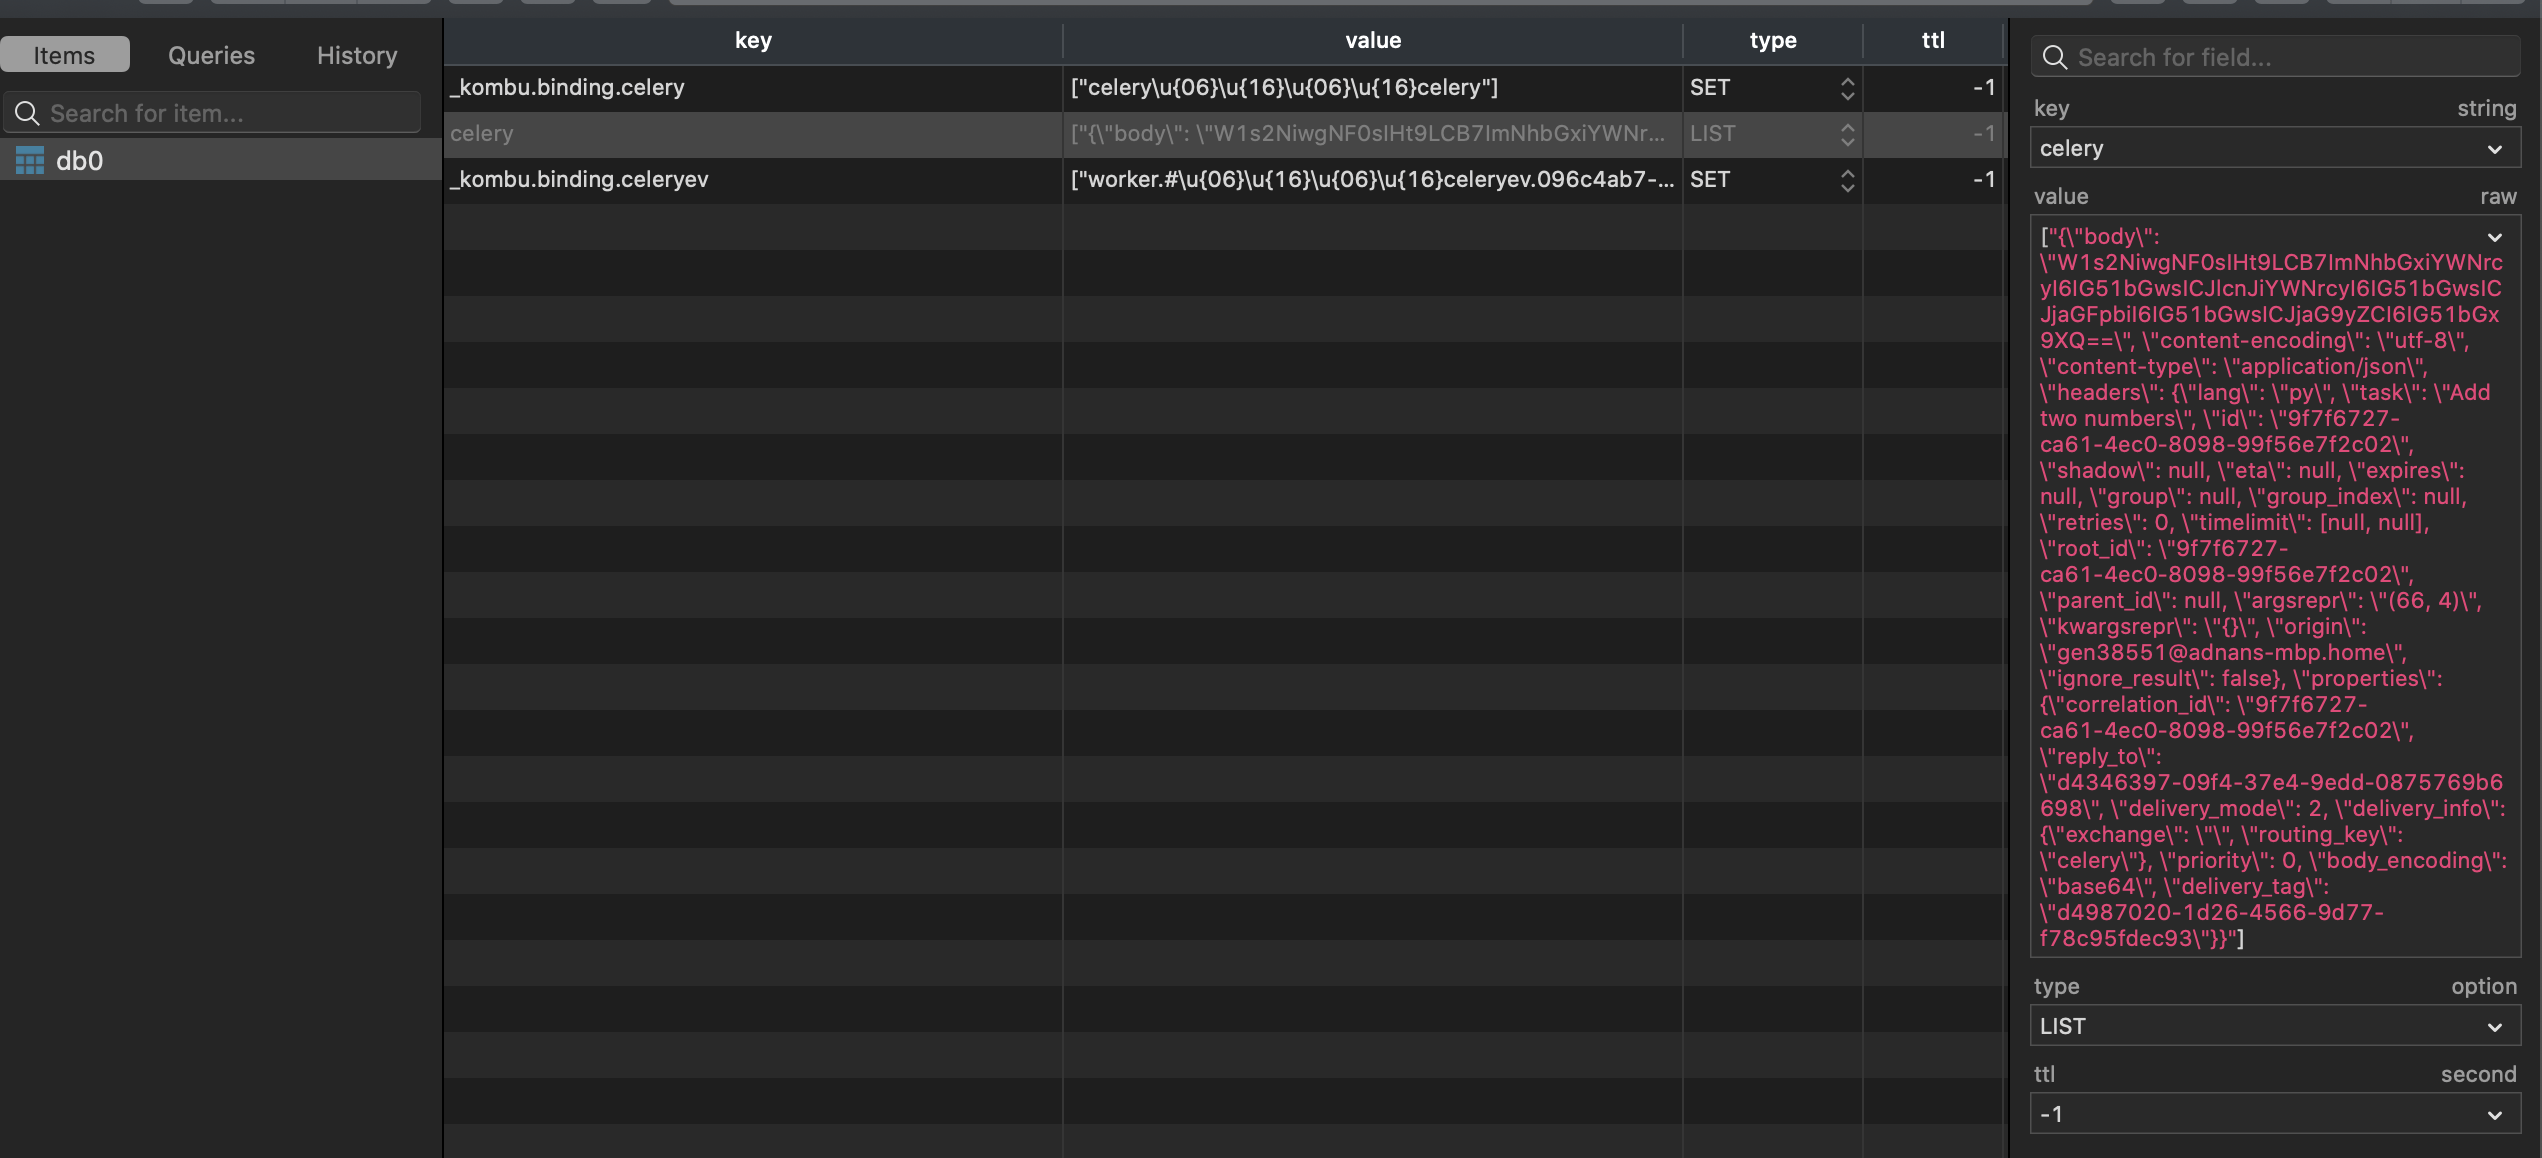
As you can see, the task ID along with the other info is visible here. The JSON data is also posted below for further clarity.
["{\"body\": \"W1s2NiwgNF0sIHt9LCB7ImNhbGxiYWNrcyI6IG51bGwsICJlcnJiYWNrcyI6IG51bGwsICJjaGFpbiI6IG51bGwsICJjaG9yZCI6IG51bGx9XQ==\", \"content-encoding\": \"utf-8\", \"content-type\": \"application/json\", \"headers\": {\"lang\": \"py\", \"task\": \"Add two numbers\", \"id\": \"9f7f6727-ca61-4ec0-8098-99f56e7f2c02\", \"shadow\": null, \"eta\": null, \"expires\": null, \"group\": null, \"group_index\": null, \"retries\": 0, \"timelimit\": [null, null], \"root_id\": \"9f7f6727-ca61-4ec0-8098-99f56e7f2c02\", \"parent_id\": null, \"argsrepr\": \"(66, 4)\", \"kwargsrepr\": \"{}\", \"origin\": \"gen38551@adnans-mbp.home\", \"ignore_result\": false}, \"properties\": {\"correlation_id\": \"9f7f6727-ca61-4ec0-8098-99f56e7f2c02\", \"reply_to\": \"d4346397-09f4-37e4-9edd-0875769b6698\", \"delivery_mode\": 2, \"delivery_info\": {\"exchange\": \"\", \"routing_key\": \"celery\"}, \"priority\": 0, \"body_encoding\": \"base64\", \"delivery_tag\": \"d4987020-1d26-4566-9d77-f78c95fdec93\"}}"]
You can see the value of body is in base64. If I decode W1s2NiwgNF0sIHt9LCB7ImNhbGxiYWNrcyI6IG51bGwsICJlcnJiYWNrcyI6IG51bGwsICJjaGFpbiI6IG51bGwsICJjaG9yZCI6IG51bGx9XQ== it gives the following output:
[[66, 4], {}, {"callbacks": null, "errbacks": null, "chain": null, "chord": null}]
Notice the list with values 66 and 4. These are the parameters you passed in the function. Other information like task name, language, etc can also be seen in the above JSON.
Alright, so what you have done so far is that you pushed the data in the queue which got serialized. It has not been consumed yet, for that you need to start workers. You invoke the workers like the below:
celery -A tasks worker --loglevel=INFO
-A switch for the application name which is tassks here. The name itself comes from the name of the task file tasks.py. You then tell that you want to invoke a worker along with log level. But wait, before I run this command, let me run the celery worker command without passing the worker name
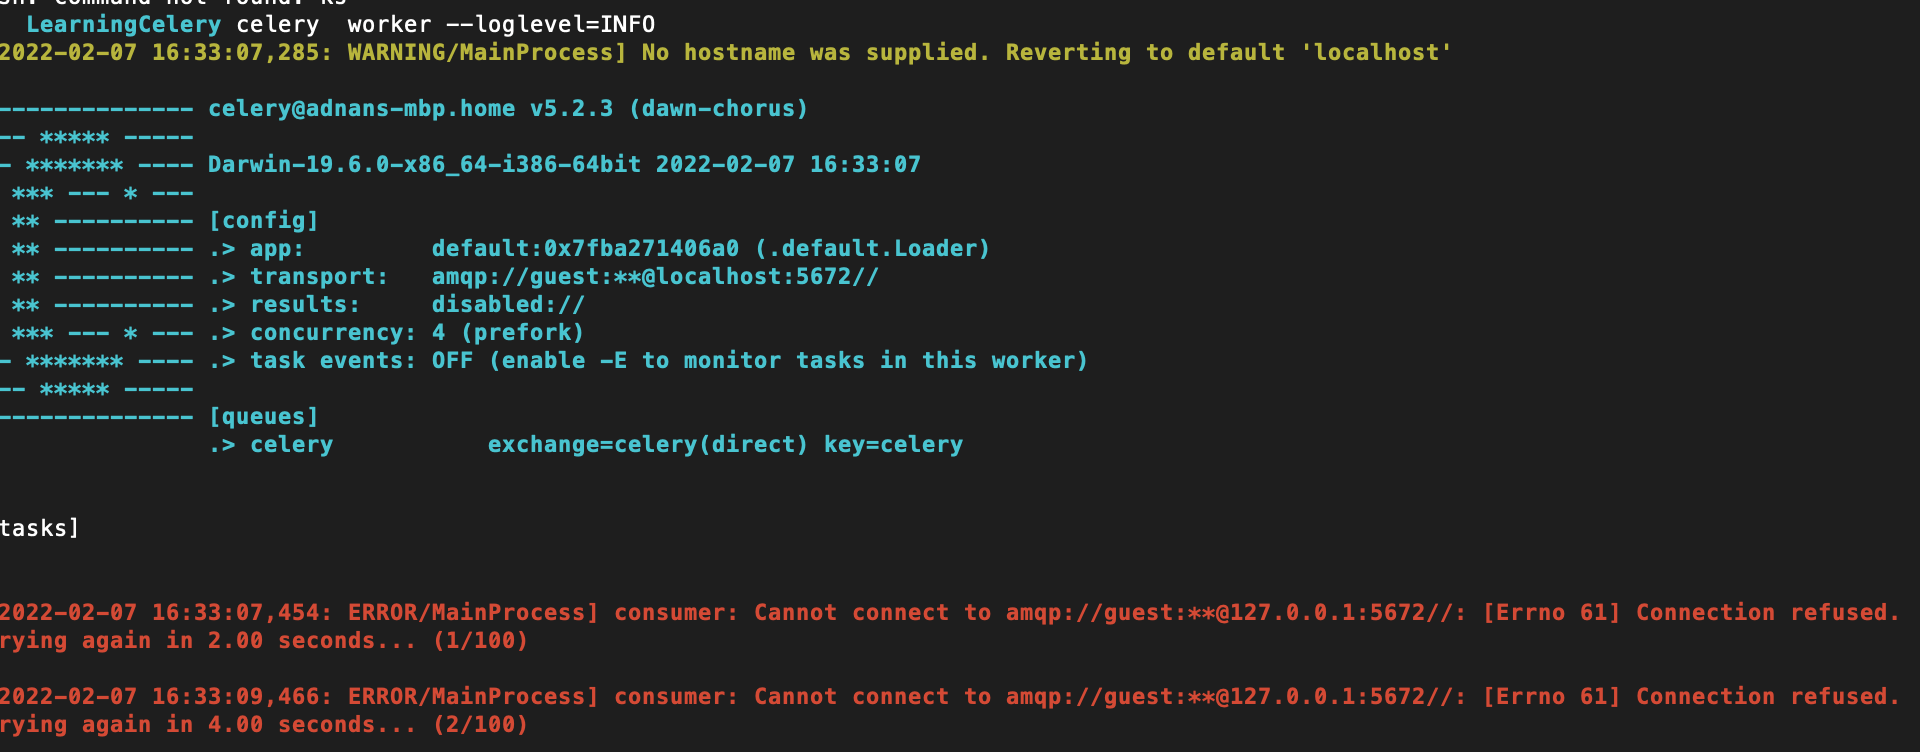
As you can see, the celery worker is making failed attempts to connect the default. Also, the [tasks] section is empty. Now, let’s run the correct command
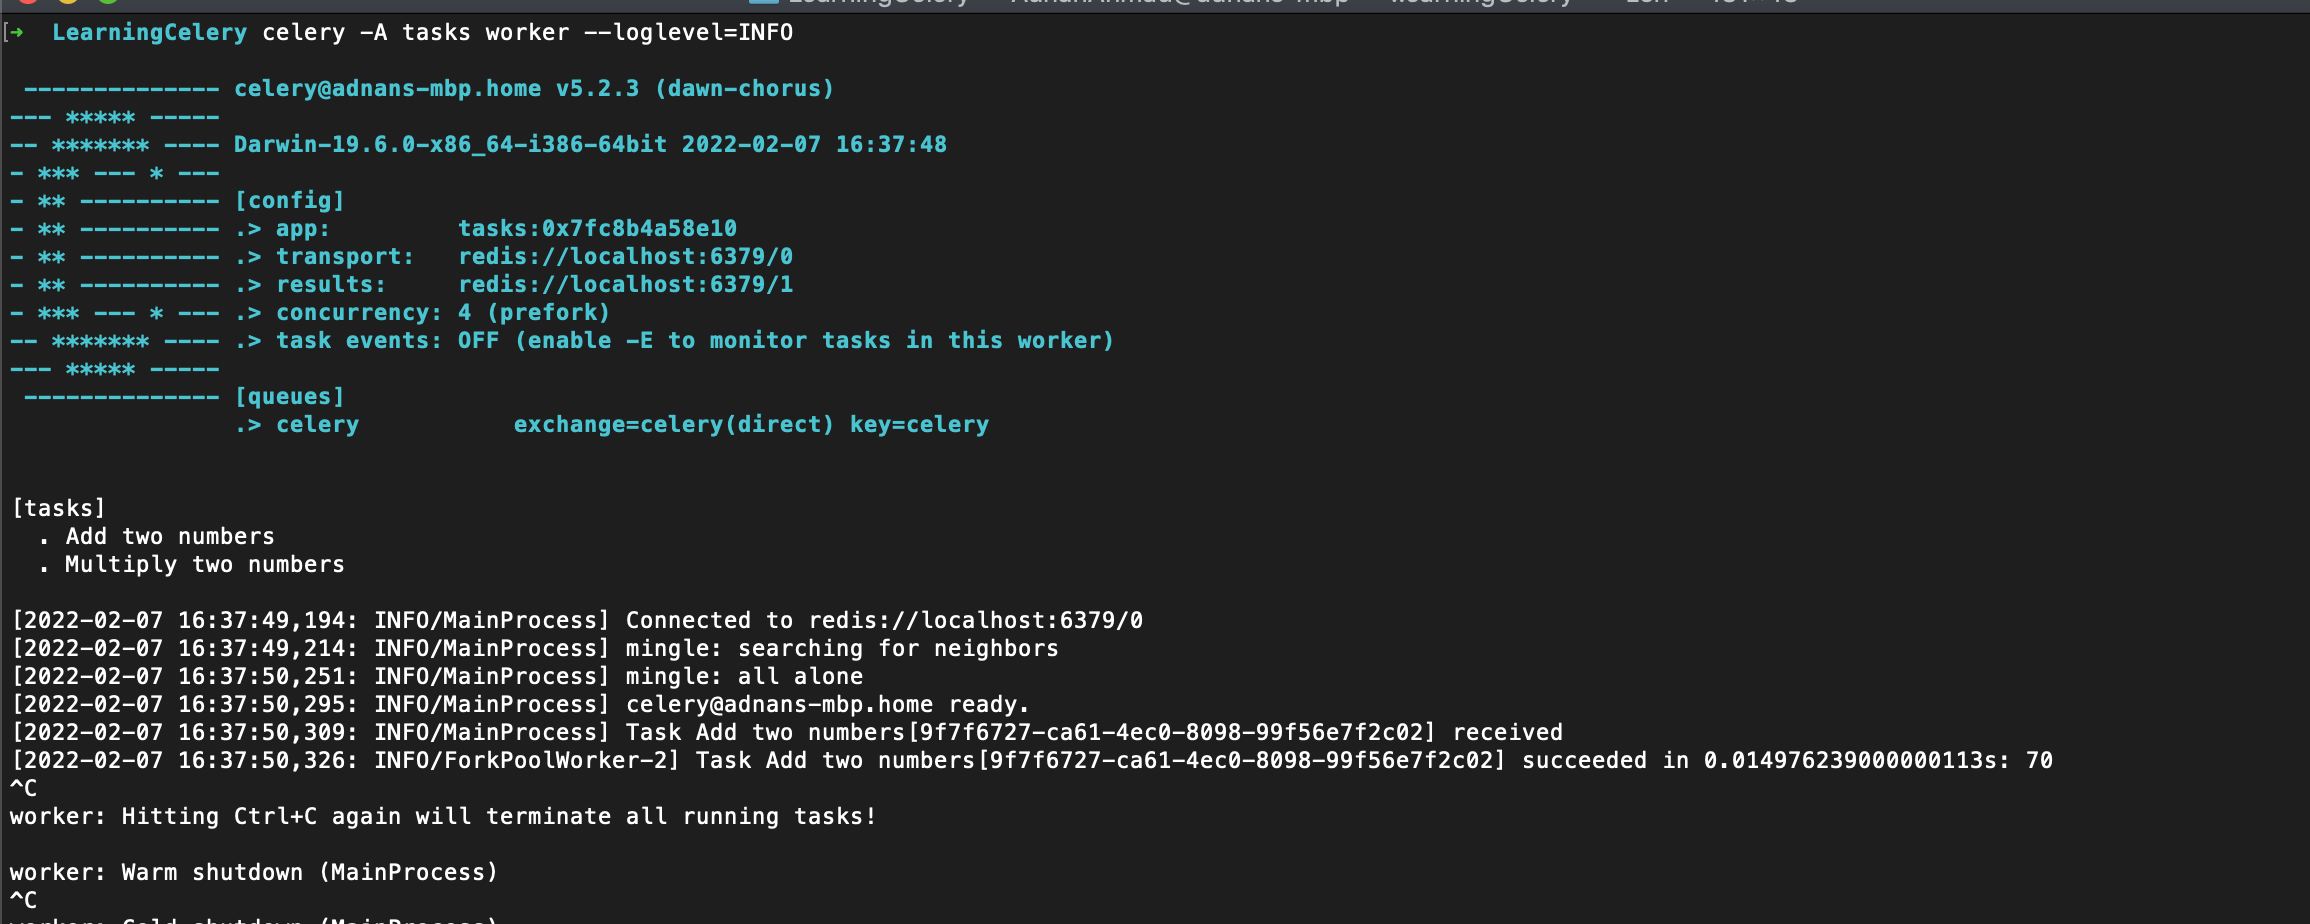
Notice the URLs of both broker and backend and task name. Now you get why do you need to pass the app name.
You can also notice the task Add two numbers along with the task id which was first received and then executed successfully. Notice the 70 figure which is the sum of 66 and 4. So, it is not necessary that the task which was pushed to queue must be handled instantly.
Since we are also using the backend, the result of the task execution is stored like the below:
{
  "status": "SUCCESS",
  "result": 70,
  "traceback": null,
  "children": [

  ],
  "date_done": "2022-02-07T11:37:50.312117",
  "task_id": "9f7f6727-ca61-4ec0-8098-99f56e7f2c02"
}
Conclusion
Celery is great for tasks that can be deferred. Its flexible architecture makes it useful for multiple purposes. I have just discussed the very basic usage of it. You may follow the docs if you are looking for other usages.