![]()
This post is the part of Data Engineering Series.
In this post, I am going to discuss Apache Airflow, a workflow management system developed by Airbnb.
Earlier I had discussed writing basic ETL pipelines in Bonobo. Bonobo is cool for write ETL pipelines but the world is not all about writing ETL pipelines to automate things. There are other use cases in which you have to perform tasks in a certain order once or periodically. For instance:
- Monitoring Cron jobs
- transferring data from one place to other.
- Automating your DevOps operations.
- Periodically fetching data from websites and update the database for your awesome price comparison system.
- Data processing for recommendation based systems.
- Machine Learning Pipelines.
Possibilities are endless.
Before we move on further to implement Airflow in our systems, let’s discuss what actually is Airflow and it’s terminologies.
What is Airflow?
From the Website:
Airflow is a platform to programmatically author, schedule and monitor workflows.
Use airflow to author workflows as directed acyclic graphs (DAGs) of tasks. The airflow scheduler executes your tasks on an array of workers while following the specified dependencies. Rich command line utilities make performing complex surgeries on DAGs a snap. The rich user interface makes it easy to visualize pipelines running in production, monitor progress, and troubleshoot issues when needed.
Basically, it helps to automate scripts in order to perform tasks. Airflow is Python-based but you can execute a program irrespective of the language. For instance, the first stage of your workflow has to execute a C++ based program to perform image analysis and then a Python-based program to transfer that information to S3. Possibilities are endless.
What is Dag?
From Wikipedia
In mathematics and computer science, a directed acyclic graph (DAG /ˈdæɡ/ (About this sound listen)), is a finite directed graph with no directed cycles. That is, it consists of finitely many vertices and edges, with each edge directed from one vertex to another, such that there is no way to start at any vertex v and follow a consistently-directed sequence of edges that eventually loops back to v again. Equivalently, a DAG is a directed graph that has a topological ordering, a sequence of the vertices such that every edge is directed from earlier to later in the sequence.
Let me try to explain in simple words: You can only be a son of your father but not vice versa. OK, it’s lame or weird but could not find a better example to explain a directed cycle.
In Airflow all workflows are DAGs. A Dag consists of operators. An operator defines an individual task that needs to be performed. There are different types of operators available( As given on Airflow Website):
BashOperator– executes a bash commandPythonOperator– calls an arbitrary Python functionEmailOperator– sends an emailSimpleHttpOperator– sends an HTTP requestMySqlOperator,SqliteOperator,PostgresOperator,MsSqlOperator,OracleOperator,JdbcOperator, etc. – executes a SQL commandSensor– waits for a certain time, file, database row, S3 key, etc…
You can also come up with a custom operator as per your need.
Installation and Setup
Airflow is Python based. The best way to install it is via pip tool.
pip install apache-airflow
To verify whether it got installed, run the command: airflow version and it should print something like:
[2018-09-22 15:59:23,880] {__init__.py:51} INFO - Using executor SequentialExecutor
____________       _____________
____    |__( )_________  __/__  /________      __
____  /| |_  /__  ___/_  /_ __  /_  __ \_ | /| / /
___  ___ |  / _  /   _  __/ _  / / /_/ /_ |/ |/ /
_/_/  |_/_/  /_/    /_/    /_/  \____/____/|__/
v1.10.0
You will need to install mysqlclient as well to incorporate MySQL in your workflows. It is optional though.
You will need to install mysqlclient as well to incorporate MySQL in your workflows. It is optional though.
pip install mysqlclient
Before you start anything, create a folder and set it as AIRFLOW_HOME. In my case it is airflow_home. Once created you will call export command to set it in the path.
export AIRFLOW_HOME='pwd' airflow_home
Make sure you are a folder above of airflow_home before running the export command. Within airflow_home you will create another folder to keep DAGs. Call it dags
If you set load_examples=False it will not load default examples on the Web interface.
Now you have to call airflow initdb within airflow_home folder. Once it’s done it creates airflow.cfgand unitests.cfg
airflow.db is an SQLite file to store all configuration related to run workflows. airflow.cfg is to keep all initial settings to keep things running.
In this file, you can see sql_alchemy_conn parameter with the value ../airflow_home/airflow.db
You can use MySQL if you want. For now, just stick with basic settings.
So far so good, now without wasting any time let’s start the web server.
airflow webserver
When starts it shows the screen like:
2018-09-20 22:36:24,943] {__init__.py:51} INFO - Using executor SequentialExecutor
/anaconda3/anaconda/lib/python3.6/site-packages/airflow/bin/cli.py:1595: DeprecationWarning: The celeryd_concurrency option in [celery] has been renamed to worker_concurrency - the old setting has been used, but please update your config.
default=conf.get('celery', 'worker_concurrency')),
____________       _____________
____    |__( )_________  __/__  /________      __
____  /| |_  /__  ___/_  /_ __  /_  __ \_ | /| / /
___  ___ |  / _  /   _  __/ _  / / /_/ /_ |/ |/ /
_/_/  |_/_/  /_/    /_/    /_/  \____/____/|__/
v1.10.0
[2018-09-19 14:21:42,340] {__init__.py:57} INFO - Using executor SequentialExecutor
____________       _____________
____    |__( )_________  __/__  /________      __
____  /| |_  /__  ___/_  /_ __  /_  __ \_ | /| / /
___  ___ |  / _  /   _  __/ _  / / /_/ /_ |/ |/ /
_/_/  |_/_/  /_/    /_/    /_/  \____/____/|__/


/anaconda3/anaconda/lib/python3.6/site-packages/flask/exthook.py:71: ExtDeprecationWarning: Importing flask.ext.cache is deprecated, use flask_cache instead.
.format(x=modname), ExtDeprecationWarning
[2018-09-19 14:21:43,119] [48995] {models.py:167} INFO - Filling up the DagBag from /Development/airflow_home/dags
Running the Gunicorn Server with:
Workers: 4 sync
Host: 0.0.0.0:8080
Now when you visit 0.0.0.0:8080 it shows a screen like:

You can see a bunch of entries here. These are the example shipped with the Airflow installation. You can turn them off by visiting airflow.cfg file and set load_examples to FALSE
DAG Runs tell how many times a certain DAG has been executed. Recent Tasks tells which task out of many tasks within a DAG currently running and what’s the status of it. The Schedule is similar to the one you would have used when scheduling a Cron, therefore, I won’t emphasize on it at the moment. The Schedule is responsible at what time this certain DAG should be triggered.
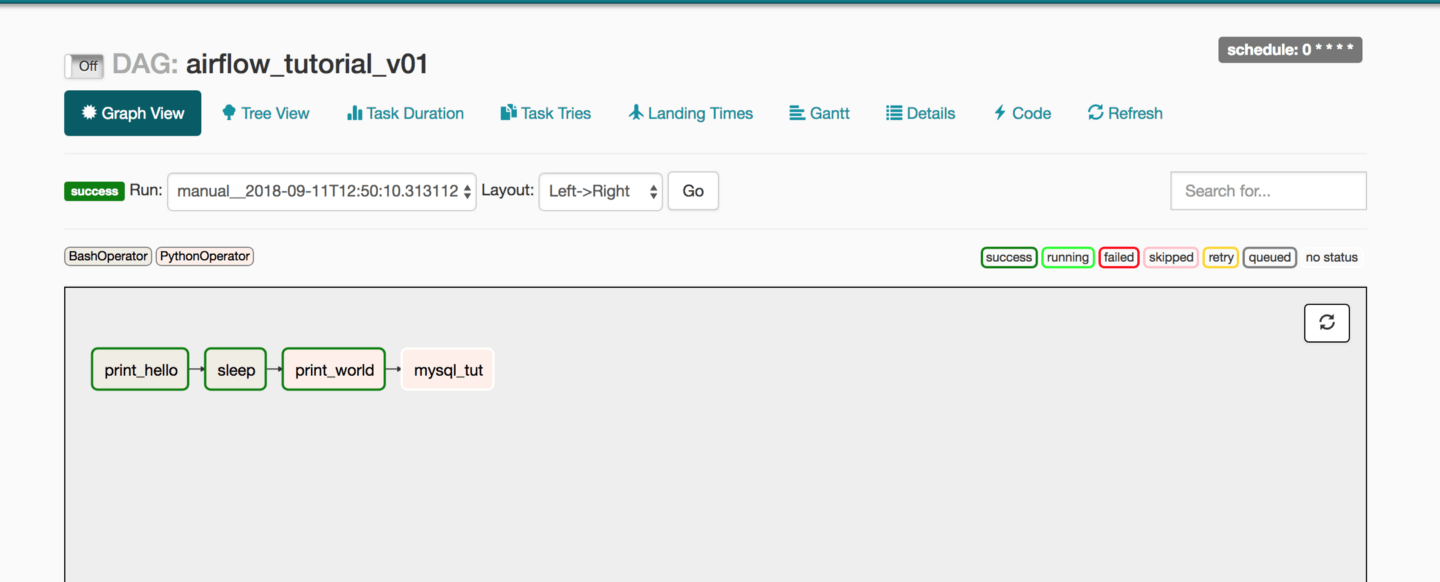
Here is the screenshot from a DAG I created earlier and executed. You can see rectangular boxes representing a task. You can also see different color boxes on the top right of the greyed box, named: success, running, failed etc. These are legends. In the picture above you can all boxes have a green border, still, if you are unsure then hover your mouse on success legend and you will see a screen like below:
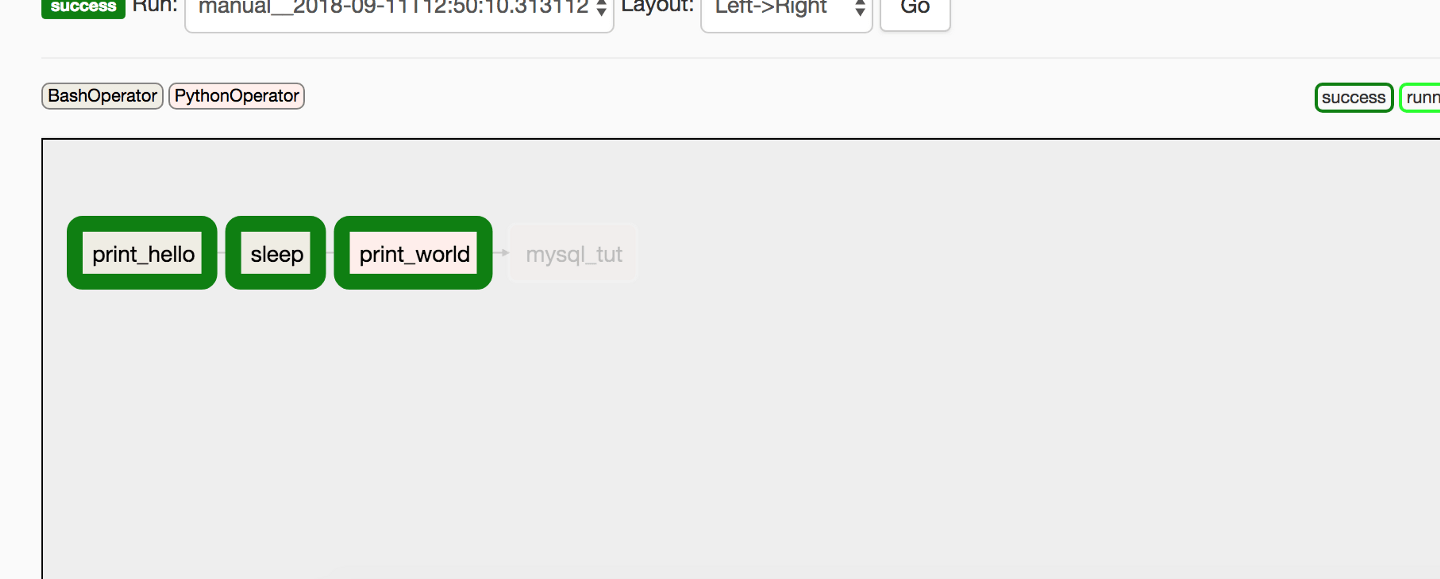
You might have noticed the background/filling color of these boxes which is green and reed. On top-left of the greyed box, you can see why are they in such colors, these background color represents the different types of operators being used in this DAG. In this case, we are using BashOperator and PythonOperator.
Basic Example
We will work on a basic example to see how it works. I will be explaining the example. In the dags folder which was earlier created in airflow_home/ we will create our first sample DAG. So, I am going to create a file with name, my_simple_dag.py
The very first thing you are going to do after imports is to write routines that will serve as tasks for Operators. We will be using a mixture of BashOperator and PythonOperator.
import datetime as dt

from airflow import DAG
from airflow.operators.bash_operator import BashOperator
from airflow.operators.python_operator import PythonOperator


def greet():
    print('Writing in file')
    with open('path/to/file/greet.txt', 'a+', encoding='utf8') as f:
        now = dt.datetime.now()
        t = now.strftime("%Y-%m-%d %H:%M")
        f.write(str(t) + '\n')
    return 'Greeted'
def respond():
    return 'Greet Responded Again'
These are two simple routines which are doing nothing but returning a text. I will tell you later why am I writing something in a text file. Next things I am going to do is to define default_args and create a DAG instance.
default_args = {
    'owner': 'airflow',
    'start_date': dt.datetime(2018, 9, 24, 10, 00, 00),
    'concurrency': 1,
    'retries': 0
}
Here you set a bunch of parameters in the default_args dict variable.
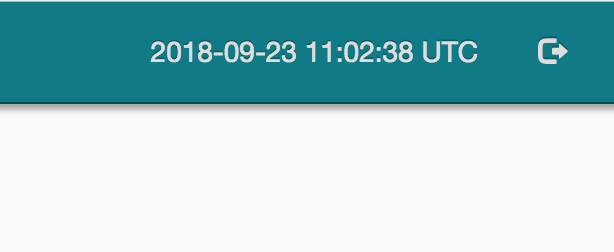
start_date tells since when this DAG should start executing the workflow. This start_date could belong to the past. In my case, it is 22 September and 11 AM UTC. This date is past for me now because it’s already 11:15 AM UTC for me. You can always change this parameter via airflow.cfg file and set your own local timezone. For now, UTC is fine for me. In case you are still curious what time is being used by Airflow, check on the top right of the Airflow Web UI, you should see something like given below. You can use this as a reference to schedule your tasks.
The retries parameter retries to run the DAG X number of times in case of not executing successfully. The concurrency parameter helps to dictate the number of processes needs to be used running multiple DAGs. For instance, your DAG has to run 4 past instances, also termed as Backfill, with an interval of 10 minutes(I will cover this complex topic shortly) and you have set concurrency to 2 then 2 DAGs will run at a time and execute tasks in it. If you already have implemented multiprocessing in your Python then you should feel like home here.
with DAG('my_simple_dag',
         default_args=default_args,
         schedule_interval='*/10 * * * *',
         ) as dag:
    opr_hello = BashOperator(task_id='say_Hi',
                             bash_command='echo "Hi!!"')

    opr_greet = PythonOperator(task_id='greet',
                               python_callable=greet)
    opr_sleep = BashOperator(task_id='sleep_me',
                             bash_command='sleep 5')

    opr_respond = PythonOperator(task_id='respond',
                                 python_callable=respond)
opr_hello >> opr_greet >> opr_sleep >> opr_respond
Now using Context Manager we are defining a DAG with its properties, the first parameter is the ID of the dag, in our case it is my_simple_dag , the second parameter we already have discussed, the 3rd parameter is something that needs to be discussed along with start_date that mentioned in default_args.
Within that Context Manager, you are assigning operators along with task Ids. In our case these operators labeled as: opr_hello opr_greet opr_sleep and opr_respond. These names then appear in rectangular boxes discussed above.
Before I move further, I better discuss DAG Runs and scheduler and what role do they play in the entire workflow.
What is Airflow Scheduler?
Airflow Scheduler is a monitoring process that runs all the time and triggers task execution based on schedule_interval and execution_date.
What is DagRun?
A DagRun is the instance of a DAG that will run at a time. When it runs, all task inside it will be executed.

Above is the diagram which might help to figure out about a DAGRun 🙂
Assume the start_date is September,24,2018 12:00:00 PM UTC and you have started the DAG at 12:30:00 PM UTC with the schedule_interval of */10 * * * *(After every 10 minutes). By using the same default_args params discussed above, the following will be the entries of DAG that will run instantly, one by one in our case due to concurrency is 1:
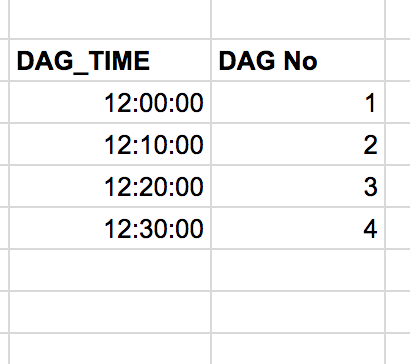
Why is it happening? Well, you are responsible for it. Airflow gives you the facility to run past DAGs. The process of running past DAGs is called Backfill. The process of Backfill actually let Airflow forset some status of all DAGs since it’s inception. The feature has been given for scenarios where you are running a DAG which queries some DB or API like Google Analytics to fetch previous data and make it part of the workflow. Even if there is no past data, Airflow will run it anyway to keep the state of the entire workflow intact.
Once past DAGs are run, the next(the one you intend to run will run) at 12:40:00 PM UTC. Do remember that whatever the schedule you set, the DAG runs AFTER that time, in our case if it has to run after every 10 mins, it will run once 10 minutes are passed.
Let’s play with it. I turn my_simple_dag on and then start the scheduler.
![]()
airflow scheduler
As soon as you run you will see the dag screen like this:
![]()
Some of the tasks are queued. If you click on the DAG Id, my_simple_dag you will see a screen like below:
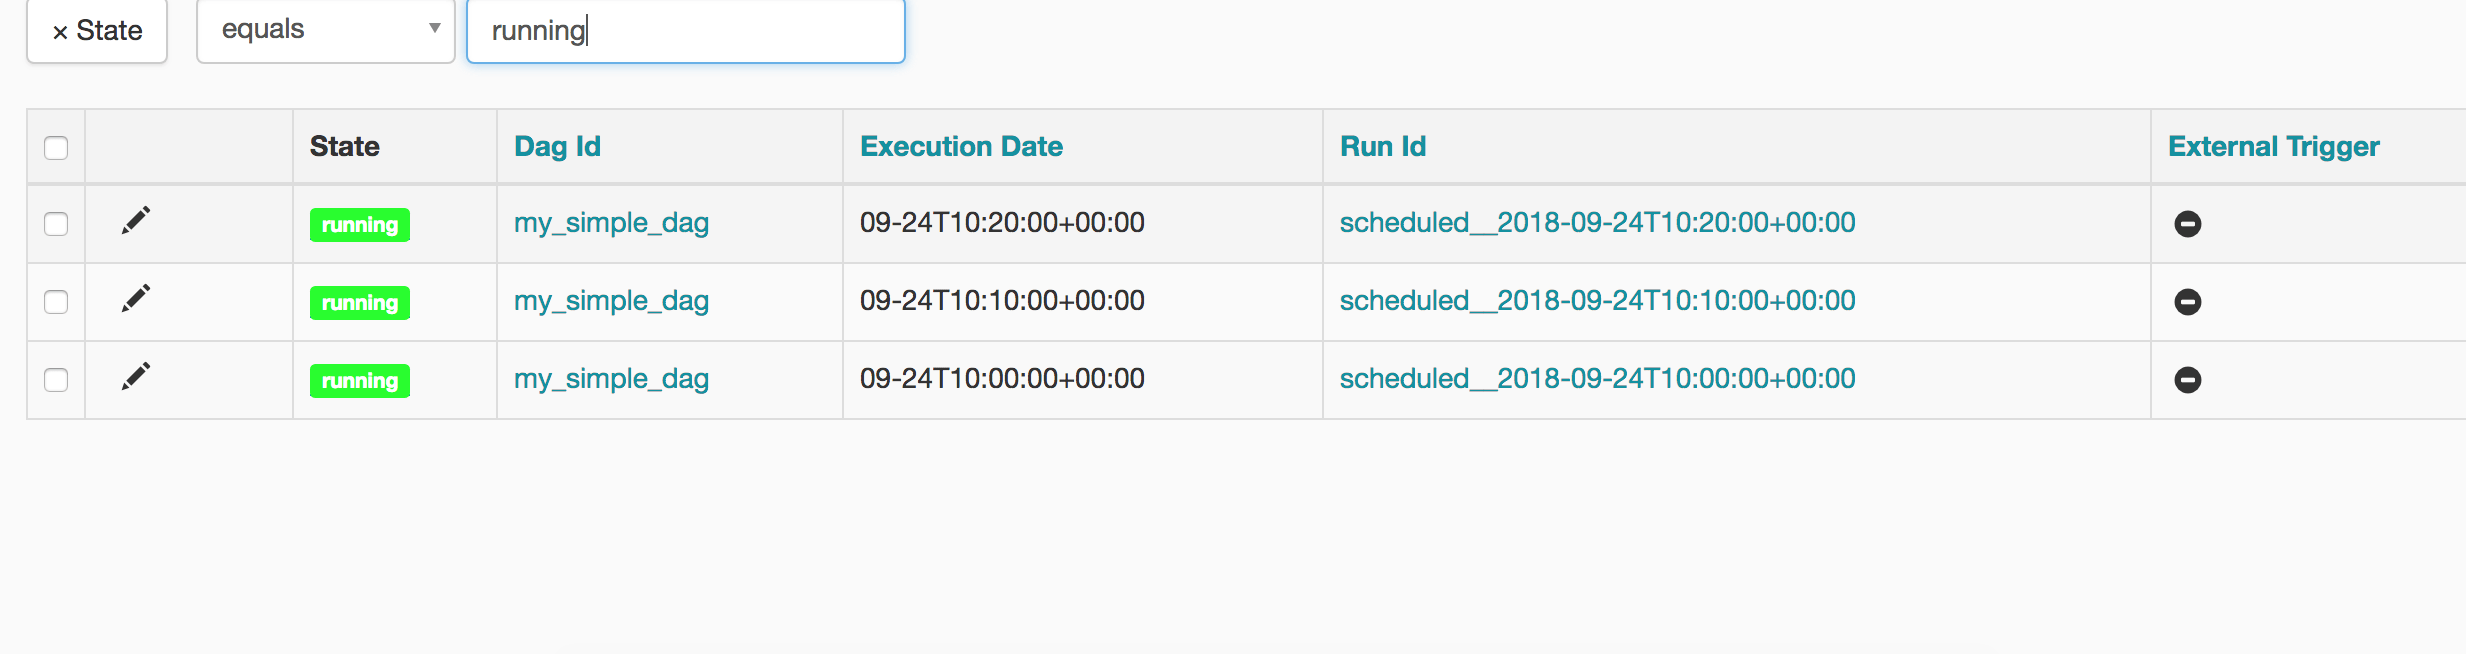
Notice the timestamp in Run Id column. Do you see the pattern? The first one executed at 10:00, then 10:10, 10:20. It then stops, let me clarify again that the DAG runs once the time duration which is 10minutes is passed. The scheduler started at 10:30 AM. so it filled passed 3 with the difference of 10 mins of the interval.
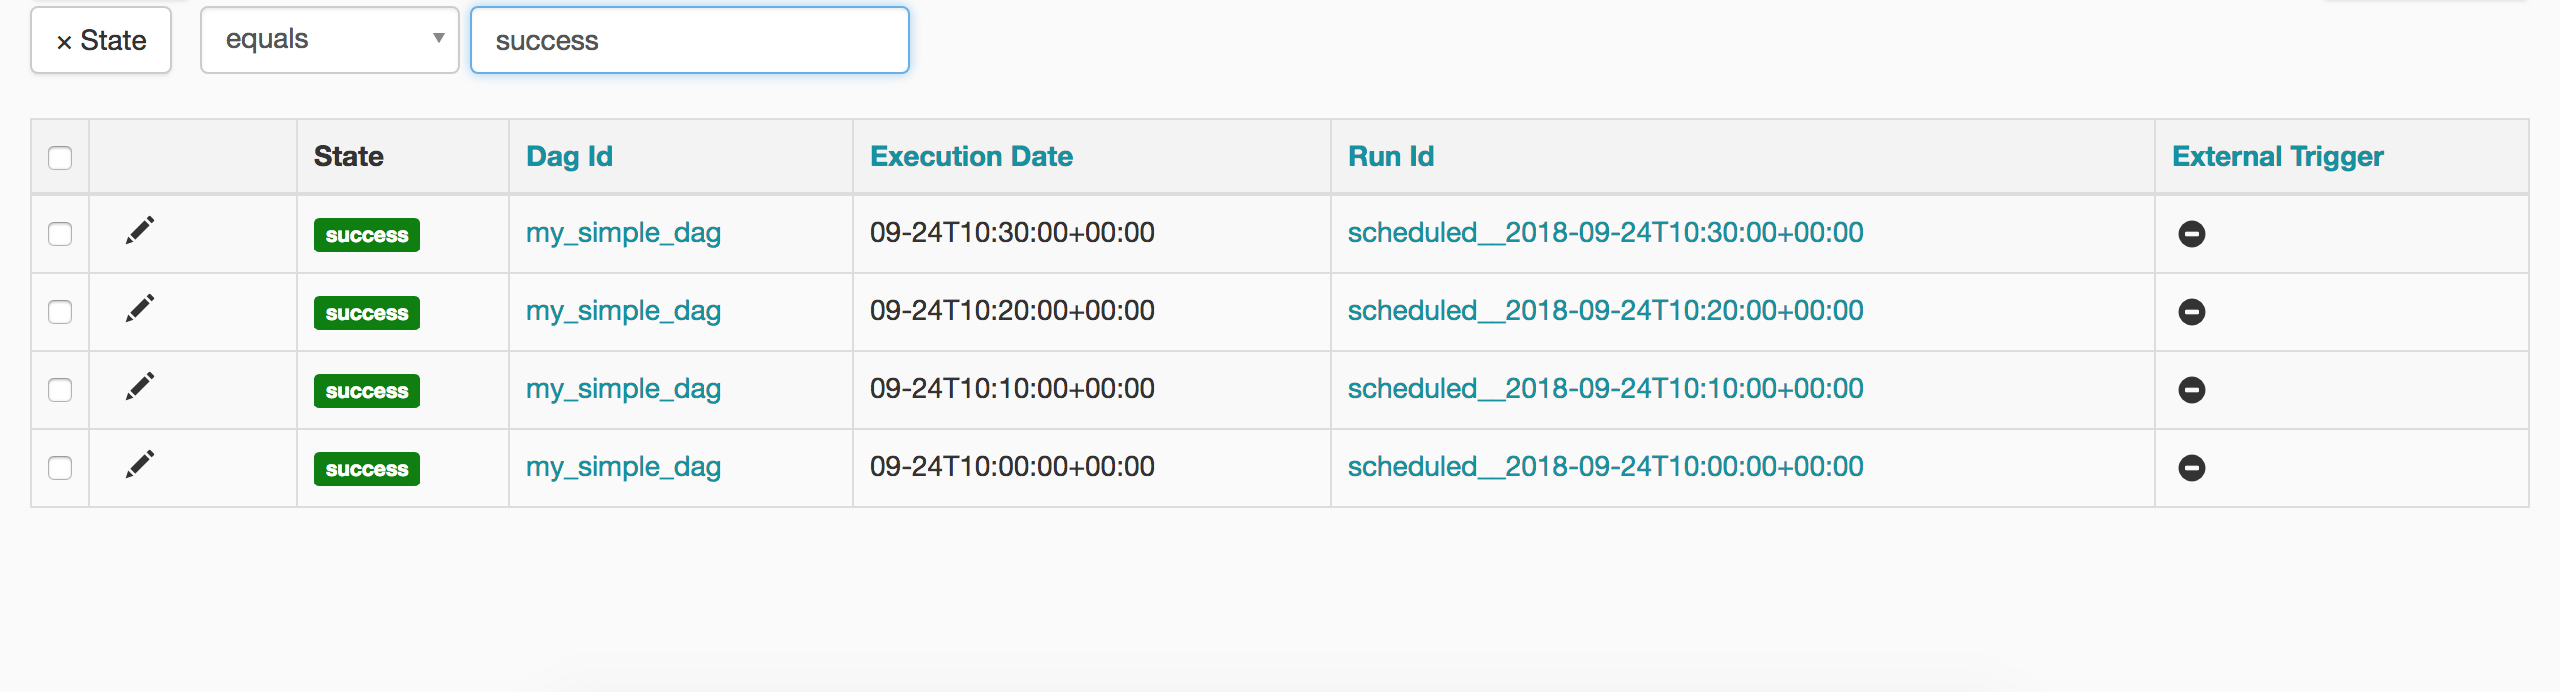
The DAG that was executed for 10:30:00 AM UTC was actually done at 10:40:00 AM UTC, The latest DAGRun record will always be a one minus than the current time. In our case, the machine time was 10:40:00 AM UTC
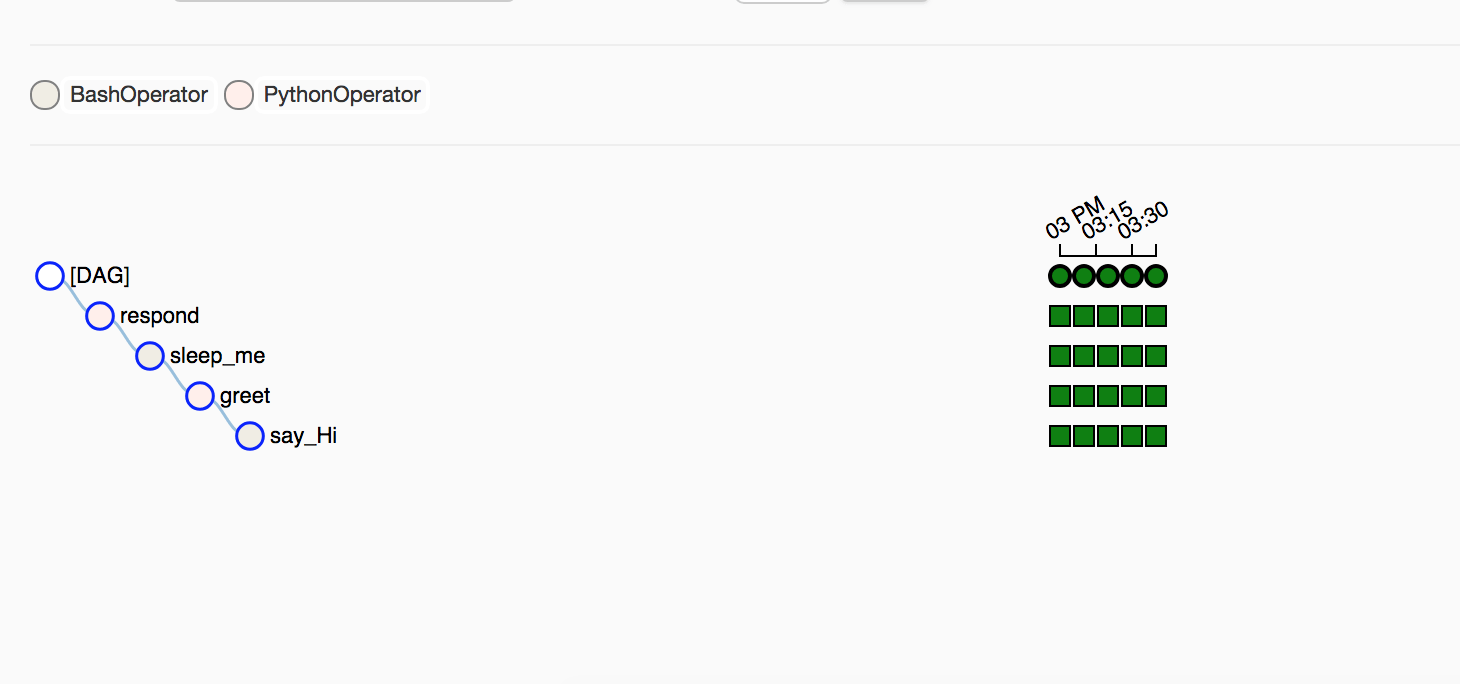
If you hover on one of the circles you can see the timestamp in front of Run: that tells the time it was executed. You can see that these green circles have a time difference of 10 minutes. The Tree View gives is a bit complicated but gives a complete picture of your entire workflow. In our case, it was run 4 times and all tasks ran successfully, the dark green color.
You can avoid Backfilling in two ways: You set start_date of the future or set catchup = False in DAG instance. For instance, you can do something like below:
with DAG('my_simple_dag',
         catchup=False,
         default_args=default_args,
         schedule_interval='*/10 * * * *',
         # schedule_interval=None,
         ) as dag:
By setting catchup=False it then does not matter whether your start_date belongs to the past or not. It will be executing from the current time and continues. By setting end_date you can make a DAG stop running itself.
opr_hello >> opr_greet >> opr_sleep >> opr_respond
The line you are seeing above tells the relationship between operators hence constructs the entire workflow. The bitwise operator here is telling the relationship between operators. Here opr_hello runs first and then the rest. The flow executes from left to right. In pictorial form it looks like below:

opr_hello >> opr_greet >> opr_sleep << opr_respond
If you change the direction of the last operator the flow will look like below:

The respond task will execute in parallel and sleep will execute in both cases.
Conclusion
In this post, I discussed how you can introduce a comprehensive workflow system to schedule and automate your workflows. In part 2, I will come up with a real-world example to show how Airflow can be used. I wanted to cover it up in this post but it already got enough lengthy and explaining the DAGRun concept was necessary as it took me quite a time to figure it out.
As always the code of this post is available on Github.