This post is part of LxD Series in which I share my learning process about different technologies. Learn more about LxD here.
Ok you saw earlier the design we are going to use for our application. Now it’s time to integrate that design in our Laravel 5 application. Before I go further, let me tell directory structure of Laravel to integrate our design.
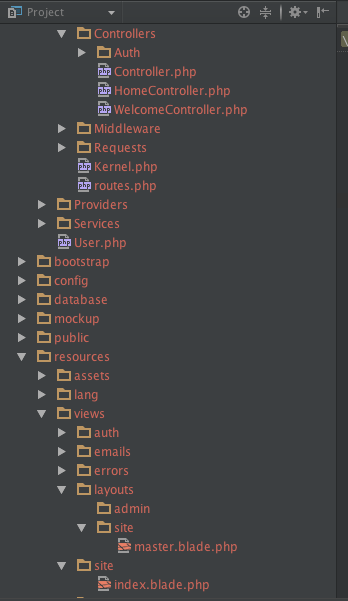
Layouts are actually part of views hence they reside in views folder. You have option to put all of your layouts within views->layouts folder or manage it better by dividing it into folders based on your site modules. For instance, Admin, Emails, Site etc. For my sake I created a site folder and created a blade template with name master.blade.php. All template files are actually PHP file with some special syntax and they will have .blade within file name.
Now, I put entire home page HTML within master file. Now once it’s done, we have to figure out which parts of our sites are dynamic and which are static. In our case only left navigation is static and right panel will have dynamic content. The way to deal is that we could have way to deal with it. Laravel’s blade template provides an easy to use technique to do it. See code below:
<!DOCTYPE html>
<html>
    <head lang="en">
        <meta charset="UTF-8">
        <meta name="viewport" content="width=device-width, initial-scale=1">
        <link href="//fonts.googleapis.com/css?family=Raleway:400,300,600" rel="stylesheet" type="text/css">
        <link rel="stylesheet" href="public/css/normalize.css">
        <link rel="stylesheet" href="public/css/skeleton.css">
        <link rel="stylesheet" href="public/css/site.css">
        <title>Welcome</title>
    </head>
    <body>
        <div  class="container top2 ">
            <div id="sidebar" class="two columns left">
                <nav id="menu" class="nav">
                    <div id="avatar">
                        <img src="http://www.wojoscripts.com/fm/uploads/avatars/team7.jpg" />
                        <hr />
                        <ul>
                            <li><a href="#">Dashboard</a></li>
                            <li><a href="#"> Projects</a></li>
                            <li><a href="#"> Clients</a></li>
                        </ul>
                    </div>
                </nav>
            </div>
            {{--Main Middle Area--}}
            <div id="main" class="ten left columns marginleft0">
                 @yield('content')
            </div>
        </div>
    </body>
</html>
Look at code, it is same as we had for mockup. I set path of assets accordingly. In order include this template in our other pages, Laravel blade provides yield method.
Yield actually returns the content within template from other parts of the site. Hence when you integrate a sub section it just ‘outputs’ the content from this function. How it works, let’s see below:
@extends('../layouts.site.master')
@section('content')
<div>
    SubPage
</div>
@stop
The blade file begins with the line @extends(‘../layouts.site.master’), which means this particular view file is actually part of master layout. extends actually take path of layout file. The dot notation is used to indicate sub folders. Hence layouts.site.master means that master.blade.php reside in layouts/site/ folder.
Next thing is @section @stop. It is like IF block we usually use in our code. @section(‘content’) is start of block, content tells where to put the code within block and @stop actually ends the dynamic code block
When we access page it appears like that:
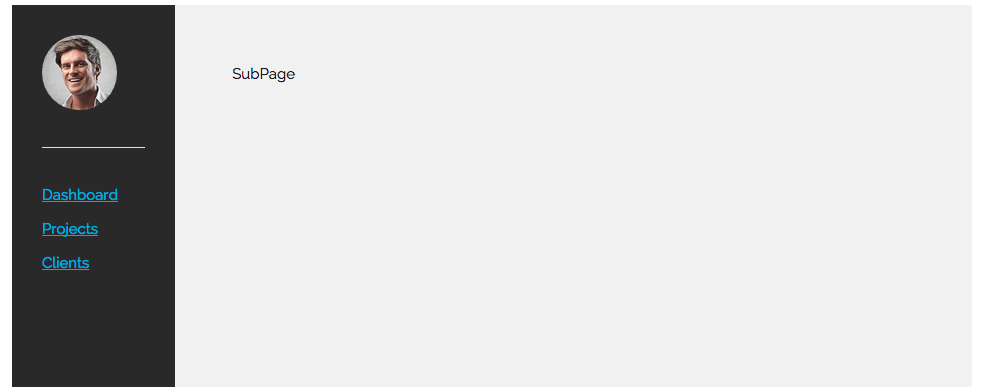
As you see Subpage is included right where it should. That’s it for now. In coming posts we will be implementing the sub pages and their controllers and routes. Till then…
