This post going to be a bit longer as I am going to cover multiple concepts. I will be covering the following things:
- Smart Contracts and how do they work in Ethereum blockchain.
- The basics of Solidity Programming language and how to use online and existing IDEs to write and test them.
- Using Truffle and Ganache for Ethereum development environment setup.
- Web3.py helps to integrate Smart Contract with Python applications.
What is a Smart Contract
According to Investopedia:
A smart contract is a self-executing contract with the terms of the agreement between buyer and seller being directly written into lines of code. The code and the agreements contained therein exist across a distributed, decentralized blockchain network. The code controls the execution, and transactions are trackable and irreversible.
As per Ethereum:
A “smart contract” is simply a program that runs on the Ethereum blockchain. It’s a collection of code (its functions) and data (its state) that resides at a specific address on the Ethereum blockchain.
In simple words, Smart Contract is a piece of code that runs within the blockchain. The term coined by Nick Szabo back in the 90s who actually wanted software that works as a middleman between multiple parties. Ethereum uses this term to run any piece of code within the Ethereum blockchain.
Solidity is the language used to write Ethereum smart contracts. It took inspiration from C++, Javascript, and Python. Vyper is a recent addition to the Ethereum ecosystem which is highly inspired by Python. Since Solidity is quite an established language and loads of resources are available, I’d recommend learning it instead of Vyper to get the basics of smart contract programming. Once you learn it, learning Vyper will get easier. I will try to cover Vyper in the coming months.
Remix is a very popular IDE to develop, run and test smart contracts. You may connect local Ethereum network or use the one it already provides, it does not matter. What makes it good that you can quickly test your code.
Solidity Primer
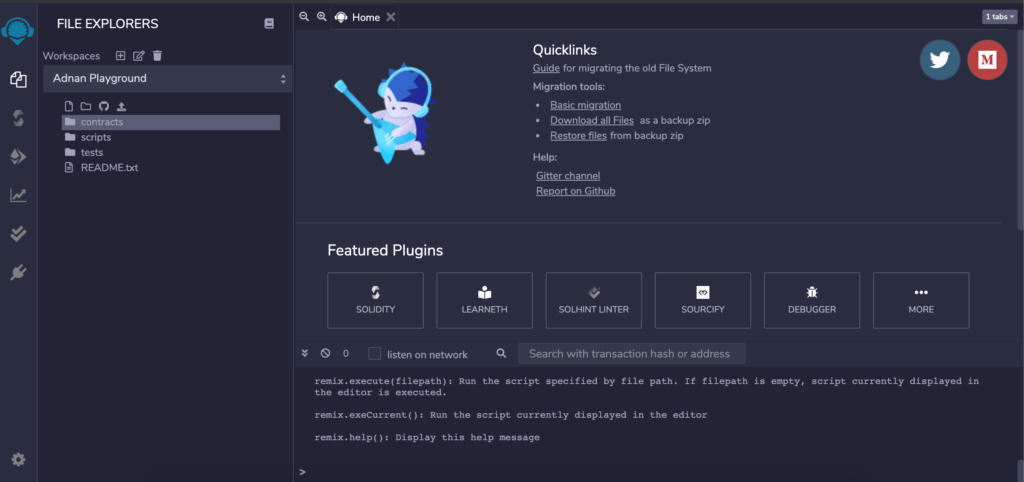
Solidity is the original programming language introduced by Ethereum to write smart contracts. Almost all famous coins and tokens running on the Ethereum platform are using Solidity. I am heading to Remix web-based IDE to write our first contract. When you visit Remix you will be seeing something like the below:
As you can it is quite an advanced IDE. The screen you are seeing on left is a side-pane related to file browsing. It has different pre-defined folders available for writing and testing your code. The next is for Solidity Compiler, you may select different options, I’d say to leave it for the default. After that is for Deployment and Transaction for compiling and running smart contracts. Under the contracts folder, I created a new file FirstContract.sol. All solidity files have .sol extension so whether you run it locally or on Remix you will have to use .sol extension for your smart contract files.
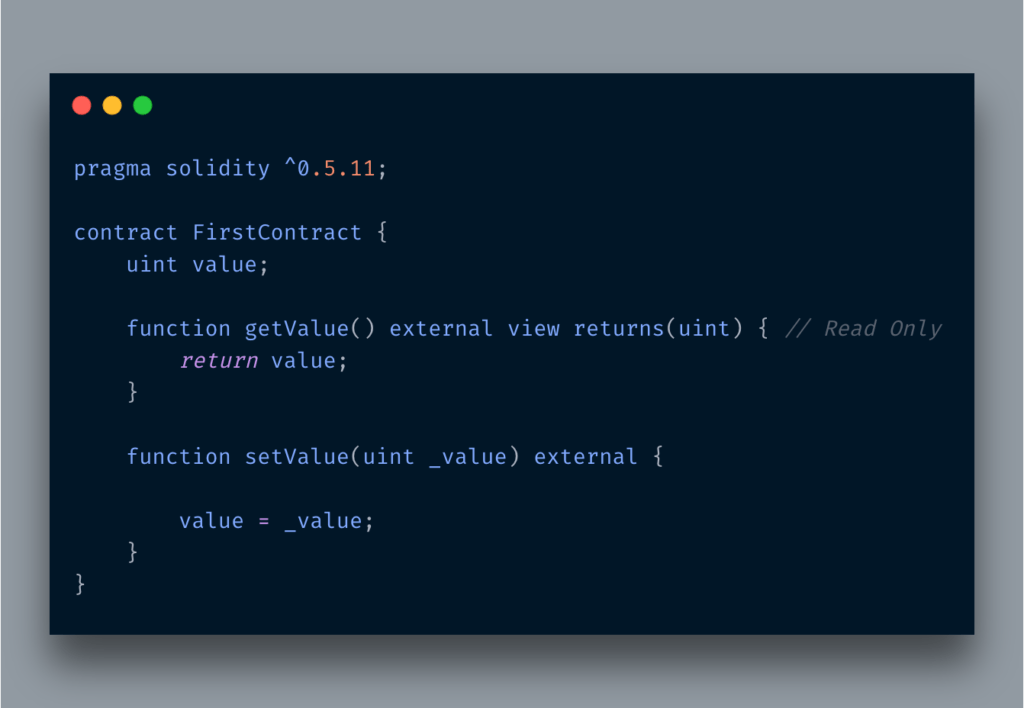
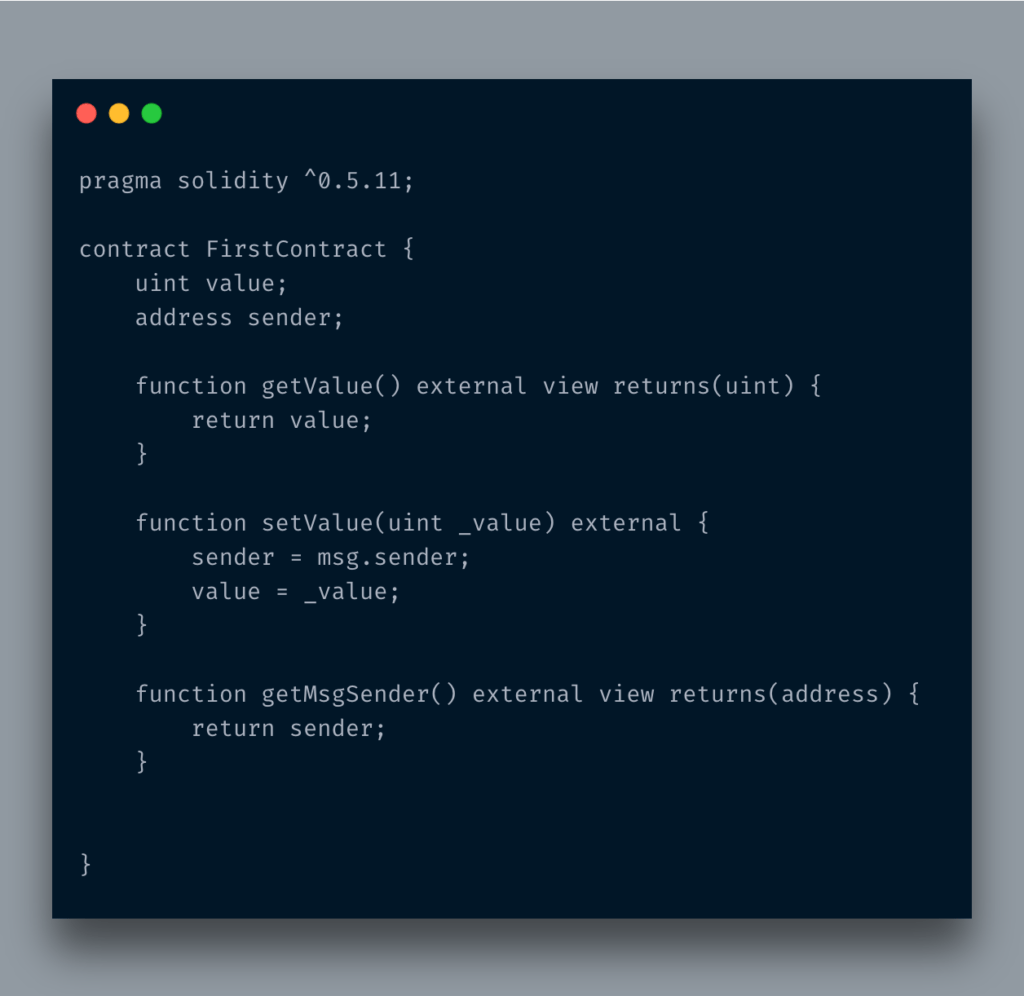
The very first line is actually telling which language and compiler version is compatible. The language solidity is being used to write code. The next thing is about versioning. If you are familiar with RegEx then it should not sound strange to you. It is telling that this code will not work for compilers earlier than 0.5.11. It will also not work for compilers like 0.6.x or later and you know it is all due to ^ sign. You have various ways to make your code compatible with different versions. For instance, pragma solidity >=0.4.22 <0.6.0; will make sure that your code is only working for compilers greater than 0.4.22 and less than 0.6.0.
The next code block should be very familiar for you if you have done OOP. The keyword contract is actually like class and starting a code block that talks about certain features of the software. I define a private variable value of type uint. The default accessibility of these variables is private. The variable value is actually a State Variable that means the content of the variable is permanently stored in contract storage. When I say this variable is private, it means it is not accessible by another contract as well as you can’t call it directly from another program like a Python app. You must know that the information which is being stored in a blockchain is still PUBLIC. So do not confuse that by making a variable private you can hide something confidential. Nothing is confidential in the blockchain world.
Next, we define a function getValue() that returns an unsigned int value . Next, you find external keyword. It makes this function available for other contracts that import this contract file. The opposite of it that is, internal can only be called inside of the contract. When you add public in it you make it function available outside of the environment and can be called from out of the system, for instance in your Python app via web3.js or web3.py. The opposite of public is private. if a variable or function is private it can’t be accessed out of it. The returns keyword actually tells that this function is returning a value of the type given in brackets which is uint in this case.
The logic of the getter/setter functions is self-explanatory.
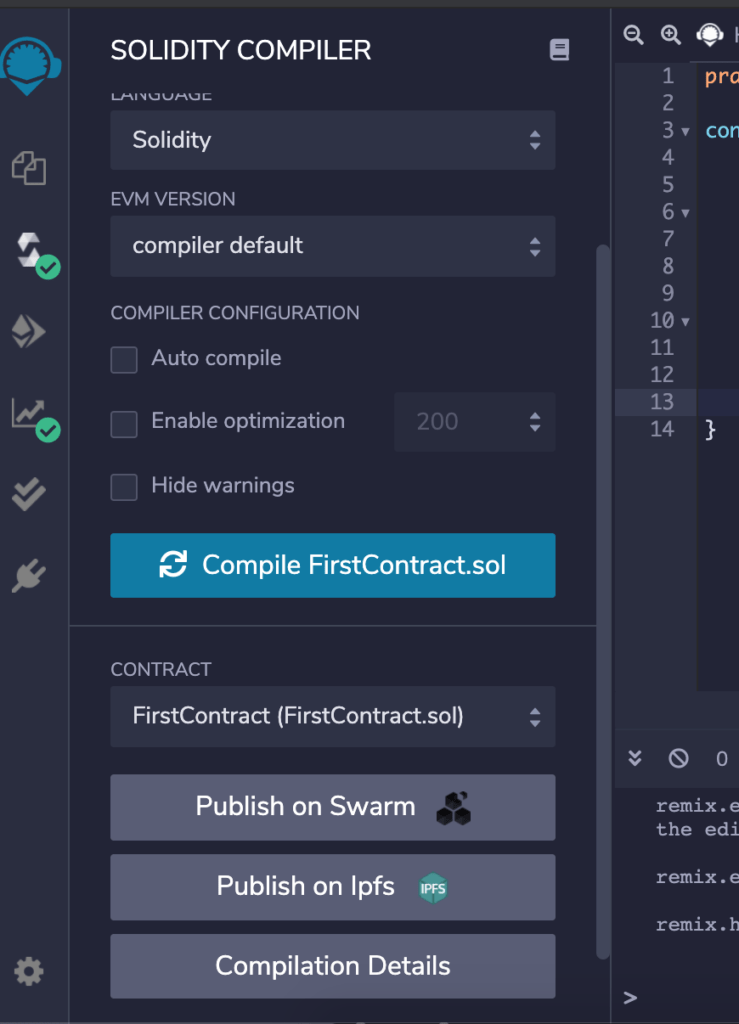
It is time to compile the code.
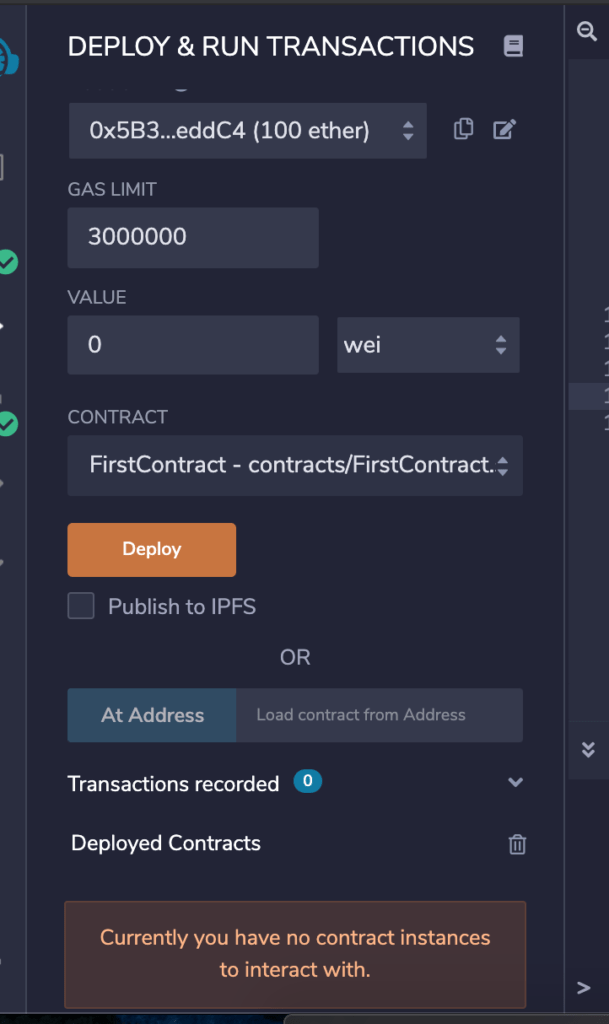
Once the contract is compiled, it is now time to deploy and run the contract on the blockchain.
You will notice a few things, the ETH wallet address will be used to deduct the amount for the gas purpose. The environment is JS by default. Leave everything as it is and make sure you pick the right smart contract for the deployment. When you hit the Deploy button, it will deploy it on the blockchain.
You see that the status says that the Transaction is mined by miners across the globe. They are paid for their service. Everything which changes the state of the Ethereum blockchain actually considered a transaction. It means you will have to pay for it. If you scroll it down a bit you will find both the transaction and execution cost in the form of gas. Who will pay for it? well, your wallet. Every time a transaction happens the amount will be deducted from your wallet.
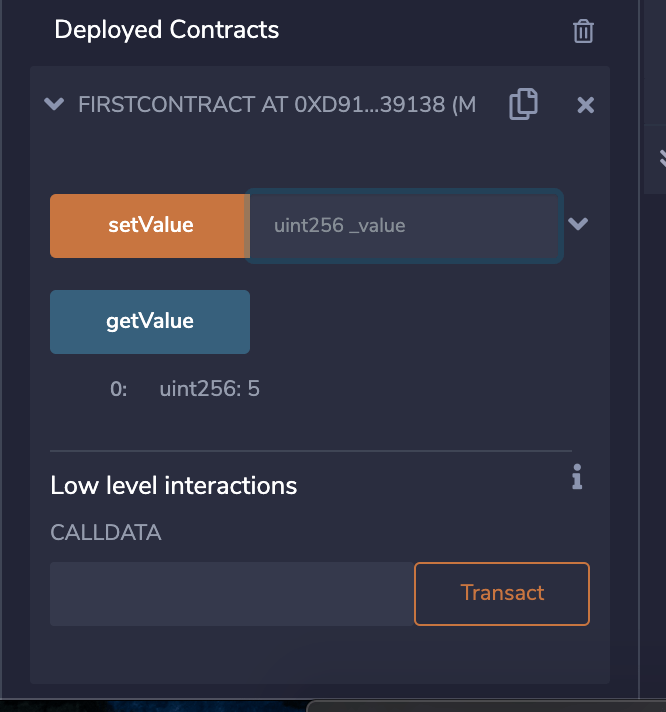
Once it is deployed, you will see your contract under Deployed Contracts section and its functions.
As you can the functions we wrote are visible here. We will set the value first.
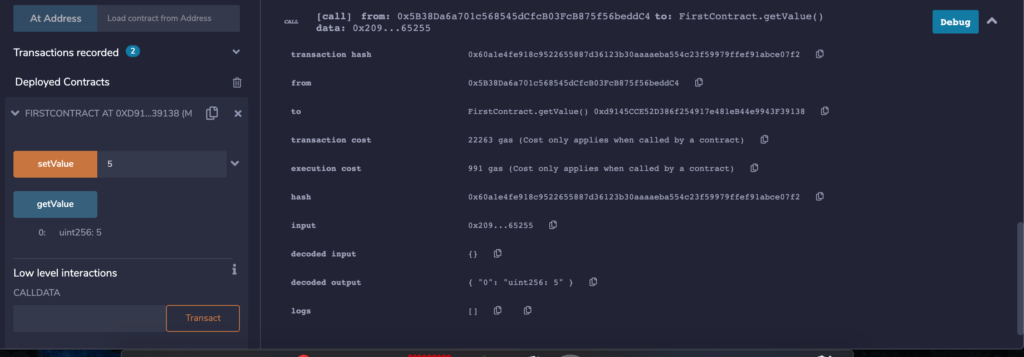
I enter 5 and hit the setValue button. When it executed, you will see that the Debug window has a few new entries. Scroll down and again you will find gas values for the transaction because the value 5 is now stored in the blockchain. Now hit the getValue button to execute the function.
Notice the [call] tag at the beginning instead of [VM]. It means that is a simple function call instead of a transaction hence no gas cost is involved here because it is not changing the state of the blockchain thus no mining is involved which means no gas deduction. These are very important concepts that you must know because every line of your code will cost money to your employer or your client. It is not like you just used an array because you love it. You use Remix or any other IDE or environment, the concepts will be the same. Before I move onto the next section, what if I want to know programmatically who is paying for the execution, msg.sender is the answer.
Here I added a new variable and a function. The sender variable is of type address. Though you do not create a function just for the heck of it. It is just for explaining purposes.
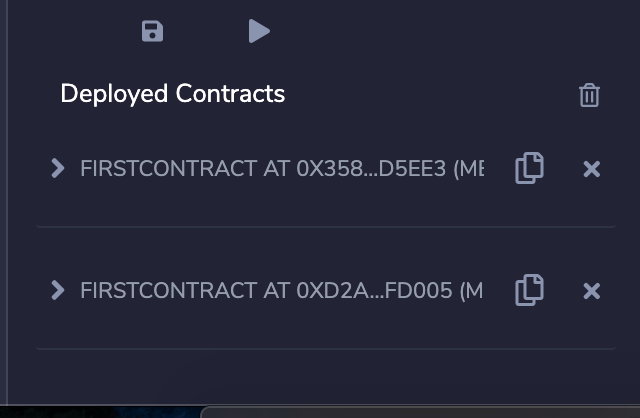
Like before, you will compile and deploy the contract. Every time you deploy a contract it will create a new copy of it. So make sure you pick the right version.
Pick setValue function from the newly deployed contract, enter any value and then run getMsgSender. As expected it will print the first address, 0x5B3.. here. The reason you executed setValue first because I am setting msg.Sender variable here. Solidity provides some special variables to find a wallet and transaction-related details. You can learn more about it here.
The Remix IDE is good to test things online but we should have some local setup to code, test, and deploy smart contracts. I will be introducing two tools here: Truffle which provides a development environment for blockchain apps and Ganache which provides a local Ethereum blockchain for testing purposes.
Setting up Truffle and Ganache
In order to install Truffle, we will be using npm as truffle is actually a node module:
npm install -g truffle
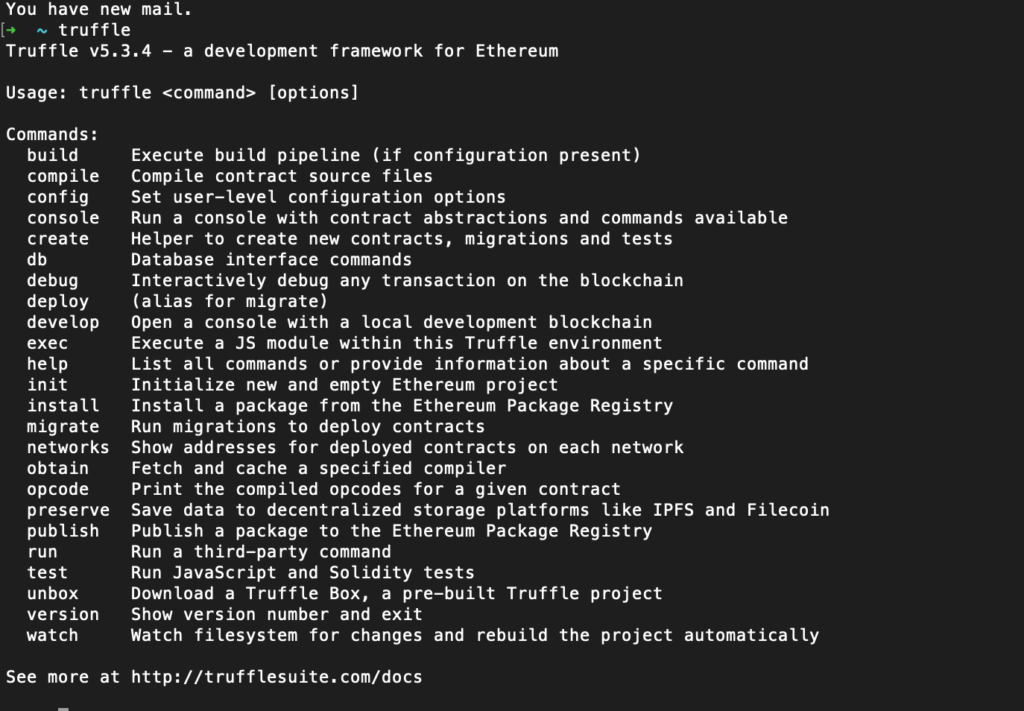
In order to check whether it installed correctly, run truffle command in the console:
Once installed, I am going to create a new folder where I will initialize the truffle project.
As you can see it creates a few folders and a config file. I am using VS Code IDE with the Solidity Plugin by Juan Blanco.
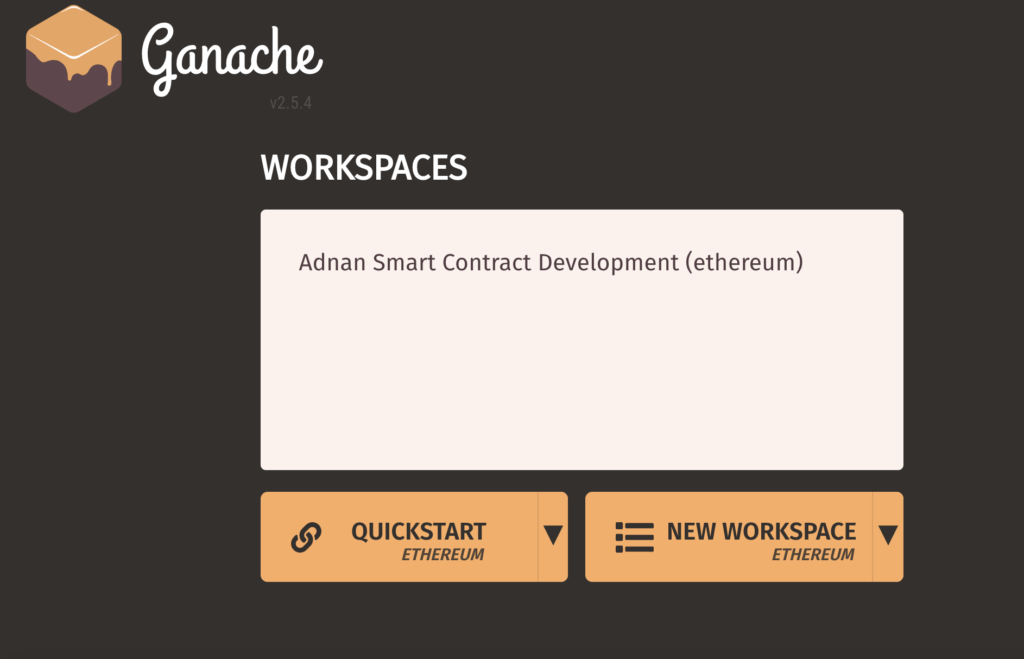
Assuming you have Ganache Desktop GUI is installed, you will be creating a new workspace in it.
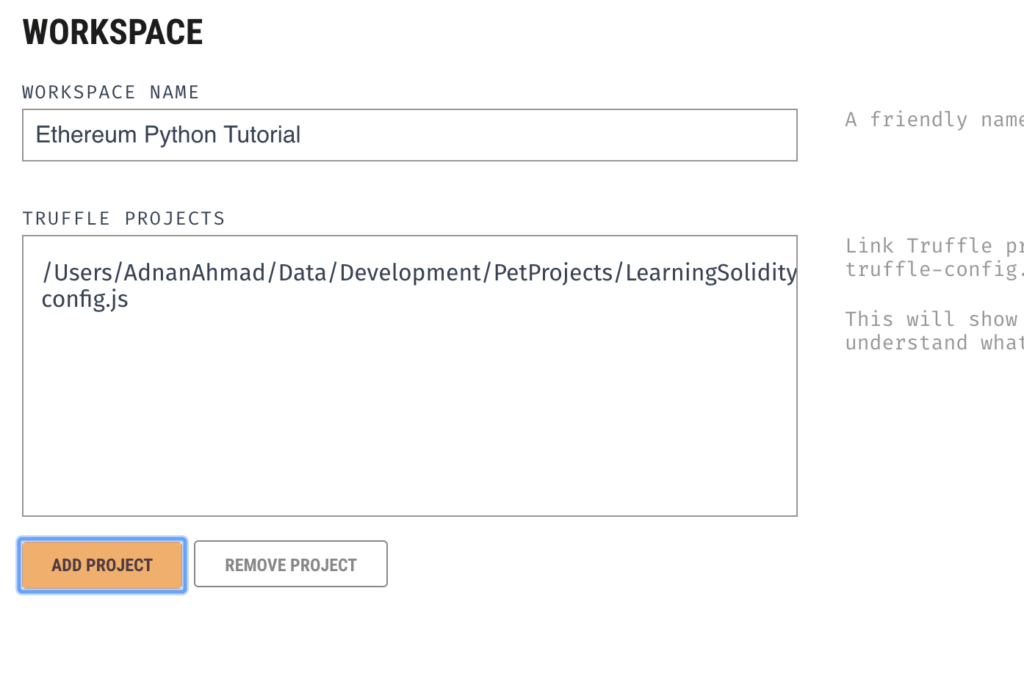
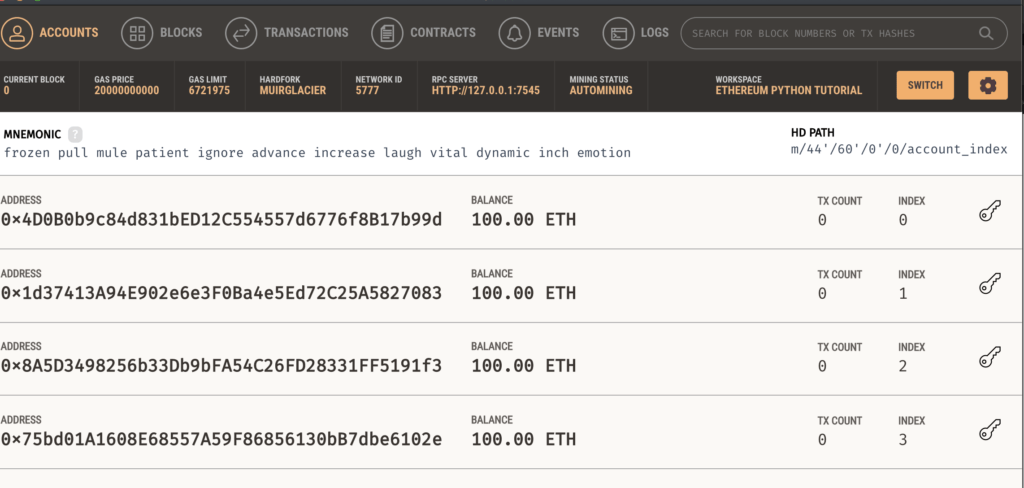
You select Ethereum as the project type and then set the directory where truffle-config.js file exists. Once it’s all done you can see the screen like below:
You can notice a few things besides the list of ether addresses available for you like gas limit, network ID, and the RPC Server, etc.
Under the contracts tab, I created a new file FirstContract.sol and just copied the contract we had developed in Remix IDE.
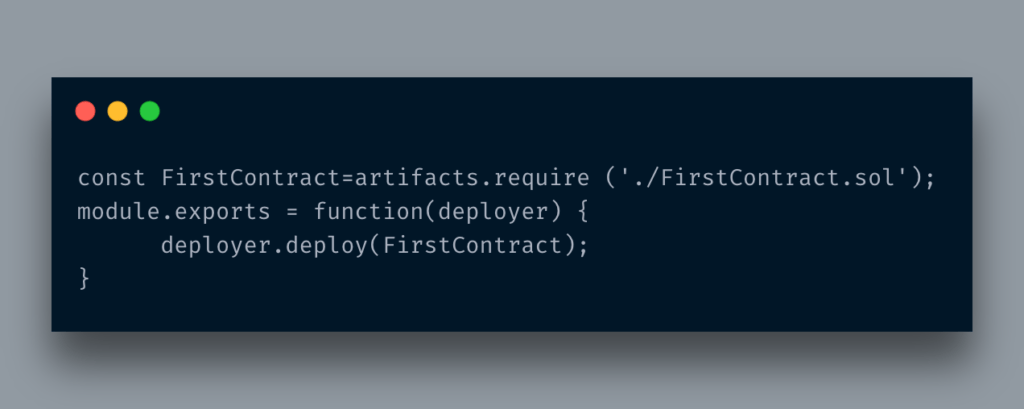
In the migrations folder, you will add a file 2_deploy_contracts.js and the following content in it.
For the web developers who worked on Frameworks like RoR, Django, and Laravel, the term migration is not something new. The first line tells where the desired contract file exists. Then the contract instance variable is set to the deploy method. You do not need to worry about it as the Truffle will take care of this. Just make sure you set the correct contract path. All set, now it is time to compile our project.
If you notice it created a new build folder that contains two files: FirstContract.json and Migrations.json. The former file contains all info related to the contract you want to deploy like its original source, the compiled bytecode, etc.
"metadata": "{\"compiler\":{\"version\":\"0.5.16+commit.9c3226ce\"},\"language\":\"Solidity\",\"output\":{\"abi\":[{\"constant\":true,\"inputs\":[],\"name\":\"getMsgSender\",\"outputs\":[{\"internalType\":\"address\",\"name\":\"\",\"type\":\"address\"}],\"payable\":false,\"stateMutability\":\"view\",\"type\":\"function\"},{\"constant\":true,\"inputs\":[],\"name\":\"getValue\",\"outputs\":[{\"internalType\":\"uint256\",\"name\":\"\",\"type\":\"uint256\"}],\"payable\":false,\"stateMutability\":\"view\",\"type\":\"function\"},{\"constant\":false,\"inputs\":[{\"internalType\":\"uint256\",\"name\":\"_value\",\"type\":\"uint256\"}],\"name\":\"setValue\",\"outputs\":[],\"payable\":false,\"stateMutability\":\"nonpayable\",\"type\":\"function\"}],\"devdoc\":{\"methods\":{}},\"userdoc\":{\"methods\":{}}},\"settings\":{\"compilationTarget\":{\"/Users/AdnanAhmad/Data/Development/PetProjects/LearningSolidity/SolidityPythonTutorial/contracts/FirstContract.sol\":\"FirstContract\"},\"evmVersion\":\"istanbul\",\"libraries\":{},\"optimizer\":{\"enabled\":false,\"runs\":200},\"remappings\":[]},\"sources\":{\"/Users/AdnanAhmad/Data/Development/PetProjects/LearningSolidity/SolidityPythonTutorial/contracts/FirstContract.sol\":{\"keccak256\":\"0x8f927552ec9dc73acee0143c170c276f19ee1e1a85959b49979ef7f524923ff3\",\"urls\":[\"bzz-raw://ba69d6310ad02e5c74228ea971e184bc5debdfb3e3af280fe43a867b136c83cd\",\"dweb:/ipfs/QmT4HoJ6bSDHqcK2jyciU5CaRqyzZfgFbeTGKfJwWwjPU3\"]}},\"version\":1}",
  "bytecode": "0x608060405234801561001057600080fd5b5061018f806100206000396000f3fe608060405234801561001057600080fd5b50600436106100415760003560e01c8063209652551461004657806355241077146100645780637a6ce2e114610092575b600080fd5b61004e6100dc565b6040518082815260200191505060405180910390f35b6100906004803603602081101561007a57600080fd5b81019080803590602001909291905050506100e5565b005b61009a610130565b604051808273ffffffffffffffffffffffffffffffffffffffff1673ffffffffffffffffffffffffffffffffffffffff16815260200191505060405180910390f35b60008054905090565b33600160006101000a81548173ffffffffffffffffffffffffffffffffffffffff021916908373ffffffffffffffffffffffffffffffffffffffff1602179055508060008190555050565b6000600160009054906101000a900473ffffffffffffffffffffffffffffffffffffffff1690509056fea265627a7a72315820ea770f34255d72ae19ebe6d36b62a54850a9602e70b039c54b29b65dc7cb7f2364736f6c63430005100032",
  "deployedBytecode": "0x608060405234801561001057600080fd5b50600436106100415760003560e01c8063209652551461004657806355241077146100645780637a6ce2e114610092575b600080fd5b61004e6100dc565b6040518082815260200191505060405180910390f35b6100906004803603602081101561007a57600080fd5b81019080803590602001909291905050506100e5565b005b61009a610130565b604051808273ffffffffffffffffffffffffffffffffffffffff1673ffffffffffffffffffffffffffffffffffffffff16815260200191505060405180910390f35b60008054905090565b33600160006101000a81548173ffffffffffffffffffffffffffffffffffffffff021916908373ffffffffffffffffffffffffffffffffffffffff1602179055508060008190555050565b6000600160009054906101000a900473ffffffffffffffffffffffffffffffffffffffff1690509056fea265627a7a72315820ea770f34255d72ae19ebe6d36b62a54850a9602e70b039c54b29b65dc7cb7f2364736f6c63430005100032",
  "sourceMap": "26:367:0:-;;;;8:9:-1;5:2;;;30:1;27;20:12;5:2;26:367:0;;;;;;;",
  "deployedSourceMap": "26:367:0:-;;;;8:9:-1;5:2;;;30:1;27;20:12;5:2;26:367:0;;;;;;;;;;;;;;;;;;;;;;;;;;;;;97:78;;;:::i;:::-;;;;;;;;;;;;;;;;;;;185:100;;;;;;13:2:-1;8:3;5:11;2:2;;;29:1;26;19:12;2:2;185:100:0;;;;;;;;;;;;;;;;;:::i;:::-;;295:86;;;:::i;:::-;;;;;;;;;;;;;;;;;;;;;;;97:78;139:4;163:5;;156:12;;97:78;:::o;185:100::-;244:10;235:6;;:19;;;;;;;;;;;;;;;;;;272:6;264:5;:14;;;;185:100;:::o;295:86::-;341:7;368:6;;;;;;;;;;;361:13;;295:86;:::o",
  "source": "pragma solidity ^0.5.11;\n\ncontract FirstContract {\n    uint value;\n    address sender; \n    \n    function getValue() external view returns(uint) { \n        return value;\n    }\n    \n    function setValue(uint _value) external {\n        sender = msg.sender;\n        value = _value;\n    }\n    \n    function getMsgSender() external view returns(address) { \n        return sender;\n    }\n    \n    \n}",
  "sourcePath": "/Users/AdnanAhmad/Data/Development/PetProjects/LearningSolidity/SolidityPythonTutorial/contracts/FirstContract.sol",
  "ast": {
    "absolutePath": "/Users/AdnanAhmad/Data/Development/PetProjects/LearningSolidity/SolidityPythonTutorial/contracts/FirstContract.sol",
    "exportedSymbols": {
      "FirstContract": [
        37
      ]
    },
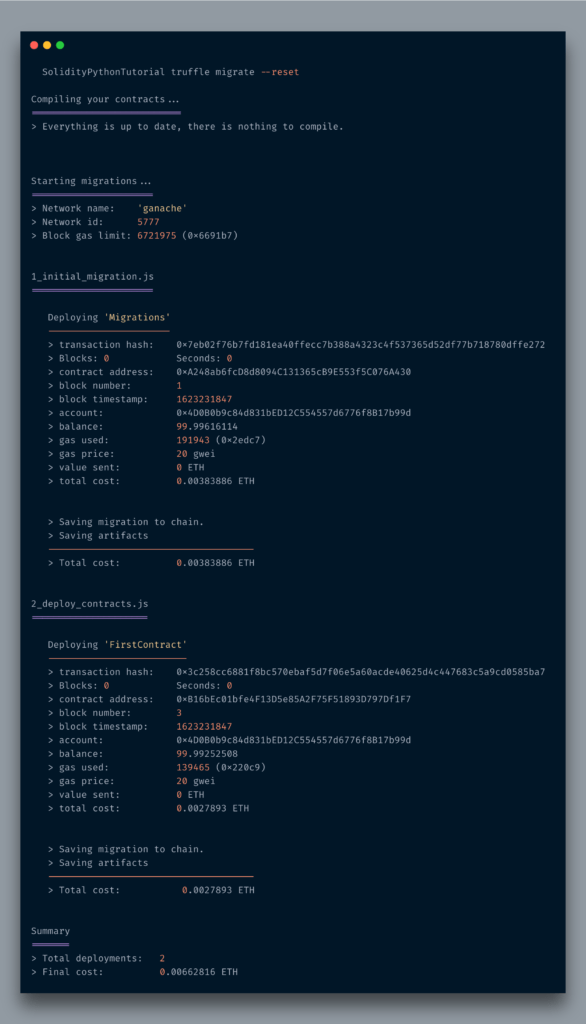
Alright. Now it is all set to deploy our first contract on the local Ethereum blockchain.
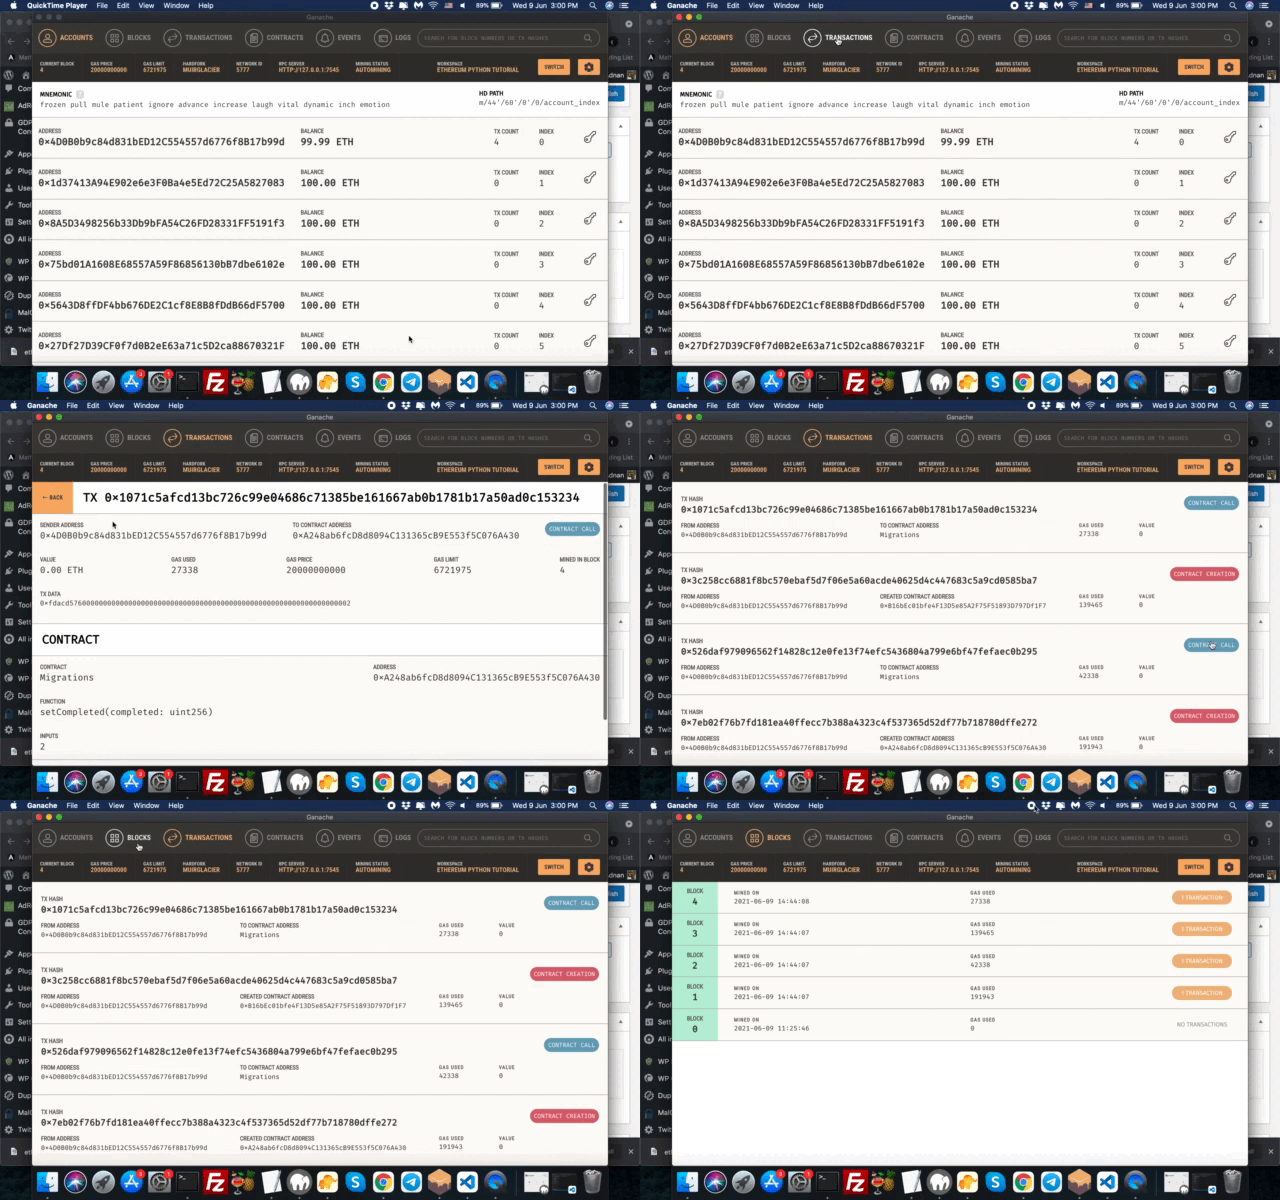
There are few things to notice here. Well, there are many things to be noticed. You see a transaction hash. It is a transaction because you changed the state of the blockchain. Then you find the contract address. The account which actually deployed the contract. The eth consumed for this operation and the total cost. The contract address is very important as we will be using it to interact while writing our Python app. You can see the deployment and execution of calls in Ganache in the below picture. Whatever you saw above you can find it on the Ganache interface as well.
Smart Contract and Python Integration
Our smart contract is deployed. In order to make it useful, we need some way to interact with apps that will not be running in the blockchain. Luckily Web3 libraries for Javascript and Python could help here.
In order to connect our Python apps with Ethereum based smart contract, we are going to use the Web3 library.
pip install web3
The web3 library is installed, it is time to write our first code.
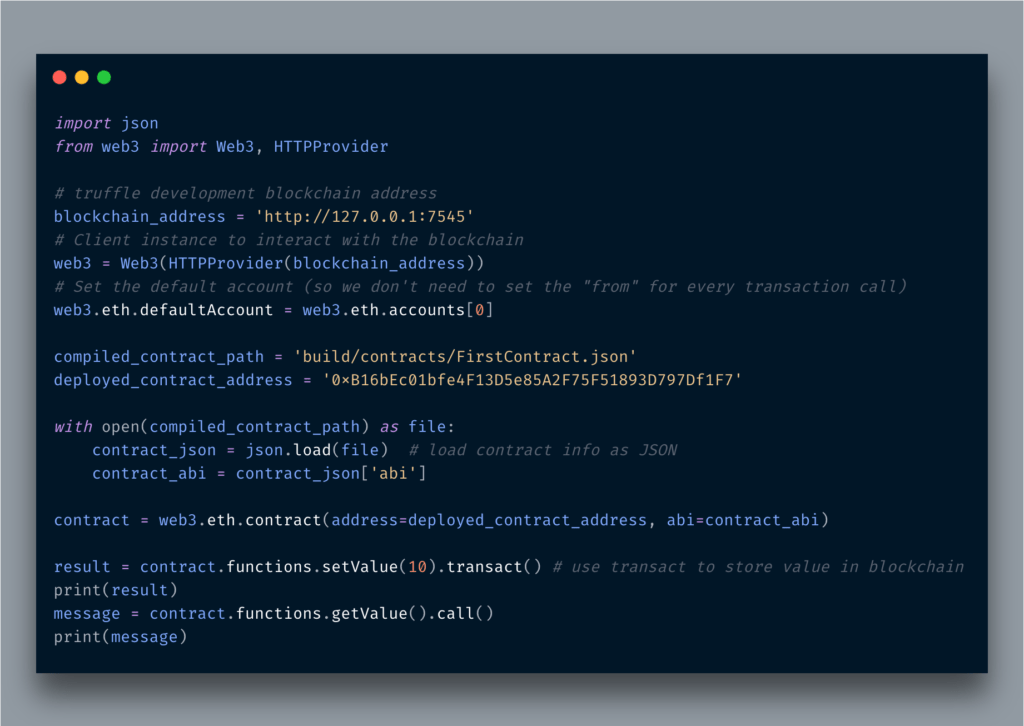
After the typical imports, the very first thing I am doing is to set the Ethereum blockchain RPC server address. it is the address you can find on Ganache’s list of accounts interface. The RPC variable is assigned to Web3 constructor. I am also setting the default ETH account for the Web3 library to interact with the deployed smart contract. The next thing I did was setting up the path to the file contains ABI data. ABI stands for Application Binary Interface that is the standard way to interact with the Ethereum blockchain. Yeah, they took it from API thing. ABI is not only helpful to provide communication between smart contracts and non-blockchain programs but also between smart contracts. You can learn more about it here.
The next important thing is to see the deployed contract address. You may find it from the data returned after deployment or simply go to the Contracts section of Ganache and copy from there.
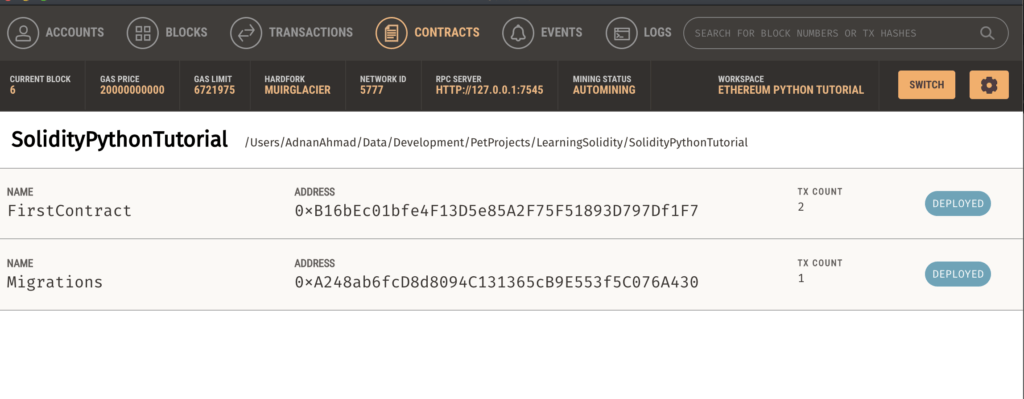 You can see the address of FirstContract(0xB16b…) here that will be used for interaction. After that, I am passing ABI part from the file and the deployed contract address to
 .contract() method. After that, I called the setValue() function first with the value and then getValue() function. Now notice that I used transact() when setting value and call() when reading the value from the blockchain, The transact() changes the state of the blockchain that is consuming gas while call() just reads the value and no gas is used at all hence no amount is deducted from the wallet.
So far so good. What if you want to get the transaction hash or txHash of the transaction. You can do the below:
Whatever the value you get, just use the hex() function to get the hexadecimal value of it and it will be the transaction hash value of the transaction.
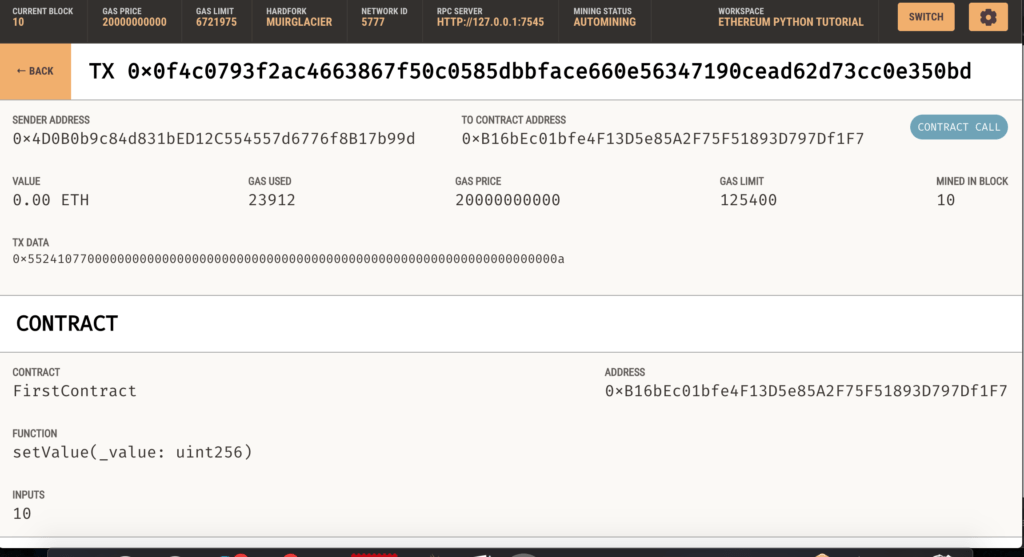
The hex value you see here is the txHash or TX ID. You can easily verify it either by going to Transactions tab or search in the search bar of Ganache. TX IDs are useful as you might like to store it in a database for audit and other purposes.
As you can see the details, it is also telling what function was executed and what input was given. Cool No?
Conclusion
Finally, this post ends. Quite long as it took me 3 days to write it 🙂
So in this post, we learned about the purpose of smart contracts, using Solidity to write smart contracts and then using Web3.py to communicate with smart contracts in Python applications. Web3.py is good if you own both public and private keys of the wallets. If you want to let others use your smart contract via a web app without handing out their private key then web3.js is the best option as it will communicate with Meta Mask, the Chrome extension many use to connect wallets with dApps. Like always, the code is available on Github.

